The Ultimate Fixer-Upper: Reinstalling Windows XP
Windows XP
This tutorial assumes you have
a Windows XP installation CD. You cannot do this with a "recovery disk". If
you're going to do a fresh install from a recovery disk it will put your
computer back to the state it was in the day it left the factory. And if
Norton and other programs were installed on your computer when you got it
and you don't want them, remember they're going to be back when you use a
recovery disk. We recommend you use a Windows XP installation disk (if you
have one) and do a fresh install.
The First Step
The first step is backing up those important files, pictures, email
messages, etc. that you do not want to lose. If you don't back them up
you're going to lose them. So, take whatever time you need to take and
backup your important files to CD or DVD and keep that DVD or CD handy -
because you're going to need it when you format and reinstall Windows XP.
And before you start with the
formatting and reinstallation process, make sure you have all your software
installation disks, driver disk/recovery disk (that should have come with
your computer) and make sure you have saved any emails with software
registration keys to a safe location (any location other than the hard drive
you're about to format). You can use a flash drive to save your registration
emails if you like - or you can put them on the CD/DVD with the other files
you've backed up. But, whatever you do, save them somewhere OFF your hard
drive and note where you've saved them.
Make sure you have a drivers disk.
If you don't make sure you back up your drivers using
WinDriversBackup (free) or
My Drivers. And make
sure the backup is complete. You'll regret not having backed up your drivers
BEFORE beginning the installation because finding the right drivers is
tedious work if you have to go searching all over the Web for them. So get
those drivers backed up if your computer didn't come with a driver disk.
Getting Started
While you're in Windows, insert your Windows XP CD-ROM
into your CD drive. Let the CD auto play. And choose "To set up Windows now
press ENTER". On the next screen choose "To continue installing a fresh copy of
Windows...press "ESC". This is what you want to do. So press the ESC key and
choose C:\Windows "Microsoft Windows XP Home" (or "Microsoft Windows XP
Professional if you have the PRO version) as the directory to which you want to
install Windows XP. You'll get a stern warning about installing two operating
systems on the same partition. We don't care. So continue with the install :)
Remember - A fresh
installation will wipe out ALL of your data. That means EVERYTHING .Once
started, the setup program will run on auto-pilot for the most part so once you
get to this stage it will be too late to save any data. Whatever you didn't save
before is gone. But you'll have to stick around because you will be required to
enter the 25 digit Windows key (it will be on a sticker on the back of your
computer - most likely). After Setup is nearly complete you'll need to give your
computer a name, choose your time zone, etc. You can install additional
features and change any of your choices anytime after Windows XP is completely
installed.
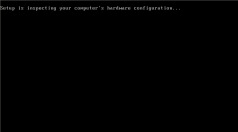
Click the image for larger view |
The Black Screen -
The beginning of the Windows Installation. This shows windows is
checking your computer. It's still not too late to back out of the
installation at this point...in case you forgot to save some important
files. |
| |
|
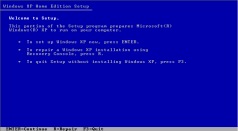
Click the image for larger view |
Welcome To Setup
Here's the screen where you have choices to make. You want to install a
fresh copy of Windows - this will remove your previous version of
Windows and ALL your files. Press Enter |
|
|
|
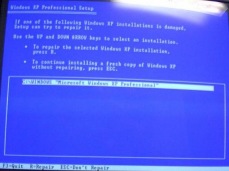
Click the image for larger view |
Where to install
When you see this screen look for your current installation. That's
where you want to install the fresh copy of Windows. Look for
C:\Windows "Microsoft Windows XP Home"
or "Microsoft Windows Professional" and install it there. You'll get a
warning about installing a second operating system on a partition with
an operating system already installed. Ignore it. |
|
|
|
 |
Auto-Pilot.
You've done it! Once you see the Windows "ad" screens
like this you know you're on the way. All you have to do now is follow
the onscreen prompts and in 20 to 30 minutes you'll be starting a whole
new installation of Windows. |
After Windows XP's setup is done and you're
booted into Windows, the first thing you'll need to do is reinstall your drivers
from your drivers disk. If you discover you don't have one at this point, it
will be too late. So we suggest you download a program to backup your drivers
before you start the fresh install of Windows. There are two we recommend. One
is called "My Drivers" and its' not free, but the free trial will function long
enough to get you through this installation (and you should purchase it after
that if it worked well for you). The other, called Double Drivers is free. For
information about My Drivers
click here. And for Double
Drivers visit this page.
After
your drivers are reinstalled, the next thing you'll want to do is install a good
anti-virus. You don't need to spend a dime or pay ransom each year to keep your
computer protected. We suggest AVAST which you can get free from
http://www.avast.com/ (Free for
home/personal use). Then install a good firewall (check out Kerio -
http://sunbeltsoftware.com/. Then
install two good anti-spyware programs. We recommend Spyware Doctor (commercial
software) and Spybot Search and Destroy (free). After you've completed these
tasks you can start installing your normal programs (Microsoft Office, etc.) and
moving your important documents and files back onto you new computer from
wherever you saved them.
If you're computer is running poorly and you
have multiple problems sometimes you can fix your Windows installation by
removing the offending programs or controlling your startups using MSCONFIG.
Then there comes a time when you've spent all the time and money you're going to
spend on trying to fix your Windows problems - that's the time you need to use
the "ultimate fixer upper" - a clean, fresh install of Windows XP. Remember,
backup EVERYTHING you consider important. Make sure you have a driver disk from
your computer manufacturer (or you use one of the programs above to create a
back up and save it on CD or DVD before you start the reinstallation.
Registry
Mechanic - A Cloudeight Endorsed Product
(Advertisement)
Download
A Free Trial of Registry Mechanic by PC Tools
With
Registry Mechanic you can safely clean, repair and optimize the
Windows registry with a few simple mouse clicks! Problems with the Windows registry are a
common cause of Windows crashes, slow performance and error messages. By using a registry
cleaner regularly and fixing registry errors your system should not only be more stable
but it will also help improve your system performance without expensive hardware upgrades.
Download
A Free Trial of Registry Mechanic by PC Tools
Registry Mechanic
uses a high-performance detection algorithm to quickly identify missing and invalid
references in your Windows registry. These problems can occur for many reasons including
being left-behind after the un-installation or incorrect removal of software, by missing
or corrupt hardware drivers, or orphaned startup programs.
Download
A Free Trial of Registry Mechanic by PC Tools
With a few easy steps
Registry
Mechanic will scan your entire registry for any invalid entries and provides a
list of the registry errors found, you can then choose to selectively clean each item or
automatically repair them all. For your convenience and protection
Registry
Mechanic can also make a backup of any repairs made so that you can easily
recover any changes if required. Try it free now!
Download
A Free Trial of Registry Mechanic by PC Tools
|
|
Make our Start Page your
Home Page | Close this
Window
|
|


