
Cloudeight InfoAve Weekly
Issue #1156
Volume 23, Number 7
December 5, 2025
Dear Friends,
Welcome to Cloudeight InfoAve Weekly Issue #1156. Thank you for subscribing and for being a part of our Cloudeight family. We appreciate your friendship and support very much! Please share our newsletters and our website with your friends and family.
If you're not getting our InfoAve Daily newsletter, you're missing out on a lot of good stuff!
It's free and it only takes a few seconds to sign up. We'd love to have you with us. Visit this page to sign up for our Cloudeight InfoAve Daily Newsletter.
Christmas Holiday Sale![]()

Cloudeight Direct Computer Care
Repair Keys Are Just $39 Right Now!
You can get a Cloudeight Direct Computer Care Key for just $39 during
our Christmas Holiday Sale! You save over 20% off our regular low price
of $50. Your Cloudeight Direct Computer Care Repair key never expires;
it's good until you use it. It's good for any computer repair that we
can do remotely.
Buy a Cloudeight Direct Computer Care Repair Key for just $39 during our
Christmas Holiday Sale!
Get your Cloudeight Direct Computer Care key for only $39 right
now!
![]()

Sharon
wants
to
know
what
we
think
of
price-tracking
apps
Do
you
have
an
opinion
on
price-tracking
apps?
With
holiday
shopping
upon
us,
I've
seen
InvisibleHand,
PriceBlink,
and
CamelCamelCamel
mentioned
and
claim
to
be a
good
way
to
see
if
items
on
sale
are
really
a
bargain.
Are
they
safe
to
use,
or
will
they
cause
more
problems
than
the
money
they
might
save?
Thanks!
Our
answer
Hi
Sharon. Price-tracking
apps
and
browser
extensions
can
be
very
effective
for
holiday
shopping,
helping
you
avoid
"fake
sales"
by
revealing
true
price
history.
https://www.joinhoney.com/
https://www.keepa.com/
https://capitaloneshopping.com/
Dan wants to know how to prevent Chrome from creating tab groups
Hi Darcy & TC, you two are so awesome. You've helped me with so many things. I don't know what I do without you. So, I've got to ask you about this new Auto tab group creation in Chrome; it is driving me nuts. You open multiple links from the same site, and Chrome auto-creates tab groups. There is NO flag to turn this off, no setting to change. I tried everything from Google help. Do you know how to turn this off? I really don't like it. Any help with this would be much appreciated. Thanks, ---Dan--
Our answer
Hi Dan. Thanks for your kind words!
Cindy asks about security keys
Security Key - Once I have set up a Security Key device, can I use that same device for a different company? Does it require the same S. Key number I set up? I have recently been required in a couple of situations to purchase a Security Key (similar to a USB device, but it has a tiny size inserted into a computer). One was a bank that I wanted to go to online to do a wire transfer to a different bank. (I went to the local Walmart, and they did not know what I was talking about! I went online and purchased the Key.) Is this now another up-and-coming security method? Thank you, thank you for your great in the moment knowledge and help!
Our answer
Hi Cindy. Security keys are hardware devices that plug into whatever device you're using (smartphone, tablet, laptop, computer, etc.). The security key holds the passkeys for the sites that have issued them. Whether or not you use a security key, you still have to validate (or complete the sign-in) with your device PIN (the PIN for the device you're using) or biometrics (fingerprint/facial recognition). The advantage of a physical USB security key is that you can use it on any device without having different passkeys for different devices. Password Managers now work the same way. Once you install a password manager that is passkey capable, you can log in with any device without having separate passkeys for each site. Again, your passkeys are verified by your device PIN or biometrics.
![]()

Your gifts help us to keep on helping you and all our friends. Please consider making a small donation today!
![]()
You have given us so many excellent articles on using Passwords. Please bear with me as I ask more questions for clarification. Do I have to make up my own PINs (since I don't use the biometrics) for every different site, or make a new one for each site? Do they have to be 4 or 6 numbers, or does it vary with each site? Could you show me an example? I just can't seem to get my old head around this change. I do have LastPass to record Passwords when/if I use them. Thanks for your patience in answering yet another question about this topic.
![]()
Hi, TC & Darcy. I have a friend who has a Windows 11 laptop. The last update, she had trouble getting it to install. That seemed to start her problems. Then one day her screen went funny. She tried a restart. Nothing. I am sure you guys have mentioned a way to start in safe mode,& I tried searching for it, but can't find it. Is this possible for her to try? If so, can you please let me know how? Many thanks, you 2 are awesome, helping so many people daily.
Our
answer
Hi
Pam. If
she
can
log
into
the
computer,
Safe
Mode
isn't
the
easiest
way
to
deal
with
a
bad
update.
![]()
Have you heard anything about Gmail removing “Check Mail From Other Accounts”? Starting in January 2026. I don’t use that feature, but it could cause significant problems for people who do. Just thought I’d ask and wanted to share.
Our
answer
Hi
Dotty. I
had
heard
rumors,
but
nothing
for
certain.
So
today, I
started
digging
into it
by going
to
Google
and
finding
out for
sure.
And it
looks
like
what you
heard is
true.
Starting
in
January
2026,
Gmail
will no
longer
support
the
"Check
mail
from
other
accounts"
feature
in the
web
interface.
Google
is
ending
support
for
pulling
in
emails
from
third-party
accounts
using
the
older
POP
(Post
Office
Protocol).
The Check Mail from Other Accounts feature found in the Settings under "Accounts and Import," will be removed. If you currently use it to consolidate mail from, say, a Yahoo or custom domain account into your main Gmail inbox, those new emails will stop in January 2026.If you use Gmail to pull in messages from another email address, you need to make changes before the deadline. If you want to...Then you should...Consolidate all mail in one place (Desktop) Switch to an email client (e.g., Microsoft Outlook, Thunderbird). These apps are designed to connect to multiple accounts using the modern IMAP protocol and manage them in one unified interface. View your third-party mail on your phone/tablet. Add the account directly to the Gmail mobile app using IMAP. The mobile app already uses IMAP and will continue to support non-Gmail accounts, but they won't be mixed into your main Gmail inbox—you'll switch between accounts inside the app. Keep getting mail into Gmail (Forwarding) Set up Auto-Forwarding from your third-party account's settings to your Gmail address. Warning: This is generally discouraged because it can break modern email security standards like DKIM and SPF, causing legitimate forwarded mail to be marked as spam or rejected entirely.Why is Google doing this?The primary reason is security. POP is an older protocol, and Google is shifting its services to rely entirely on modern standards like IMAP to provide better security and a more consistent experience across multiple devices.Rest assured: Any emails you have already imported using the "Check mail from other accounts" feature will remain in your Gmail account. They will not be deleted.

Now available: Reg Organizer 9.40
If you purchased or renewed Reg Organizer through Cloudeight within the
last 12 months, you're entitled to a free version upgrade to Reg
Organizer 9.31. Works great with Windows 10 and Windows 11.
Save $14 on Reg
Organizer right now!
Reg
Organizer - A Swiss Army Knife of Windows Tools - Works Great on Windows
10 and Windows 11.
![]()

How to Remove Most Telemetry and Advertising in Windows 11
Windows 11
Windows 11 relies on data collection to make money. You are the product. It also generates income for Microsoft using integrated advertising throughout the operating system. However, you can significantly reduce both telemetry and promotional content while increasing your privacy without resorting to complex, high-risk third-party tools.
Here is the easiest and safest way to remove most telemetry and advertising in Windows 11, focusing entirely on built-in settings.
Disable Privacy & Telemetry Settings
These settings are the core of Microsoft’s data collection. Turning these off limits what data is sent back to the company.
General Privacy Controls
Go to Settings (Windows Key + I).
Navigate to Privacy & security.
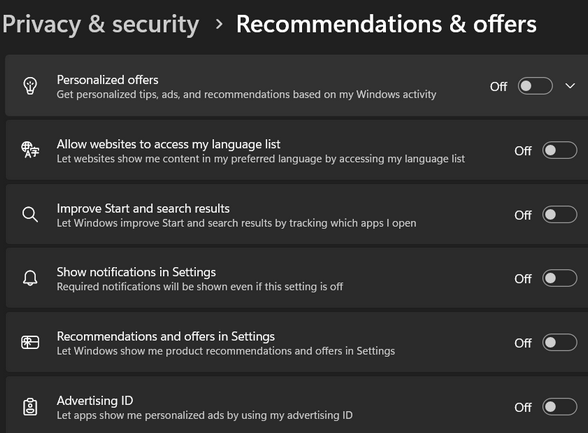
Click Recommendations and offers.
Turn off all six toggles:
“Personalized offers”
“Allow websites to access my language lists.”
“Improve speech and search results.”
“Show notifications in settings.”
“Show recommendations and offers in settings.”
“Advertising ID”
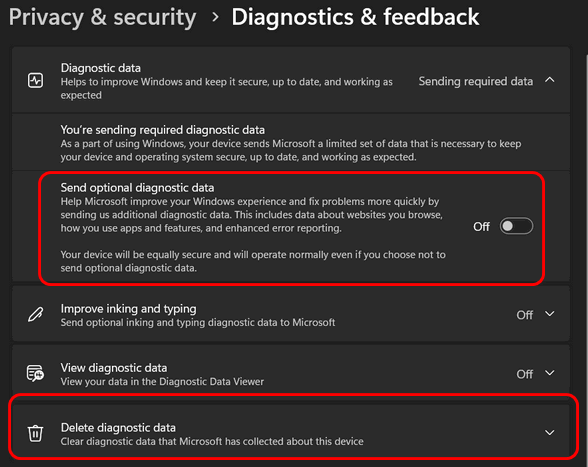
Diagnostic Data
In Privacy & security, click Diagnostics & feedback.
Set “Send optional diagnostic data” to Off.
If you want to be thorough, click Delete diagnostic data to wipe any data currently stored on your device that hasn’t been sent.
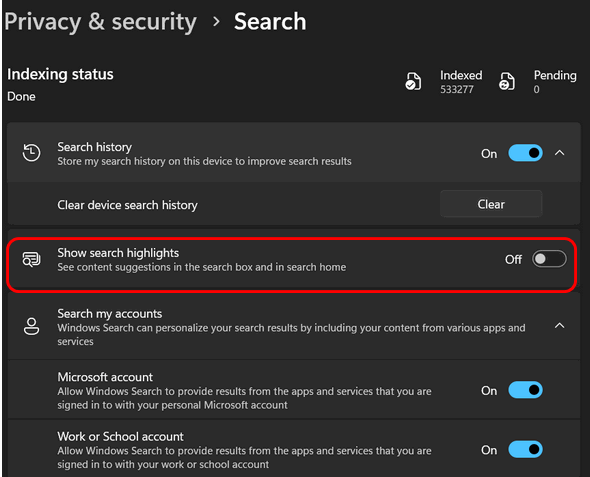
Turn off Search highlights.
Search highlights are basically ads that show in the search box on the taskbar.
In Privacy & security, click on “Search”.
Turn the toggle off next to “Show search highlights”.
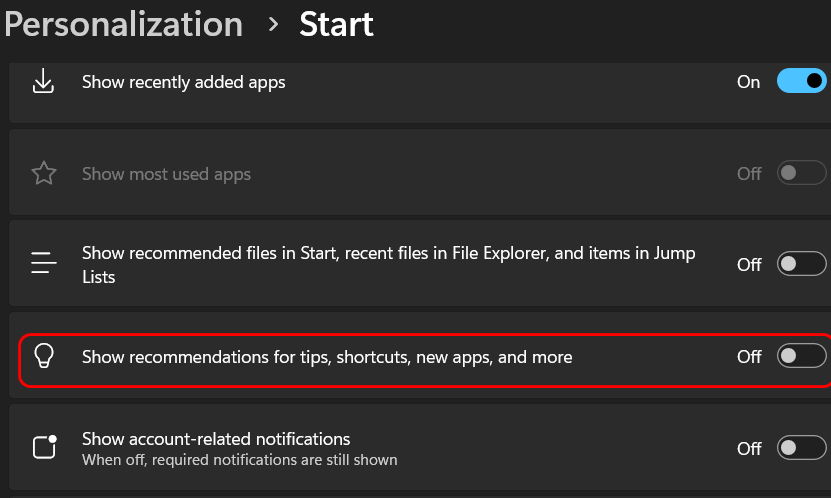
Start Menu Suggestions
Windows often uses the Start Menu and Taskbar to recommend apps or services (which are essentially ads).
Go to Settings (Windows Key + I).
Navigate to Personalization > Start.
Turn off the toggle for “Show recommendations for tips, shortcuts, new apps, and more.”
Next, go to Personalization > Lock screen.
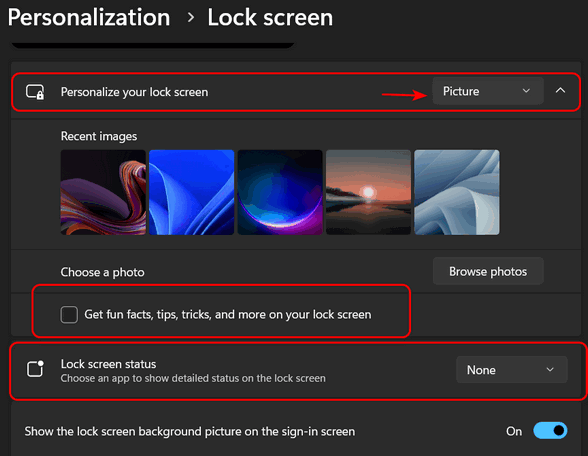
Next to “Personalize your lock screen,” choose “Picture” – do not choose Windows Spotlight (you’ll see ads).
Uncheck “Get fun facts, tips, tricks, and more on your lock screen.”
Change Lock screen status to “None”.
Remove Pre-Installed Promotional Apps
Windows 11 comes with several apps pre-installed that serve promotional content. You can safely remove most of them.
Open the Start Menu.
Right-click on any app you don’t use (common candidates are Xbox, Microsoft Teams, Solitaire, News, or Spotify).
Select Uninstall.
If an app cannot be uninstalled via the right-click menu, it’s generally best to leave it alone.
How to Scan Your Hard Drive for Errors
Windows 10 / Windows 11
Windows 10 and 11 let you scan your hard drive(s) for errors while you use your computer – and it’s easy to do.
Let’s scan your Windows drive (usually C:\) for errors.
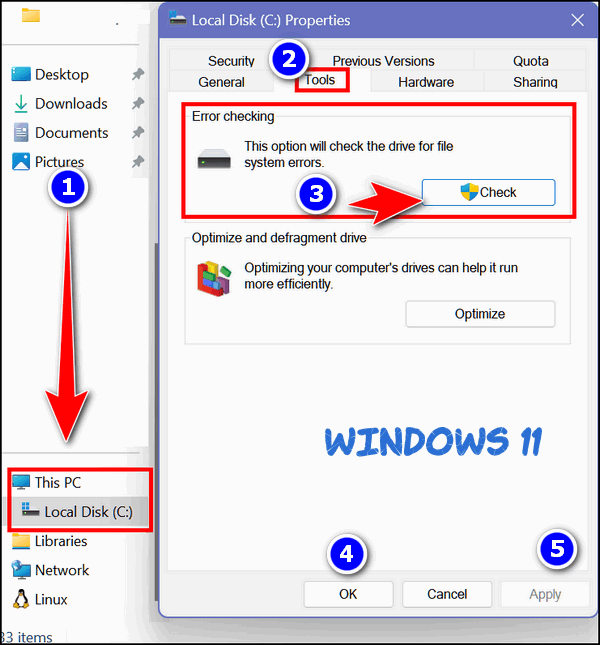
Open File Explorer (Windows Key + E). On the left pane under This PC, right-click on your C:\ drive, and click “Properties”. (Windows 11 users note: You will need to click on “Show more options” to click on “Properties".) When the “Properties” dialog opens, click the “Tools” tab, and then click the “Check” button.
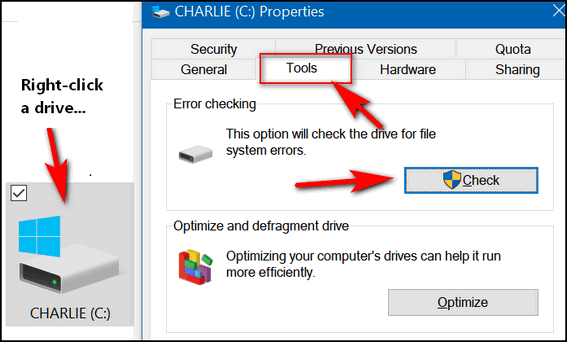
Above: Windows 10. Below: Windows 11.
Once you click the “Check” button, the following dialog will appear. It will tell you if you need to scan the drive for errors. If you don’t (as below), it will also tell you that. Even if it says, “You don’t need to scan this drive,” you can still scan the drive if you want to. Just click “Scan drive.”
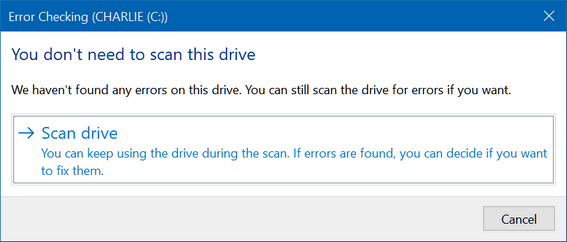
You can scan any hard drive using this tip.
How to Scan your hard drive(s) using the Command Prompt.
1.) Type CMD in the taskbar search.
2.) In the search results, click “Run as administrator”.
3.) Type the following command at the prompt and press Enter. (Make sure you leave a space before the slash.)
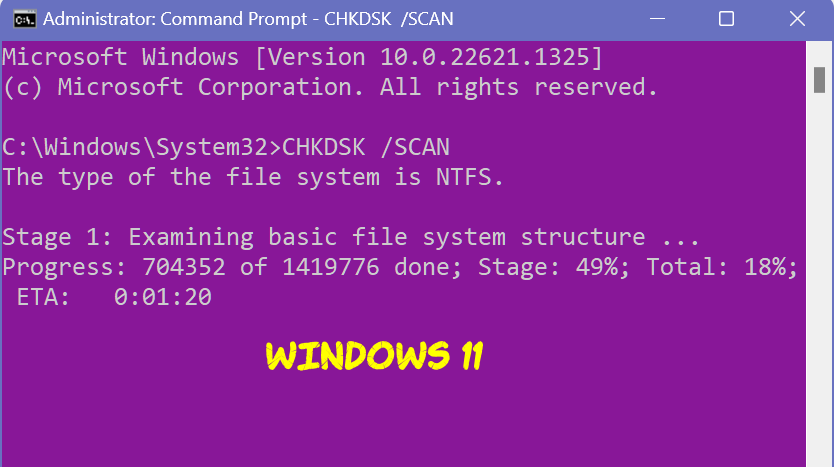
CHKDSK /SCAN
Windows will scan your drive…

Above Windows 10: Below Windows 11.
When the scan is finished, Windows will let you know if further action is required. As you can see, I don’t need to do anything more. My drive is fine.
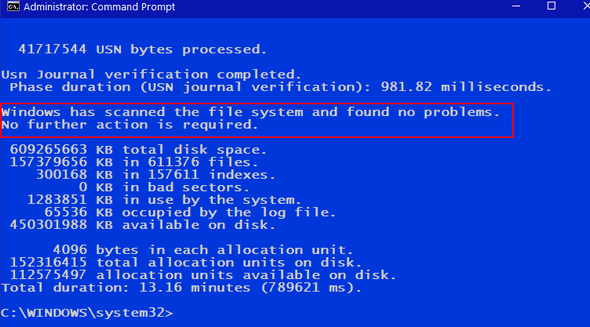
And now you know how to scan your hard drives for errors!
And a couple more things…
If drive errors are found, you can fix them by following the instructions provided.
You can use this tip to scan any drive, not just the Windows drive ( usually Drive C:\).
![]()
How to Block Almost All Ads on Windows 11 by Changing Your DNS Settings - It's Easy!
Windows 11
Last week, we featured an article on using AdBlock's DNS servers to block ads on Android phones, and it works great. You can read that article here.
Now we will show you how to use the same method to block ads on your Windows 11 PC. Using an Ad-blocking DNS is one of the most effective and safest ways to block ads, tracking, and telemetry across your entire operating system, including the ads inside many Windows apps, because it stops the connection before it even reaches your browser or app.
Here is a simple, step-by-step guide on how to implement an ad-blocking DNS on Windows 11.
What is DNS Blocking? Is it Safe?
When you type a website (like `example.com`), your computer asks a Domain Name System (DNS) server for the website's IP address.
An Ad-blocking DNS provider maintains a huge list of known tracking, telemetry, and advertising server addresses. When your computer requests the address of an ad server, the ad-blocking DNS responds with "Nothing" or an internal address (such as `0.0.0.0`), effectively blocking the ad request without slowing down the main content.
This method is extremely safe because you are only changing a network setting; you are not installing any software, touching your Windows Registry, or modifying core Windows files.
We will use AdGuard's DNS servers for this tip. AdGuard DNS is one of the most popular and reliable free ad-blocking providers. So, let's go!
First, Access Network Settings
1. Press the Windows Key + I to open Settings.
2. Navigate to Network & Internet on the left side.
3. Click on your active connection type (Wi-Fi or Ethernet).
Next, Edit DNS Server Assignments
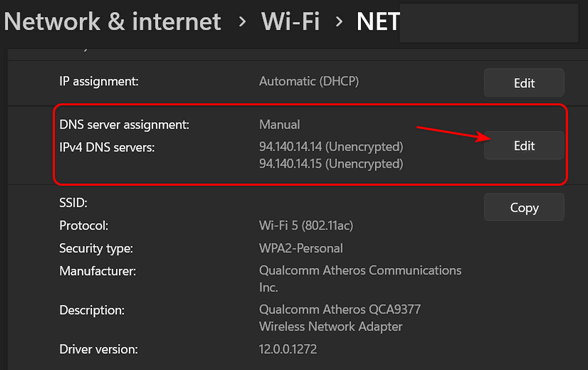
1. On the connection details page, scroll down to DNS server assignment.
2. Click the Edit button.
3. In the pop-up window, change the setting from Automatic (DHCP) to Manual.
4. Toggle the IPv4 switch on.
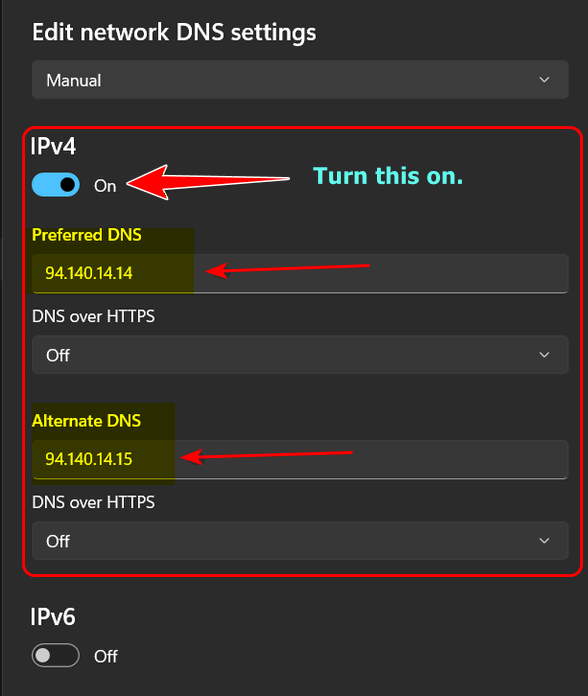
Enter the AdGuard DNS Addresses
Under the IPv4 section, enter the following DNS addresses:
Preferred DNS 94.140.14.14
Alternate DNS 94.140.15.15
OK, Now, Let's Save and Verify
First, click Save. Then test it. Verify the ad blocking by visiting a site you know to be very ad-heavy. You should notice that web pages (and even some Windows apps ) no longer display advertisements.
We hope you found this tip useful!
Want more tips, tricks, and information?
We have thousands of Windows tips, tricks, and more on our InfoAve website.
Subscribe to our free InfoAve Daily newsletter.
Christmas Holiday Sale
Cloudeight Direct Computer Care
Repair Keys Are Just $39 Right Now!![]()
Buy a Cloudeight Direct Computer Care Repair Key for just $39 during our
Christmas Holiday Sale!
Get your Cloudeight Direct Computer Care key for only $39 right
now!
![]()

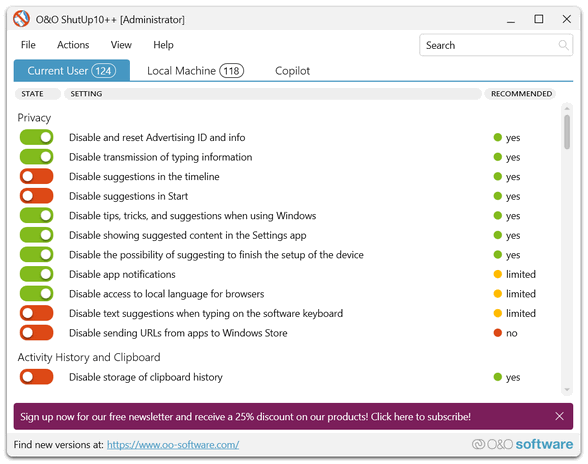
O&O ShutUp10++: Take Back Control of Windows Privacy
O&O ShutUp10++ is a popular, free, and portable utility designed to give users hands-on control over the many privacy and telemetry settings in Windows 10 and Windows 11 by consolidating dozens of options that would otherwise require digging through multiple Settings menus, Group Policy, or the Windows Registry.
O&O ShutUp10++ is completely free for everyone and requires no installation; simply download a small file and run it. You can even put it on a USB drive and run it from there.
It consolidates over 100 Windows settings related to privacy, security, system updates, and app permissions into one simple interface and uses a traffic light–style safety system to mark each setting with a color-coded indicator showing the risk of making changes: green for options that are generally safe to disable with minimal or no loss of major functionality, amber for those that may cause usability issues or minor feature loss such as clipboard history, and red for options that carry a high risk of breaking essential Windows or third-party features such as Windows Update.
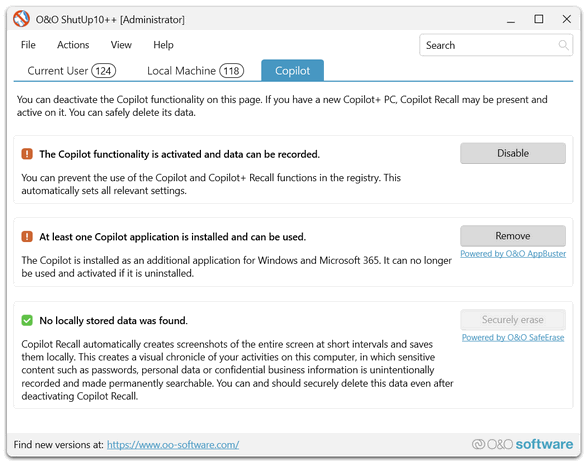
Each setting includes a detailed explanation that describes what it does and what the impact will be if you disable it, and the program strongly encourages or prompts you to create a system restore point before applying changes, providing a crucial safety net. It is also updated regularly to add controls for new and controversial Windows features, including the ability to disable aspects of Windows Copilot+ Recall.
Here's a word from the developers...
O&O ShutUp10++ means you have full control over which comfort functions under Windows 10 and Windows 11 you wish to use, and you decide when the passing on of your data goes too far. Using a very simple interface, you decide how Windows 10 and Windows 11 should respect your privacy by deciding which unwanted functions should be deactivated.
O&O ShutUp10++ is entirely free and does not have to be installed – it can be simply run directly and immediately on your PC. And it will not install or download retrospectively unwanted or unnecessary software, like so many other programs do these days!
O&O ShutUp10++ from O&O Software GmbH, an established and well-respected German software company known for data recovery and drive utilities, means you can download and use this app with confidence. It does not install hidden components or download unwanted or unnecessary software in the background, meaning it's not like so many other free utilities that come bundled with things you don't want. In other words, O&O ShutUp10++ is good, clean, freeware.
Most changes the program makes simply toggle settings that Microsoft already allows through Group Policy or the Registry, so they rely on standard Windows settings and can be easily reverted to their default from within the app.
To sum things up: If you want more privacy with minor risks, then 0&0 ShutUp10++ may be just the tool you've been looking for. You can read more about and/or download 0&0 Shutup 10++ here.
![]()
Your gifts help us to keep on helping you and all our friends. Please consider making a small donation today!
![]()

Not Fat, Yet…
Well, it’s not been a fun year, but it’s getting better. Having two children who live very far apart means pappy gets two Thanksgiving feasts each year. I’m not known as a temperate kind of guy. So after having a lousy year healthwise, I ate heartily at both feasts…
But…I’m not fat. Yet. But yes, I agree, I might be a little plump, but I’m certainly not fat. But anyway, health issues and Thanksgiving feasts aside,
Recently, because of a lack of better things to do with my free time, I’ve become concerned and upset about food labeling. Yes, it’s true, I should get a life. I used to have one, but age and health problems intervened. So, I’m going to rant about things that need to be ranted about, and food labeling is one of them. And wondrously, I’m going to try to somehow tie this all in with the Internet and computers.
Because I’m nearly fat and have nothing else to do, I sit here tonight with a box of Kellogg’s Raisin Bran and several cans of Campbell’s Soup...
Please read the rest of this essay here.

What are deep fakes?
A deepfake is basically a super convincing fake video or audio clip made using smart computer programs (AI). Think of it like a digital mask and voice changer that's so good, you can make someone look like they're saying or doing anything, even if they never did it in real life. If a scammer has just a few seconds of your voice, they can make a deepfake call to your family saying you're in trouble, or they can put a politician's face onto someone else's body. The whole point is that they look and sound so real, they're really hard to spot as fake.
![]()

Sales of the following products and services help support our newsletters, websites, and free computer help services we provide.
Cloudeight Direct Computer Care:
Single Keys, SeniorPass, or Season Tickets - always a great deal. Cloudeight Direct Computer Care is like having PC insurance.
Get more information here.
Emsisoft Anti-Malware: Emsisoft is the only Cloudeight-endorsed and recommended Windows security program. It provides users with a complete antivirus, antimalware, anti-ransomware,
and anti-PUPs solution. We offer single Emsisoft licenses and multi-computer licenses at discount prices. Also, we offer our exclusive Emsisoft with Cloudeight installation & setup.
Get more information here.
Reg Organizer: Reg Organizer is the Swiss Army Knife of Windows tools. It's far more than just a registry optimizer and cleaner... it's a Windows all-in-one toolkit. Reg Organizer helps you keep your computer in tip-top shape and helps you solve annoying Windows problems. Reg Organizer works great with Windows 10
and Windows 11! Get more information about Reg Organizer (and get our special discount prices) here.
MORE IMPORTANT STUFF!
Your InfoAve Weekly Members' Home Page is located here.
Help us grow! Forward this email newsletter to a friend or family member - and have them sign up for InfoAve Weekly here!
Get our free daily newsletter! Each evening, we send a short newsletter with a tip or trick or a computer-related article - it's short and sweet - and free. Sign up right now.
We have thousands of Windows tips and tricks and computer articles posted on our Cloudeight InfoAve website. Our site has a great search engine to help you find what you're looking for, too! Please visit us today!
Help us by using our Start Page. It costs nothing, and it helps us a lot.
Print our Cloudeight Direct Flyer and spread the word about our computer repair service! If you want to help us by telling your friends about our Cloudeight Direct Computer Care service, you can download a printable flyer that you can hand out or post on bulletin boards, etc. Get the printable PDF Cloudeight Direct Computer Care flyer here.

We'd love to hear from you!
If you have comments, questions, a tip, a trick, a freeware pick, or just want to tell us off for something, let us know.
If you need to change your newsletter subscription address, please see "Manage your subscription" at the very bottom of your newsletter.
We received hundreds of questions for possible use in IA news. Please keep in mind that we cannot publish all questions and answers in our newsletters, but we try to answer every single question. We can only use a few in each week's newsletter. If you have a support question about a service or product we sell, please contact us here.
Subscribe to our Daily Newsletter! Get computer tips & tricks every night. Our daily newsletter features a computer tip/trick or two every day. We send it out every night around 9 PM Eastern Time (USA). It's short and sweet, easy to read, and FREE. Subscribe to our Cloudeight InfoAve Daily Newsletter!
We hope you have enjoyed this issue of Cloudeight InfoAve Weekly. Thanks so much for your support and for being an InfoAve Weekly subscriber.
Have a great weekend. Be safe!
Happy Holidays & Merry Christmas!
Darcy & TC
Cloudeight InfoAve Weekly - Issue #1156
Volume 23, Number 7
December 5, 2025
Not a subscriber? Subscribe to our FREE Cloudeight InfoAve Weekly Newsletter here.
"Cloudeight InfoAve Weekly" newsletter is published by:
Cloudeight Internet LLC
PO Box 73
Middleville, Michigan, USA 49333-0073
Read our disclaimer about the tips, tricks, answers, site picks, and freeware picks featured in this newsletter.
Copyright ©2025 by Cloudeight Internet