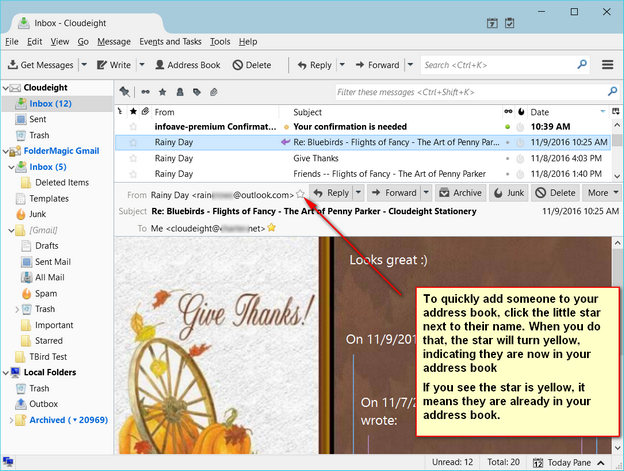
Thank you for using our Thunderbird Email Setup. Here a few tips that will help you get started with Thunderbird. The more you use Thunderbird the more features you'll discover; these tips will get you started.
Click here to view our HELP page for Thunderbird Click here for Stationery for Thunderbird
Comments or questions? Contact Us
INDEX
1. The Thunderbird Toolbar: Getting Started (Includes toolbar info, sending to multiple contacts, bc, bcc, and more!)
2. Message Rules & Filters
3. Adding Folders
4. Stationery (If we installed Thunderbird for you, we installed your Stationery add-on)
5. Saving Mail from Windows Mail to Thunderbird (or Windows Live Mail) (If we installed Thunderbird for you, we did this for you)
6. Sound alerts
7. Change line spacing to single space when clicking Enter in an email (If we installed Thunderbird for you, we did this step)
8. Hide or View folders for an email account
9. Creating a Mail list of Contacts to send to
10. Adding new contacts to your Address Book
1. The Thunderbird Toolbar: Getting Started
How to Enable The Thunderbird Toolbar
Since we set up Thunderbird with the Menu bar & the Mail toolbar visible, this is for those of you who have set up Thunderbird yourself or who have accidentally lost your Menu bar / Mail toolbar.

Right-click in the blue area (see above) and put a checkmark in the boxes next to Menu Bar and Mail Toolbar - that's all there is to it. Now you'll have "File" "Edit" "View"
"Go" "Message", "Tools" and "Help" showing in the "Menu bar" and "Get Messages", "Write", etc. showing in the "Mail Toolbar"
Using Thunderbird's Toolbar

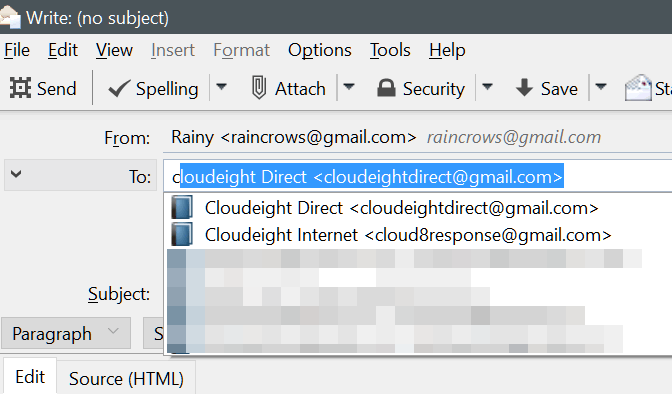
The Thunderbird toolbar is set up to be easy-to-use. The large buttons "Get Messages", "Write" and "Address Book" are the buttons you'll use most. We've set up your Thunderbird email program to automatically check for mail every 5 minutes. If you want to manually check for messages, just click on the "Get Messages" button. If you want to write a message, click Write. If we've imported your address book, you probably won't need to click on the Address Book button very often. As you can see (below), once you start typing in a name or an email address a list of people will appear whose names start with the first letter you started typing. If the person is in your address book, all you have to do is click on their name/address.
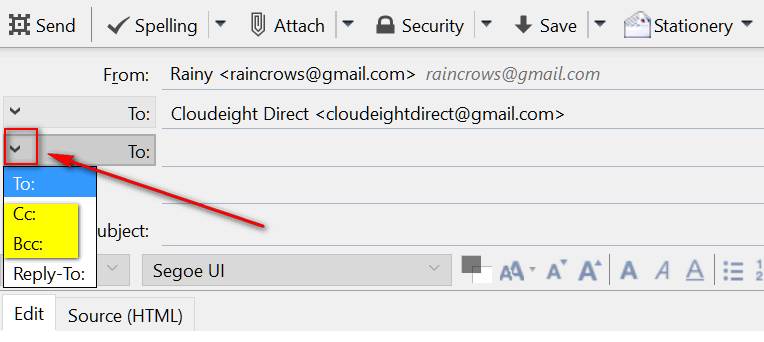
If you're looking for CC and BBC, no problem. Under the first "To" line, click the down arrow (below) and chose "Cc:" or "Bcc:" and enter the email address. Again, if the person is in your address book just typing the first letter or two of the name will bring up a list of all persons in your address book beginning with the letters you typed - just click on the name and it will appear in the Bcc: or Cc: line. If you have one Bcc: and one Cc:, use the next line down, click the arrow and choose "Bcc:" or "Cc". Very simple stuff!
If you want to send to multiple contacts, you can either create a groups contact from your address book, or add one name, and when it is added, click Enter to add more.Keep in mind, if you send to multiple people in the "To" field, all can see each other's name and address when the mail is received. If you want it more private, add the names to BCC field
Marking messages read or unread is easy. To mark a message as unread, right-click, select "Mark" and choose "Unread". Or double click he message and click "More" on the Message toolbar, click More, and choose Mark as unread (see image below). To mark all messages in a directory as read, right-click on message and choose "All unread".
The Thunderbird Message Toolbar (below) appears whenever you click on (open) a message. You can choose "Reply", "Forward" or "Archive" the message - or make as Junk or delete it.

If you click "More" you'll see other useful options.

(Above: Thunderbird Message Toolbar's "More" menu.)
Thunderbird's "Tools" menu has a lot of useful items:
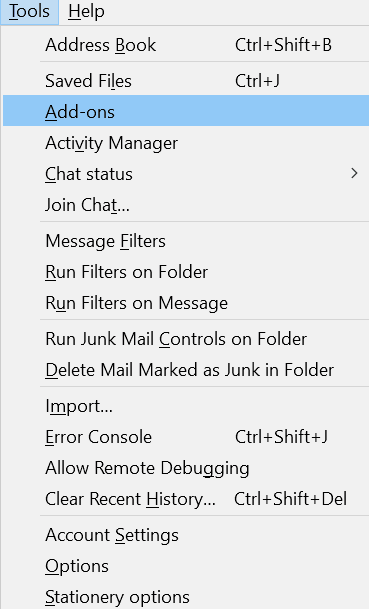
You can expand Thunderbird's capabilities by using Add-ons. If you click "Add-ons" in the menu, you can view any installed add-ons, and/or you can search for new add-ons. Be careful though. Adding a lot of add-ons could degrade Thunderbird's performance.
2. Message Rules are called Filters in Thunderbird
If you're a former Windows Mail, Outlook Express or Windows Live Mail user, you might have used "Message rules" to organize your email. In Thunderbird, message rules are called "Filters" You can organize your email using filters. You can have mail redirected to specified folders based on the message's "From", "Subject" and many other fields. Just remember to create the folders first, then the "filters".
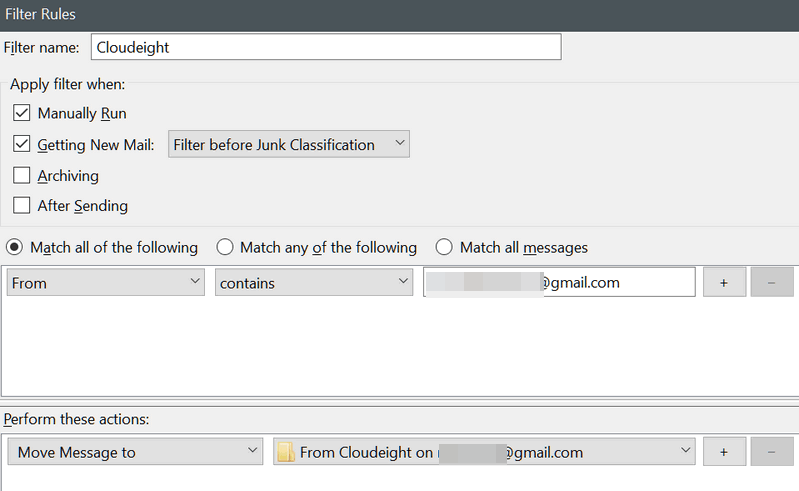
(Above: Thunderbird's Mail Filters setup)
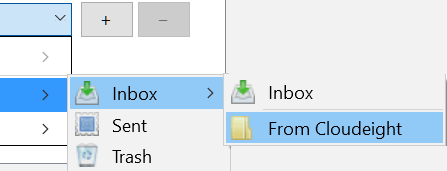
(Above: Setting up a filter so that all mail from Cloudeight to me, automatically goes into a folder I created called "From Cloudeight".)
You can make as many message filters as you want - it can really help you keep your mail organized.
3. Adding Folders In Thunderbird
In order to take advantage of message filtering in Thunderbird, you will need to create new folders...and that's very easy to do. Just right-click on the inbox of the account you want to add a folder to, and choose "New folder" and give it a name. Folders you create in "Local folders" will be accessible only from your PC. Folders you create under your account(s) will be created on and accessible from the web as well as your PC.
4. Using Stationery in Thunderbird
If we installed and setup Thunderbird, we woud have added the Stationery Add-on, so all you have to do to use stationery is click Write (or reply) and choose the stationery you want to use. See Below:
Using the Stationery add-on.
The stationery add-on adds a down arrow next to the "Write" button (see image below).
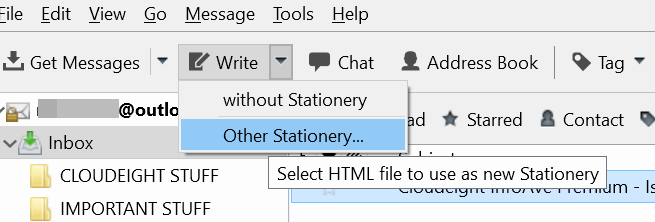
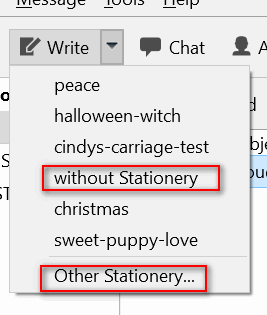
Click "Other Stationery" and browse to the folder where you save your stationery if we setup your program for you, we set the default Stationery folder for you, so you all you do is click "Other Stationery" and your stationery folder will open and then just double click the stationery you want to use. If we did not setup Thunderbird, see our Help page on how to create default folder for stationery.
Previewing Stationery - You can go to the folder the stationery is stored in and doubleclick any selection to preview it. When we setup Thunderbird, we create a folder in your Documents called Stationery, or Cloudeight Stationery.
You'll notice that the more stationery you use, the more you'll see on your list when you click the arrow next to "Write" (see below):
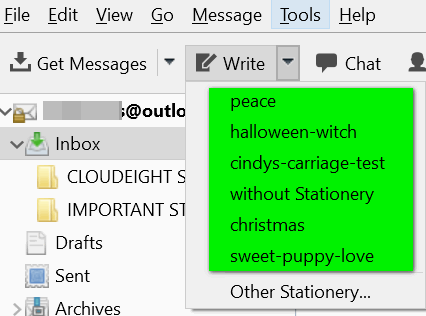
The way Thunderbird's stationery add-on works is that the next email you write will use the same stationery as the last email you sent. If you don't want to use stationery, choose "without Stationery". If you want to choose a different stationery, choose "Other Stationery" (see below):
What about music and scrolling?
Due to restraints in most modern email programs, we are no longer including music and scrolling with our stationery.
What about installing Cloudeight Stationery for Thunderbird?
We will be distributing our new Thunderbird stationery in zip files. We'll be posting instructions on the download pages showing you how to extract zip files and how to extract them to any folder you like.
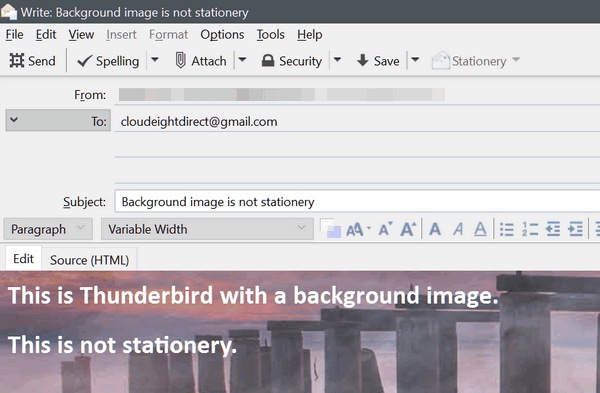
How to use a background image in Thunderbird
If you want to use a background image, it's easy to do in Thunderbird.
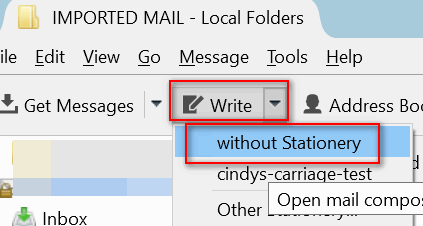
Start by clicking "Write" "Without Stationery" from the toolbar to open the compose window (see below):
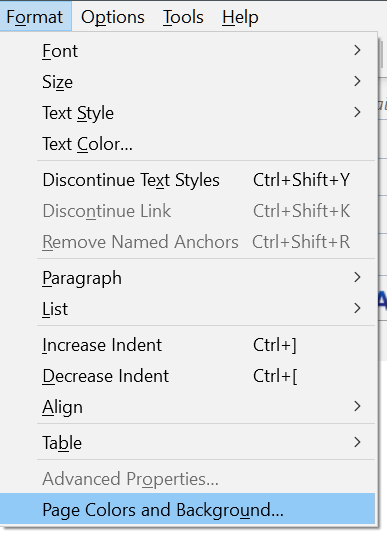
When the Thunderbird compose window opens, click "Format" then "Page Colors and Background" (see below):
After you click "Page Colors and Background", you'll see the dialog below: Choose a background picture by clicking on the "Choose File..." button. Don't forget to change your text & link colors so you can read them over the background picture. If you choose a dark background picture, chose light colored fonts and a dark background color. For light colored pictures do the opposite.
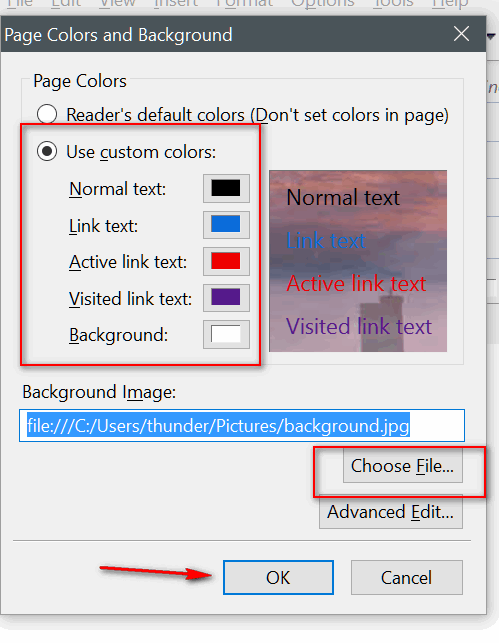
Once you've chosen your background picture and your font, link and background colors, go ahead and compose & send your message.
5. Saving Mail from Windows Mail to Thunderbird - Note: the same intructions work for Windows Live Mail too
NOTE: If we setup your Thunderbird, we would have done this step for you.
a. Make a folder on your desktop called Saved Mail. Now open Windows Mail and choose File, Export Messages.
b. Now choose Microsoft Windows Mail from list and choose next.
c.
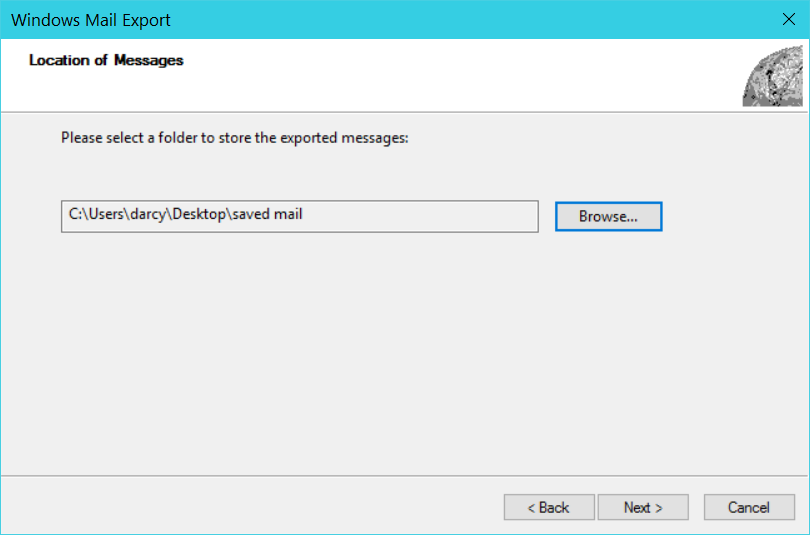
Browse to the folder you created - we named it Saved Mail on our desktopd.
Select Folder you want to export, or choose All.e.
Create a folder under Local Folders (important to do it here) and name it Saved Mailf:
Click Tools, ImportExport Tools, then choose Import all messages from a directory, then choose Also from its subdirectories, click Ok and you are done. If you have a lot of folders and mail, it will take a lot longer, so don't interrupt the import!See below for a step by step picture tutorial. Alternatively, you can create a folder on your desktop called Saved Mails, and drag and drop mail from your Windows Mail program to this folder. Then, Open Thunderbird, Create a Folder under Local Folders called Saved Mail, and drag the emls directly into the folder from your desktop folder.
Screenshot 1:
Make a folder on your desktop called Saved Mail. Now open Windows Mail and choose File, Export Messages. >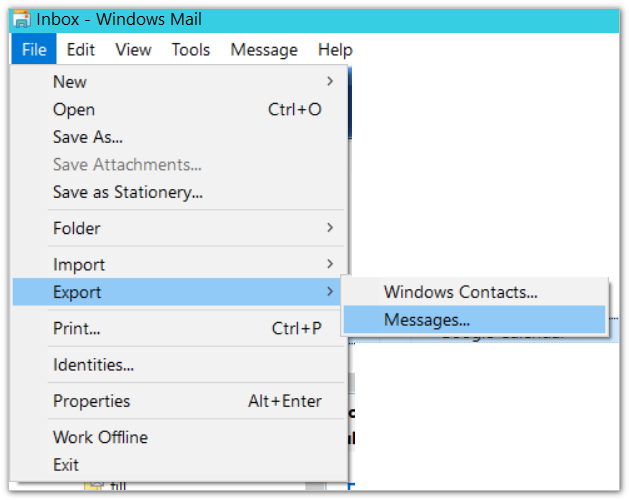
Screenshot #2: Now choose Microsoft Windows Mail from list and click Next.

3.3. Screenshot 3: Browse to the folder you created - we named it Saved Mail on our desktop
Screenshot 4: Select Folder you want to export, or choose All.

Screenshot 5: Now Open Thunderbird, Create a folder under Local Folders (important to do it here) and name it Saved Mail

Screenshot 6:
Click Tools, ImportExport Tools, then choose Import all messages from a directory, then choose Also from its subdirectories, click Ok and you are done. If you have a lot of folders and mail, it will take a lot longer, so don't interrupt the import!
6. Turn sound and alerts on/off
Open Thunderbird, click Tools, Options, and General Tab. You will see the sound options here. See screenshot below


