
Issue #948
Volume 19 Number 6
December 10, 2021
Dear Friends,
Welcome to Cloudeight InfoAve Weekly Issue #948. Thank you very much for subscribing and for being a part of our Cloudeight family. We appreciate your friendship and support very much! Please share our newsletters and our website with your friends and family.
If you're not getting our InfoAve Daily newsletter, you're missing out on a lot of good stuff!
It's free and it only takes a few seconds to sign up. We'd love to have you with us. Visit this page to sign up for our Cloudeight InfoAve Daily Newsletter.
![]()

Marinus can't click links in saved PDF files
I save many of your tips in a folder under your name (Cloudeight).
Whenever I look them up, I simply open them up from the relevant folder.
That works fine. But many of your tips include references to websites,
etc. There is no problem in clicking on these links in
your newsletters, but once saved in a PDF format in the folder in
Documents, I am no longer able to open these links. Please advise me how
to avoid this problem, apart from simply transferring your actual
newsletter. The reason why I prefer to avoid that is the fact I merely
wish to retain certain sections.
Our answer
Hi Marinus. If you want true PDF files with working links you're going
to need an actual PDF conversion program. Using Microsoft's Print to PDF
feature only "Prints" a copy of whatever you're looking at to a PDF
file. Think of printing one of our newsletters to paper... the links
won't work. Microsoft Print to PDF does exactly that -prints to PDF
instead of your printer. It's not "Converting" to PDF.
Here's a free online HTML to
PDF converter that is free and works well - I tested it.
Our newsletters are HTML files (web pages) so this converter converts
our HTML newsletter to PDF with all content including working links. You
can open these saved PDF files with Edge, Chrome, or Firefox and the
links will work.
We hope this helps you, Marinus.
![]()
Eileen asks about Windows "S" mode
I'm trying to help out a good friend who just bought a new HP
laptop with Windows 10. It must be something new with her laptop but I'm
totally confused. What is the "S" mode that's on her computer? Does she
really need it? The info that I found was that once you delete this "S"
mode you can't get it back. It's somehow connected with Microsoft. The
info that we found on the internet says it's a really secure mode but
you have to use Microsoft apps and no others. Got an answer for me, TC
or Darcy?
Our answer
Hi Eileen. Windows S mode is a mode of Windows that Microsoft
pushes to manufacturers by offering a lower price to them. It locks the
end-user to using only Microsoft apps and programs and apps from the
Microsoft store. Luckily, all computers sold in "S" mode can easily be
switched to regular Windows. See the following article to learn more
about S mode and how to take a computer out of S mode and switch to
regular Windows.
Windows S Mode – What is it?
If you need more help or info, please let us know.
![]()
Nancy says she needs her Gmail fixed
I need my Gmail fixed. Things have gone awry. I have no "spam" folder to
check, nor anything besides, "Mail". The list that used to be there is
gone.
Our answer
Hi Nancy. Look at the two screenshots below and see if one or the other
(or both) helps you with your Gmail problems.
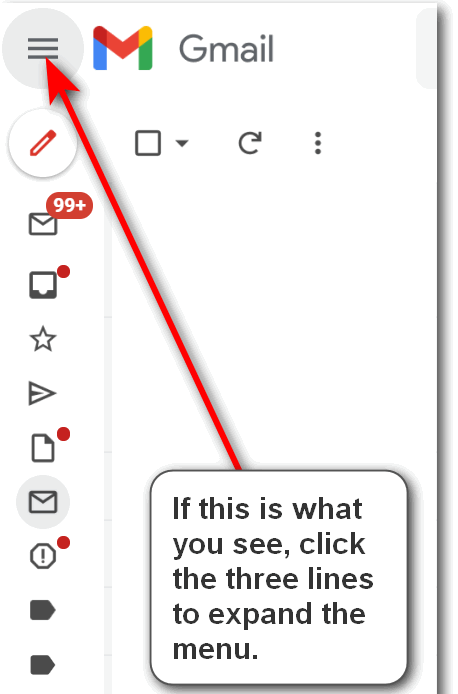

Let us know if this helps you.
-----
Nancy wrote back: "Oh my! Something so darn simple. It worked. Thank
you so much. Nancy."
![]()
Cheryl wants to know about Windows 11 tips
Hello again. Is there an easy way to search on the Cloudeight InfoAve
webpage for Windows 11 specific articles? I've tried typing in certain
phrases such as "sleep mode" "Windows 11" and nothing comes up related
to what I'm looking for. I apologize for being such a bother but I
tried to find the articles without your help and I'm not able to do so.
Thank you, kind souls.
Our answer
Hi Cheryl. We are adding Windows 11 tips and info just as fast as we
can. In most cases, Windows 11 Is quite a bit like Windows 10. Sleep mode
is under Power Options just like it was in Windows 11.
Right-click on the start button.
Click on Power Options.
Under "Power" click on "Screen and sleep"
And you'll see the settings options are familiar and much as they are in
Windows 10.
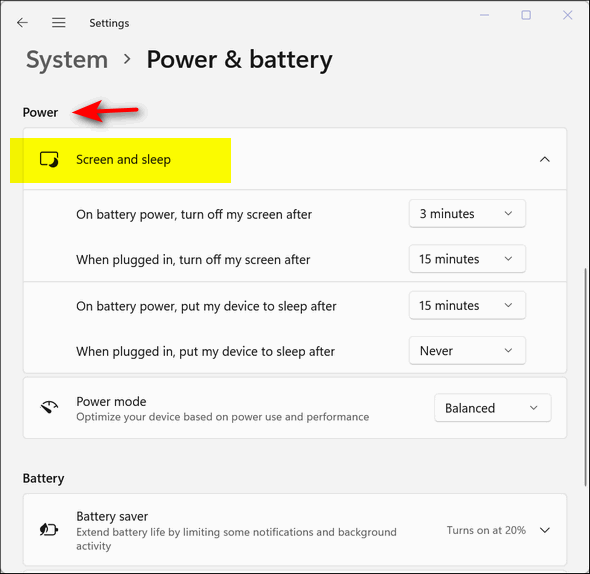
We will continue updating our Windows 10 tips for Windows 11 as quickly
as possible. And as time goes by we'll get most of our Windows 10
tips updated with Windows 11 info.
![]()
Judy asks about VPNs
Hi! I am a "snowbird" for the winter. Being Canadian, we fly south to
Arizona for the warmth! One thing we miss, however, is certain sports
broadcasts only/mainly aired in Canada. The big one is curling! I am
hearing friends that use a VPN to view broadcasts they can't get in the
States. What is a VPN?? Are they hard to use and do you have one to
recommend?
Like everyone, I don't know where I'd be without you and your
information, help and encouragement! I have been a subscriber pretty
much since the beginning and you have taught and helped me with so much!
Thanks from the bottom of my heart!
Our answer
Hi Judy. Thank you so much!
VPN is an acronym for Virtual Private Network. You can
read more about VPNs here.
Generally, a VPN is not necessary, but for something like bypassing
restrictions set by an ISP or a government or for working from home and
dealing with sensitive data (like medical records, financial info, etc.)
VPNs can be very useful.
The only VPN we've done extensive testing with is CyberGhost. We tested
it when Emsisoft was giving it away as a promo. For what you want to do
with it -viewing TV programs - almost any VPN would do the trick. But
rather than installing a VPN on your computer, I suggest you just
install the VPN browser extension in the browser you use most. That way
you can easily turn it on and off as you need it.
You can get the CyberGhost VPN extension free for Edge or Chrome from
here.
You can get CyberGhost VPN free for Firefox here.
Once you install it you can turn it off and on as needed in your
browser.
We hope this helps you. If you need more info or decide to install a full
VPN on your computer - let us know and we'll try to help you.
![]()
THANK YOU FOR HELPING US!
When you support us with a small gift, you help us continue our mission to
keep you informed, separate the truth from the hyperbole, and help you
stay safer online. Plus, our computer tips make your computer easier to
use.
Did you know that we provide support to thousands of people? Every week
we help dozens of people via email at no charge. The questions and
answers you see in our newsletters are from the email answers and help
we provide to everyone free of charge.
Thanks to your gifts, we do a lot more than provide this free newsletter. We help you recognize online threats, fight for your online privacy, provide you with the knowledge you need to navigate the Web safely, provide you with suggestions for safe, free software and websites, and help you get more out of your PC.
Please Help us keep up the good fight with a small gift.
Interested in making an automatic monthly gift?
Visit this page. Help us
keep helping you... and helping you stay safe on the Web
![]()
Sharon has two questions. One about
her home page and one about opening HTML documents
I have 2 questions and know you will have the answers. In the upper left
corner of my home page which is your Cloudeight start page, a new tab is
there I unchecked tabs in settings but it is there when I open my
browse. I close it and it goes away but I do not want it there.
Also, how do I open a Firefox html document{.htm}
Thanks for your help. Sharon.
Our answer
Hi Sharon, First, apparently your browser is opening a blank page or tab
when you open your browser and thus a tab appears before the start page.
I'm guessing you're using Firefox. In your Firefox address bar type the
following and press Enter.
about:preferences#home
Make sure yours looks like this:
1.) Custome URLS... is selected.
2.) Only one URL is showing next to the Homepage and new windows.
3.) Under "New tabs" set to "Blank Page".
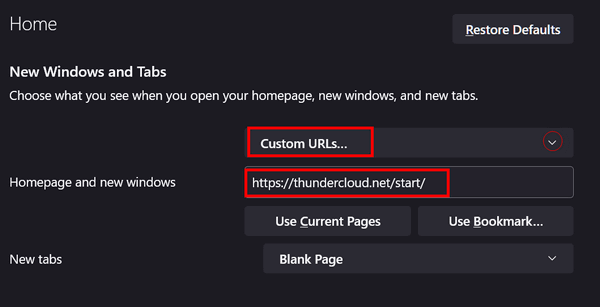
As far as Firefox html documents, an html document (HyperText Markup
Language) is a fancy name for a web page. Since you have Firefox set as
your default browser, any HTM or HTML file will say "Firefox HTML
document (.htm)". If you switched your default browser to Chrome, for
example, it would say "Chrome HTML document (.htm)".
We hope this helps you, Sharon.
![]()
Bernie wants us to clarify what resetting a computer does
So my faster Windows 11 ain't so fast anymore. I went to one of your
recent helps: "How to Reset Windows 10 or Windows 11 and Keep Your
Personal Files."
It seems I need to reset 11. But one line in your publication scares me:
"When the reset is done, all your files and folders will be right where
you left them, but you'll need to reinstall any programs you installed."
When I went from Windows 10 to Windows 11, I didn't have to do a thing.
Word Perfect and Quicken were right where I left them. I really don't
want to have to reinstall either of those as they are not very nice to
do. If I'm misreading, please let me know. I'm on the fence: do I want a
faster response or do I want to keep Word Perfect and Quicken? Bernie.
Our answer
Hi Bernie. There is a huge difference between upgrading a computer and
resetting a computer. Upgrading from Windows 7 to Windows 10 or Windows
10 to Windows 11 keeps all files as well as all of your compatible
programs. A reset saves your personal files, completely removes Windows,
reinstalls a fresh copy of Windows, and then puts your files back on your
computer in the location they were in before the reset. Windows also
leaves a list of programs that were removed on your desktop after the
reset so you can reference it when you reinstall your programs. Only the
apps/programs that came with Windows will be reinstalled.
All this is nothing new. It's the same in Windows 11 as it was in
Windows 10.
You should never do a reset unless your computer is barely functional or
has so many problems that fixing them all would be impractical.
We hope this helps you, Bernie.
![]()
John is seeing ads for browser extensions
Hello again, I hope you can tell me if this is safe or not. When I go to
certain sites using either Chrome or Edge, I get this window telling me
to update my browser "search verified browser extension". It either says
Chrome or Edge, depending on what I am using. I find I don't have or
think I don't have a "search verified extension". Do you think this is
real or a problem? Thanks so much for your professional opinions and the
help that you give to everyone. Sincerely, John.
Our answer
Hi John. Thank you! If this happens on random sites, your browser
has been infected. If it only happens on a couple of sites it's probably
an advertisement on the websites. Just to be sure your browsers are
clean you should do a browser reset and clear browser history.
To reset Edge and clear browsing history, see the following page:
https://www.thundercloud.net/infoave/new/how-to-reset-the-new-microsoft-edge-browser/
To reset Chrome and clear browsing history, see the following page:
https://www.thundercloud.net/infoave/new/how-to-reset-chrome-and-clear-browsing-history/
Resetting Chrome and Edge will not affect your saved passwords or
bookmarks.
We hope this helps you, John.
![]()
Don't have a Cloudeight SeniorPass? It's a great deal. Learn more here.
Our Cloudeight SeniorPass is a great deal. You get unlimited support for one full year from the date you first use your SeniorPass. We can help keep your computer running well, fix all kinds of computer problems, clean up malware, and a whole lot more. Our SeniorPass is like insurance for your computer. And it's only $99 for an entire year.Get your SeniorPass today for just $99. It's just like having insurance for your computer - only better!
To learn more about our SeniorPass, please see this page.
Interested in making an automatic monthly gift? Visit this page. Help us keep helping you... and help you stay safe on the Web.
![]()

Working with Fonts on Windows 10
and Windows 11
Windows 10 and Windows 11
Viewing and installing fonts on Windows 10 and Windows 11 is quick and easy. It’s a big improvement from previous versions of Windows.
To view the fonts on your Windows 10 computer, type Fonts in taskbar search and press Enter. On Windows 11, the best way to view your fonts is going to Settings > Personalization > Fonts. Curiously, if you type “Fonts” in Windows 11 taskbar search (or Start menu search), it opens Control Panel > Fonts, which does not give you a very good view of your installed fonts. Gee! I thought Microsoft was ‘deprecating’ the Control Panel.
You’ll see all the fonts installed on your computer system and displayed exactly as they will appear when you use them.
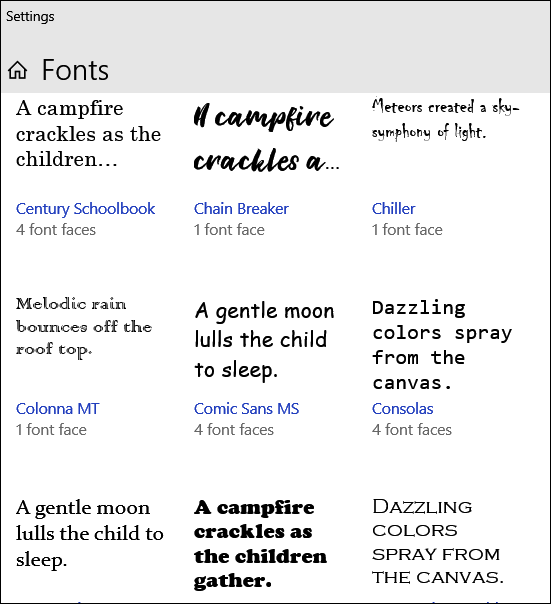
Above: Fonts displayed in Windows 10.
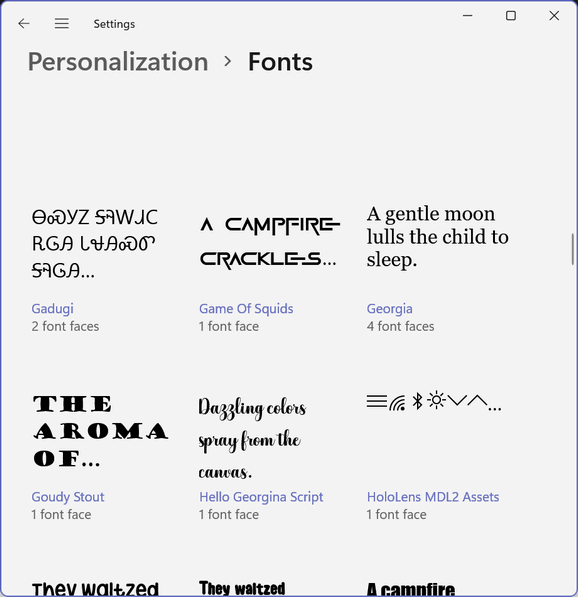
Above: Fonts in Windows 11. Notice the top-row disappears as you scroll
down. Obviously, a bug in Windows 11.
Installing fonts on Windows 10 or Windows 11 is a snap. The biggest challenge with installing fonts in Windows 10 and Windows 11 is finding good free fonts from above-board sites that don’t bundle malware or other software with the fonts.
Here are three free fonts sites we have tested and found all 3 to be free of trickery.
DaFont
https://www.dafont.com/
Thousands of fonts, easy to download. Fonts come in a zip file with nothing inside but the fonts, and sometimes a “readme” text tile and/or a graphic of the font. No malware. No tricks.
Google Fonts
https://fonts.google.com/
Google Fonts is a great site. Thousands of fonts. However, downloading fonts from Google takes some getting used to. Persevere and you’ll find some great fonts to download from Google – and Google Fonts is one of the only where all fonts are free for home or commercial use.
FontSpace
https://www.fontspace.com/
There’s a very nice search feature on this site to help you find a font by name. Fonts are in zip files. They’re easy to download. All fonts here are free, but most are free for home (personal) use only.
Moving right along. Finding good free fonts is the hard part… trying to find a good free font site and browsing through all the fonts can be time-consuming. But if you love fonts, that can be a labor of love.
Now for the easy part. Installing fonts on Windows 10 and Windows 11.
We downloaded a font in a zip file from DaFont. Then we unzipped the file and double-clicked on the font file.
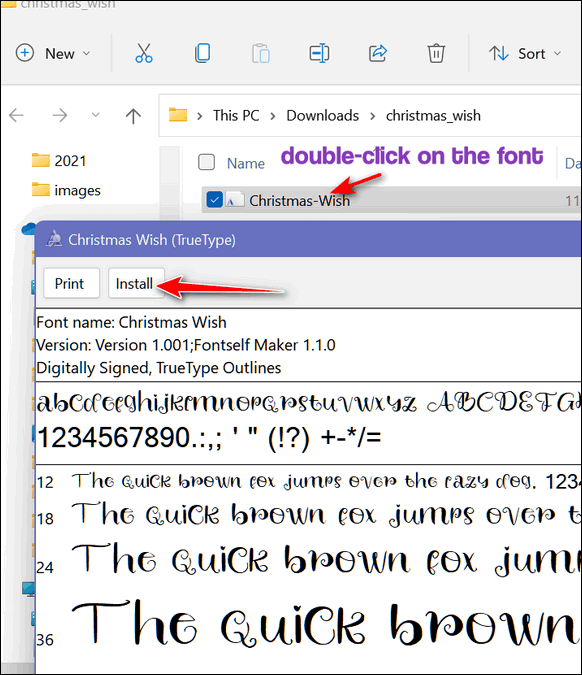
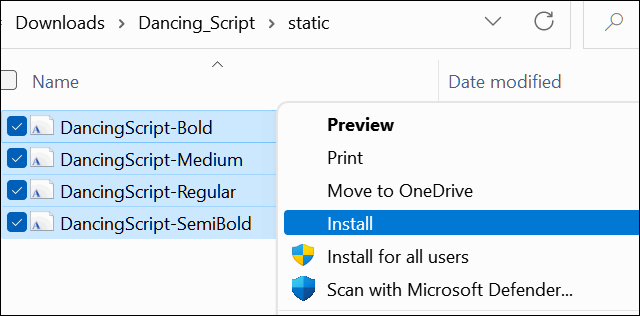
Or if you choose you can install multiple fonts all at one time by selecting them all and choosing “Install” or “Install for all users”. From the right-click menu. In Windows 11, when you right-click the font file(s) you get the truncated Windows 11 context menu, you’ll have to click “Show more options” to get the full context menu…
For this post, I’ve chosen a Christmas font (Christmas Wish from Dafont.com). I downloaded it and installed and I can view it in Settings > Personalization > Fonts…
You can search for the font you downloaded or any font you have installed. Also, note that you can drag and drop fonts here to install them.
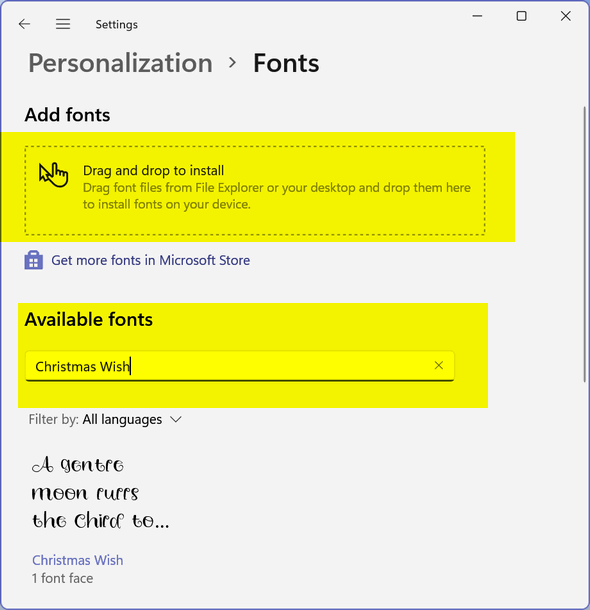
Once you find your new font, you can see what it (or any font) looks like by typing a word or sentence in the text box and using the slider to make the font larger or smaller. In Windows 11 you need to click on the font preview to open the preview text box and font-size slider.
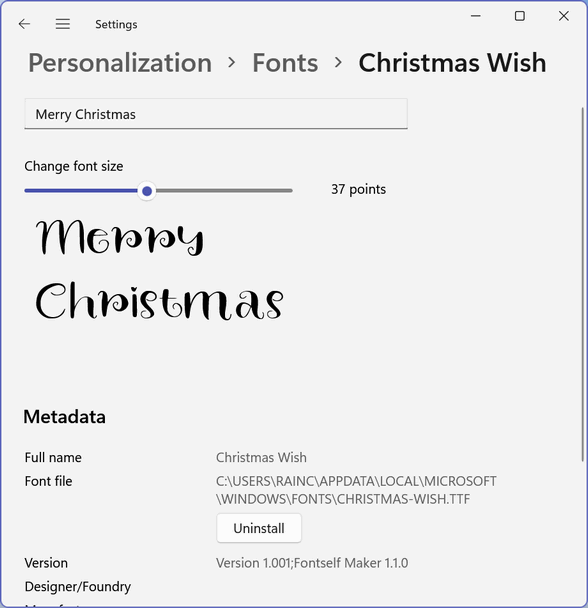
In Windows 10 the font, preview text box, and slider are all on the same page.
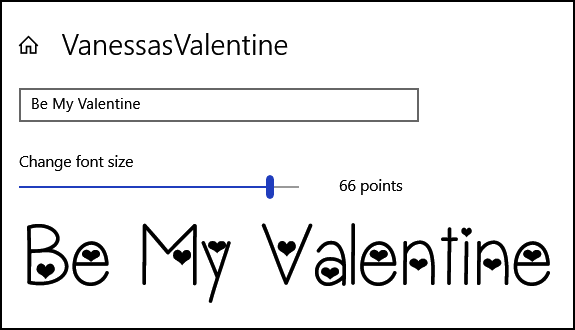
Using your new font. The fun stuff!
Once you’ve installed a new font, you can use it in any application that allows you to select fonts. Here, I’m using my new “Christmas Wish” font in my very old version of PaintShop Pro, on Windows 11. Ain’t it pretty?

Now you know all about downloading, installing, previewing, and using fonts on Windows 10 or Windows 11.
Have fun!
![]()
Windows has World Clocks, Alarms,
Timers, Stopwatches, and More!
Windows 10 and Windows 11
Did you know that Windows 10 and Windows 11 have timers, stopwatches, world clocks, alarms, and more? Both Windows 10 and Windows 11 have similar features. If you’re using Windows 10, you can learn more about these features by reviewing our post here.
If you’re using Windows 11 or will be soon, we’re going to show you how to use the Clock app in Windows 11. Type CLOCK in taskbar search and press Enter when you see the Clock app appear. You can also find the Clock app on the Windows 11 Start menu – under “C”.
When the Clock app opens, you’ll see “Welcome to focus sessions”. But don’t let this deter you. Not many of us will use “focus sessions” but maybe we should. If you don’t know what focus sessions are Microsoft defines a focus session as…
Achieve your goals and get more done with focus sessions. Tell us how much time you have, and we’ll set up the rest. After each period, you’ll get a short break. This will help you recharge and get you ready for your next task.
If that sounds like something you need, go for it, if not, don’t be deterred when the Clock app opens with “focus sessions” displayed. Why does Microsoft love to confuse people?
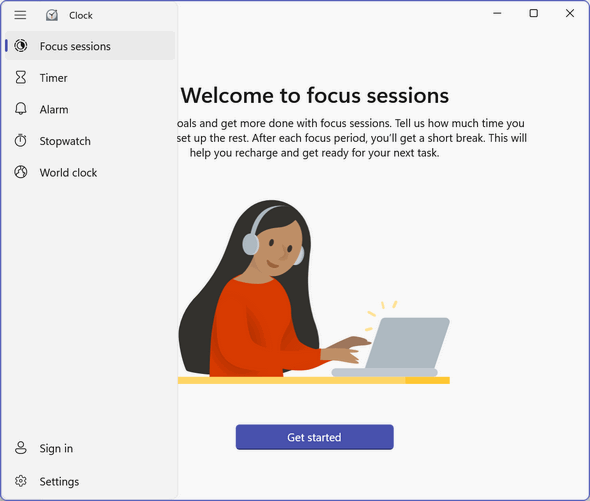
Let’s move on with the more useful things that the Clock app brings.
Timers
Represented quaintly by the hourglass icon, the Timers section of the Clock app allows you to set up as many timers as you need. I’m sure I don’t need to tell you why timers would come in handy, but if you want to make me a blueberry pie, you might find a timer useful and I’d be so grateful. Windows 11 shows eight timers by default. Just click on a timer and you can set it for any time from 99 hours, 59 minutes. and 59 seconds to one second. I can’t imagine using a timer to count off one second. Nuclear research?
Anyway, you can create as many timers as your little heart desires for whatever amount of time -within the aforementioned limits.
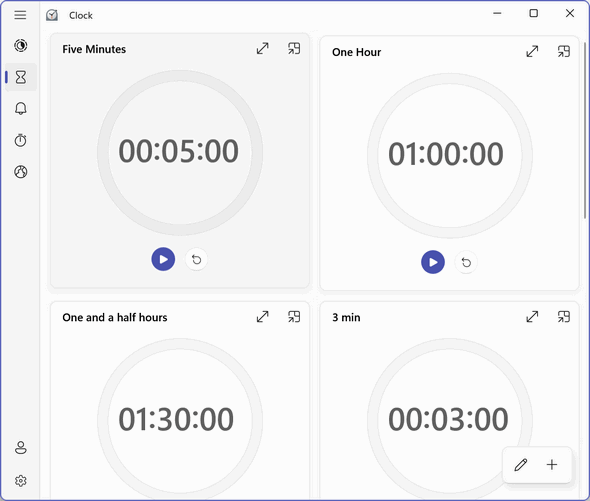
Alarms
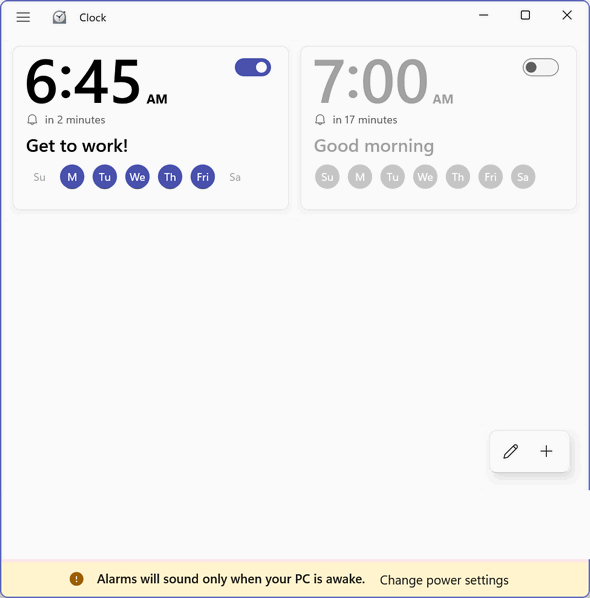
How many alarms do you want? The Clock app in Windows 11 will alarm you. The alarm part of the clock app is represented by a bell icon. The Alarms app shows two alarms by default but allows you to set as many alarms as you need. you can name each alarm, choose a sound for each alarm, and even choose a snooze interval time. How alarming!
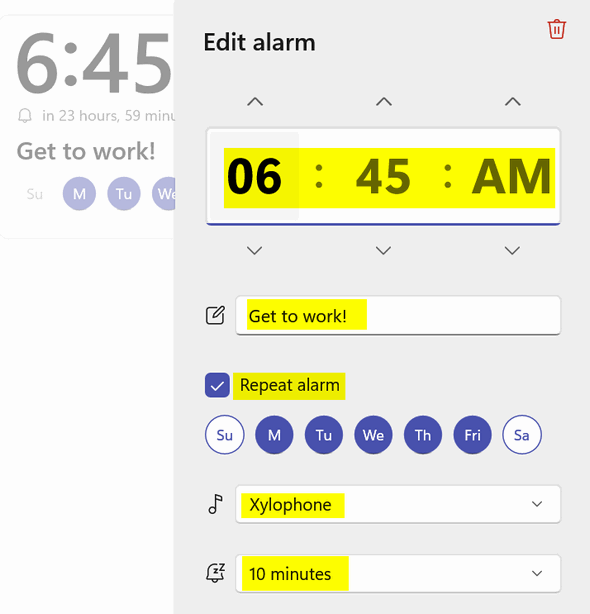
Because I’m fascinated with these alarms, I want to show you that you really can name the alarm to whatever tickles you, as well as change the alarm’s sound and snooze interval, and choose the days of the week you want the alarm to sound. You can even ditch the whole thing by clicking on the red garbage can.
Stopwatch
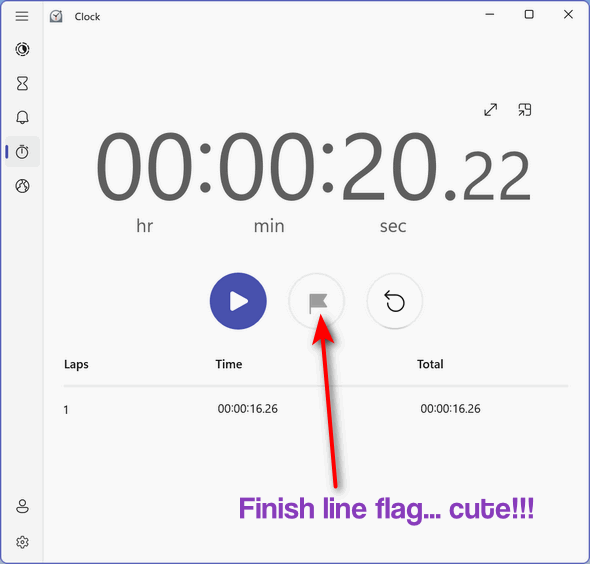
Who doesn’t know what a stopwatch is or what it does? Everybody knows that. So, other than showing you that the Windows 11 Clock app has a stopwatch, what else would you like to know?
It’s amusing in a way because it counts “Laps” – not laps you sit on, but laps you run. Now I can’t imagine running laps with a laptop – although that would give LAPtops a whole new meaning!
World Clocks
Represented by a really poorly drawn “world” icon (you have to squint to even make out what it is), the world clocks part of the Clock app is quite useful. Who among you is old enough to remember in the days in television’s infancy when all the newscasts showed like fifty clocks behind the news anchor showing what time it was in every part of the world from the North Pole to Timbuktu…even Casablanca!
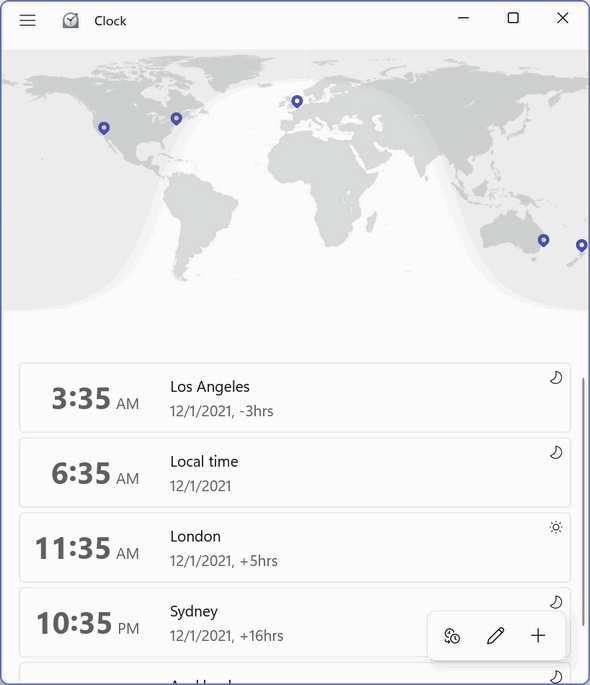
You don’t need Walter Cronkite or Huntley & Brinkley to return to the tube to see what time it is anywhere in the world. Nope! You only need the Windows 11 Clock app. For hidden behind that poorly-drawn globe icon is a world map. And if you click the plus sign near the bottom you can add any city on this planet. Select as many cities as you like and you’ll instantly know what time it is anywhere in the world.
As you can see below, I’m keeping tabs on my friends in Los Angeles, Sydney, Auckland, and London. Hello friends!
But if I had friends in Casablanca or Timbuktu, I could keep tabs on them too! Here’s looking at you, kid!
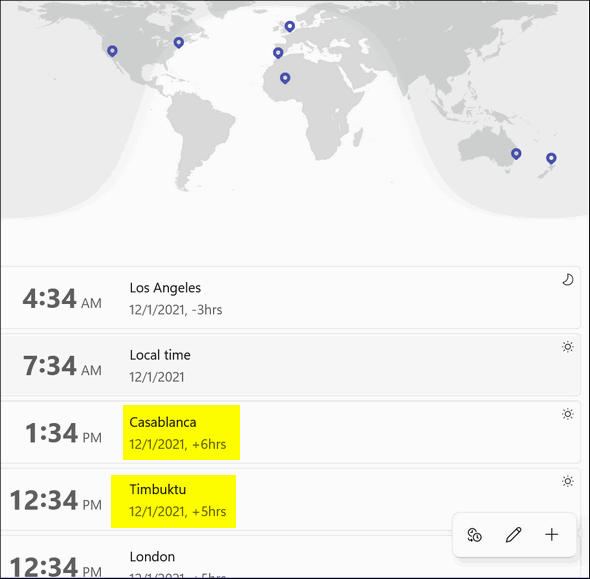
This review, I think, should give you a reasonable overview of what you can do with the Windows 11 Clock app. If not, I’ve failed.
And if you’re using Windows 10 and you, unfortunately, slogged through this whole article looking for info on Windows 10’s Clock app, you’ll find that article here.
How to Make Your Own
Screensaver on Windows 10
Windows 10 (all currently supported versions)
This tip was inspired by a question I was asked during a support session.
Until yesterday I hadn’t given any thought to making screensavers on Windows 10 using pictures already on my computer. And I sure didn’t realize how easy it was to do. If you’d like to make a custom screensaver using your personal photos, or any photos on your computer, follow me., and I’ll show you how.
Step #1. This is a step you won’t appreciate now, but you will later. By default, Windows 10 will use whatever photos you have in your Pictures folder. But it won’t use the pictures in any subfolders in your Pictures folder. But you can choose any folder you want, so here’s what I recommend that you do first.
Make a folder in your Pictures folder called “MyScreenSaver” or whatever tickles your fancy – as long as you know what it is. Then copy all of the photos you want to appear in your screensaver to that folder. Our “Copy to / Move to” tip works great for this. Once you copy all the pictures you want in your screensaver to the folder you created, move on to…
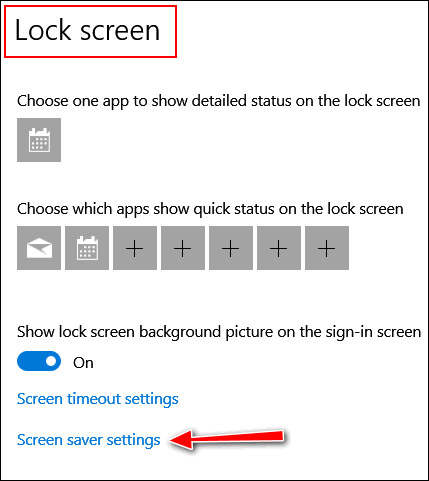
Step #2. Now with all the photos copied to the folder you created for your screensaver, right-click on an empty area of your desktop and choose “Personalize”. In “Personalization” click on “Lock screen” (it’s in the menu on the left). Scroll down until you see “Screen saver settings”.
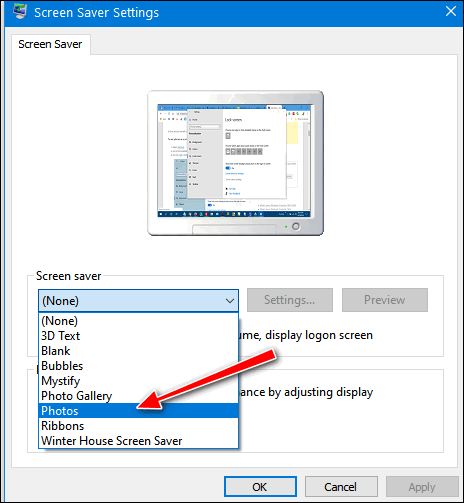
Step #3. When Screen saver settings opens, use the down-arrow to display a drop-down menu. Choose “Photos” from the list.
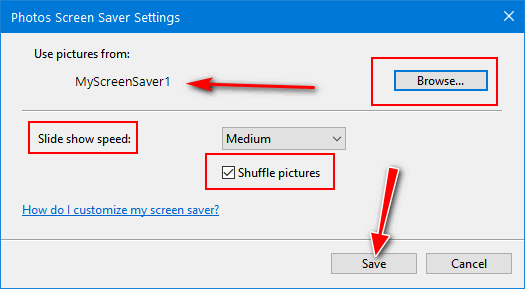
When you choose “Photos” you’ll see this dialog:
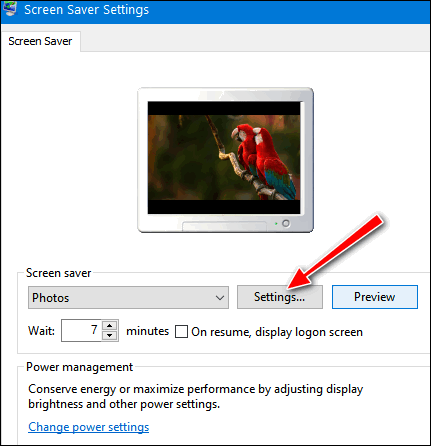
Your “Pictures” folder will be the default folder. Click "Browse” and browse to the folder that contains the pictures you want to use for your screensaver.
I created a folder called MyScreenSaver1. After you select the folder you want to use, you can choose how quickly you want the images in your screensaver to change… slow, medium, or fast. And if you check the box next to “Shuffle pictures”, Windows will display your pictures in random order.
Once you have every set, click “Save”.
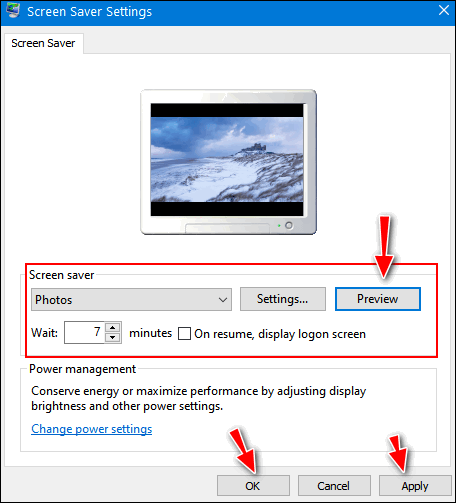
Step #4. It’s time to preview your screensaver and make sure it looks the way you want it. If the pictures are changing too rapidly or too slowly for you, just click “Settings” and go back and change the speed.
Once everything is the way you want it, click “Apply” and “OK”.
Now you know how to make a screensaver with any photos you have on your computer.
![]()
Want more tips, tricks, and information?
We have thousands of Windows tips, tricks, and more on our InfoAve website.
Subscribe to our free InfoAve Daily newsletter.![]()

Now available: Reg Organizer 8.80
If you purchased or renewed Reg Organizer through Cloudeight within
the last 12 months, you're entitled to a free version upgrade to Reg
Organizer 8.76.
Save $14 on
Reg Organizer right now!
Reg Organizer
- A Swiss Army Knife of Windows Tools - Works Great on Windows 10!
![]()
800+ Free Christmas Wallpapers & Christmas Images Since Christmas is fast approaching, we deemed it a great time to look for some
free desktop wallpaper to use to spruce up our desktops for Christmas – as well
as the holiday season. Our site pick today claims to have over 800 Christmastime
wallpapers and other images you can use for your holiday projects. Far be it for
us to tell you how to the other images and graphics for holiday projects.
But one thing we can tell you is all the images are free – unless you click on the
images that are labeled “i-Stock”. Those are not free. So, before writing to me
and telling me that all of these images are not free, make sure you’re not
clicking on i-Stock which are ads disguised as non-ads. If you know what I mean. Let’s move on to the fun stuff, shall we? All of the images you see on this page are free and from our site pick pixabay
who tells me they have “800+ Free Christmas Wallpapers & Christmas Images”.
Well, that’s what they say. I did not view all 800+ Christmas Wallpapers &
Christmas Images”, but I spend a long time on the site browsing through, let’s
say 287 of them. And I liked what I saw. I downloaded a dozen or so images and
resized a few so you could get a glimpse of what awaits you. Let’s take a look at some free Christmas wallpaper from pixabay! By now you have a pretty good idea of what you’ll find when you visit our site
pick. If you don’t have a good idea of what you'll find by now, you should lay
off that spiked egg nog! Are you ready to grab some free Christmas wallpaper and Christmas images for
your holiday projects?
Visit pixabay’s free Christmas Wallpaper and Christmas Images website right now. And speaking of Christmas projects, we used a Christmas image from pixabay to
wish you all a very MERRY CHRISTMAS!
The Best Computer
Care and Repair - Anywhere! We can fix your computer while you watch. You never have to leave
your home. Just sit back, relax, and watch us work.
Get PC service
from folks you trust at the best prices you'll find anywhere.
The Keepers of Christmas
Read the rest of this
Christmas essay here.
Cloudeight Stationery works great with OE Classic!
Sales of the following products and services help support our newsletters, websites, and free computer help services we provide.
SeniorPass - One year of Cloudeight Direct Computer Care - unlimited sessions!
Get more information here.
Windows 10 Customization: Make Windows 10 look and work the way you want it to. Learn more.
MORE IMPORTANT STUFF! Your
InfoAve Weekly Members' Home Page is located here.
Print our Cloudeight Direct Computer Care Flyer and spread the word about our Cloudeight Direct Computer Care repair services. Get our ready-to-print flyer here. Help us Grow! Forward this email newsletter to a friend or family member - and have them
sign-up for InfoAve
Weekly here!
Get our free daily newsletter! Each evening we send a short newsletter with a tip or trick or a computer-related article - it's short and sweet - and free.
Sign-up right now.
We have thousands of Windows tips and tricks and computer articles posted on our
Cloudeight InfoAve website. Our site has a great search engine to help you find what you're looking for too!
Please visit us today!
Help us by using our Start Page. It costs nothing, and it helps us a lot. Print our Cloudeight Direct Flyer and spread the word about our computer repair service! If you want to help us by telling your friends about our Cloudeight Direct Computer Care service, you can download a printable flyer you can hand out or post on bulletin boards, etc.
Get the printable PDF Cloudeight Direct Computer Care flyer here.


![]()

![]()

It’s a wintry mix kind of day. The sky is obscured with an unending
blanket of gray that will never brighten and yield to an increasingly
earlier sunset and only to be swallowed up by the long winter darkness.
It’s always windy this time of year, and that makes the dead cold of
winter even more foreboding. The winter solstice has yet to come yet
winter surrounds me. The once vibrant trees which were bursting with
life just a few weeks ago, now stand brittle, dull, creaking skeletons
swaying under the mournful gray of nature’s sky-canvas. That canvas will
stay with us until spring decides to appear from the barren frozen
ground.
Christmas is less than three weeks away. And, of course, some still
refuse to call it Christmas — as if saying the word somehow entangles
them in some kind of religious denomination or organization.
Christmas is not “Happy Holidays”, it’s Christmas. If someone does not
want to call it “Christmas” they should not be taking time off work,
exchanging gifts, or celebrating… no one will force them to. But, of
course, they will anyway. Christmas doesn’t exist to them, but they will
be hypocrites and celebrate what they try so hard to deny.
Many of those who shun Christmas will still be glowing in the revelry of
a holiday they deny. You’ll see them putting up Christmas trees,
shopping for gifts, and knocking back a drink or two… and celebrating
what they so publicly love to deny.
I’m tired of politics. I’m tired of hypocrites. I’m tired of deniers and
liars and “influencers”. I just want Christmas to be the way it always
was...![]()

What is a watering hole attack?
A watering hole attack is a security exploit in which the attacker seeks
to compromise a specific group of end users by infecting websites that
members of the group are known to visit. The goal is to infect a
targeted user's computer and gain access to the network at the target's
workplace.
The term watering hole attack comes from hunting. Rather than tracking
its prey over a long distance, the hunter instead determines where the
prey is likely to go, most commonly to a body of water -- the watering
hole -- and the hunter waits there. When the prey comes of its own will,
often with its guard down, the hunter attacks.
The target victim can be an individual, an organization or a group of
people. The attacker profiles its targets -- typically, employees of
large enterprises, human rights organizations, religious groups or
government offices -- to determine the type of websites they frequent.
These are often messaging boards or general interest sites popular with
the intended target...
From TechTarget
![]()

Our newest Cloudeight Endorsed Email Program - Very Similar to Windows
Mail & Outlook Express.
Read more about OE Classic here!
![]()

Cloudeight Direct Computer Care: Single Keys, SeniorPass, or Season Tickets - always a great deal. Cloudeight Direct Computer Care is like having PC insurance. Get more information here.
Emsisoft Anti-Malware: Emsisoft is the only Cloudeight endorsed and recommended Windows security program. It provides users with a complete antivirus, antimalware, anti-ransomware, anti-PUPs solution. We offer single Emsisoft licenses and multi-computer licenses at discount prices. Also, we offer our exclusive Emsisoft with Cloudeight installation & setup. Get more information here.
OE Classic Email program.
The email program that is most like Outlook Express. We can even set
it up for you.
Get more details here.
Reg Organizer: Reg Organizer is the Swiss Army Knife of Windows tools. It's far more than just a registry optimizer and cleaner... it's a Windows all-in-one toolkit. Reg Organizer helps you keep your computer in tip-top shape and helps you solve annoying Windows problems. Reg Organizer works great with Windows 10! Get more information about Reg Organizer (and get our special discount prices) here.
We'd love to hear from you!
If you have comments, questions, a tip, trick, a freeware pick, or just want to tell us off for something, let us know.
If you need to change your newsletter subscription address, please see "Manage your subscription" at the very bottom of your newsletter.
We received hundreds of questions for possible use in IA news. Please keep in mind we cannot answer all general computer questions. We try to personally answer as many as we can. We can only use a few
in each week's newsletter, so keep this in mind. If you have a support question about a service or product we sell, please contact us here.
Subscribe to our Daily Newsletter! Get computer tips & tricks every night. Our daily newsletter features a computer tip/trick or two every day. We send it out every night around 9 PM Eastern Time (USA). It's short and sweet, easy-to-read, and FREE.
Subscribe to our Cloudeight InfoAve Daily Newsletter!

We hope you have enjoyed this issue of Cloudeight InfoAve
Weekly. Thanks so much for your support and for being an InfoAve Weekly subscriber.
Have a great weekend... be safe!
Merry Christmas!
Your friends at Cloudeight,
Darcy and TC
Cloudeight InfoAve Weekly - Issue #948
Volume 19 Number
6
December 10, 2021
Not a subscriber? Subscribe to our FREE Cloudeight InfoAve
Weekly Newsletter here.

"Cloudeight InfoAve
Weekly" newsletter is published by:
Cloudeight Internet LLC
PO Box 73
Middleville, Michigan USA 49333-0073
Read our disclaimer about the tips, tricks, answers, site picks, and freeware picks featured in this newsletter.
Copyright ©2021 by Cloudeight Internet

