
Cloudeight InfoAve Weekly
Issue #1019
Volume 20 Number 25
April 21, 2023
Dear Friends,
Welcome to Cloudeight InfoAve Weekly Issue #1019. Thank you very much for subscribing and for being a part of our Cloudeight family. We appreciate your friendship and support very much! Please share our newsletters and our website with your friends and family.
If you're not getting our InfoAve Daily newsletter, you're missing out on a lot of good stuff!
It's free and it only takes a few seconds to sign up. We'd love to have you with us. Visit this page to sign up for our Cloudeight InfoAve Daily Newsletter.
![]()

Make a donation today and help us keep on helping you!
Our Spring Donation Drive Has Begun!
Four times a year we have donation drives. We hope that you will continue to help us keep helping you. Today, we are beginning our spring donation drive.
Any donation, large or small is appreciated.
If you can help us during our spring donation drive, we would really appreciate it. If not, we understand and we’ll be here for you to help you with your computer questions and problems. You’ll always get our best, no matter what.
Read more about our Spring Donation Drive here.
THANK YOU SO MUCH!
![]()

Donna wants to know if she can use
Windows Photo Gallery on Windows 10
I am using Windows 10. Is there a way I can use Windows 7 Photo Gallery
instead of the Windows 10 Photo app? Thanks so much for all the help and
info you people provide. You're the best. Donna
Our answer
Hi Donna. Thanks so much. Just about four years ago, we published an
article showing how to install Photo Gallery & Movie Maker on Windows
10. Because it's been so long, I went back and checked the laptop I
installed them on - which is now running the latest version of Windows
10 and on another PC running Windows 11. And I'm happy to say Photo
Gallery and Movie Maker both worked well.
We have not gotten around to updating the article, but the download link and the instructions are still good. You can read our article here. We show you, in detail, how to download and install Windows Photo Gallery & Movie Maker on Windows 10 or Windows 11. You can see from the screenshot below that Photo Gallery works well on Windows 11 and it works just as well on Windows 10.
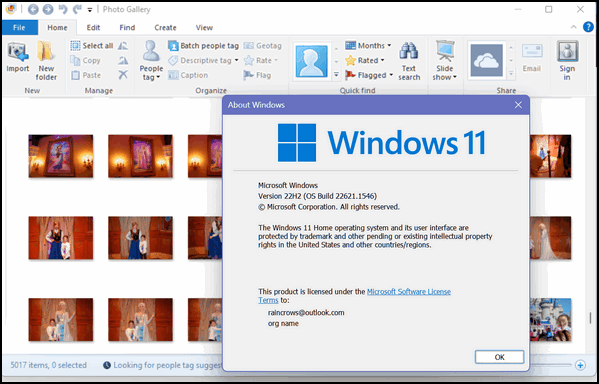
Again, Donna, thanks so much for your kind comments and your support.
![]()
Janet wants to change the name of the
administrator account on her computer
My son got a new computer with Windows 11 on it and he gave me his
Windows 10 computer. I really like it. But now my question is this. How
do I change the administrator account name? Also, I'm using Thunderbird.
How can I change it? I am having trouble changing this computer to my
liking. I really like your newsletters and your website. They have
helped me so much. Thank you.
Our answer
Hi Janet. Thanks! Here is how to the change administrator account name
on Windows 10 using the Control Panel.
1. Type Control Panel into the Taskbar search
2. Then click Open or press enter when you see Control Panel
3. Under User Accounts, click on Change Account type
4. Select the account you want to rename.
5. Click on Change the account name.
6. Type the new user account name in the box.
Keep in mind when you look in C:\users\ you'll see the old name (whatever name he used) will be there but as far as logging in and the account name you see, it will be whatever you named it. Everything else will remain the same (including Thunderbird). You may need to add your account to Thunderbird if your son set it up. But that's easy to do and it's also easy to delete other accounts from it too. Thunderbird won't be affected by the administrator account name change - as the actual account name in C:\Users will not change.
Another thing you can do, if you want to, is creating a new administrator account with your name and sign-in information and once you get everything set up the way you want it, you can delete your son's account. Go to Settings > Accounts > Email & Accounts > Add account. You can choose to add a Microsoft account or a local account and give that account administrator privileges.
If you want, you can even change the password or PIN if you think it's necessary. If you need to do that, let us know.
We hope this helps you, Janet.
----------
Janet wrote back: "Thanks so much for your help. I created a new
account of my own and deleted my son's account. I couldn't have done
this without you!"
![]()
Rose wants to know if she should
update her computer
Should I allow the Windows KB5025221 update to install or are there
problems with it? Thank you, thank you for all your help over many
years! Rose.
Our answer
Hi Rose. KB5025221 is a cumulative update for Windows 10 that was
released on April 11, 2023. It addresses security issues for your
Windows 10 computer and also contains several bug fixes. This update is
part of the April 2023 cumulative updates for Windows 10. It adds no new
features to Windows 10 and is not a version update. Since this is
primarily a security update, you should install it soon. We hope this
helps you, Rose.
![]()
Richard has a question about email
privacy
I have a question for you. You caution computer users about
showing/displaying their email addresses. Is there an app or a Google
extension that would do this….though I would think it is not a good idea
as transmitted emails sometimes need recipient address information.
Perhaps it could be a “tutorial” for people who use email. When to hide
an email address and why one would consider doing so?
Our answer
We don’t caution users about showing their email addresses when
necessary (for instance, online orders, newsletter subscriptions,
writing for help or support, etc.) We caution users from showing their
email addresses on social media sites like Facebook, Instagram, and
Twitter, as well as on public forums. In other words, never put your
email address in a post or tweet where others can easily access it.
There is no magic program to prevent people from putting their email addresses on public display. The only option would be to use a throwaway email address when you sign up for things or request help or support, but you still wouldn’t want to publish it on social media or public forums.
Throw-away email addresses can be used in place of your real email address any time you want. Each throw-away mail service has its advantages & disadvantages. Here are 6 sites from which you can get and use a throw-away email address – and these are in no particular order.
EmailOnDeck
Mailinator
ThrowAwayMail
Maildrop
FakeMail
GishPuppy
We hope this helps you, Richard.
![]()
Don't have a Cloudeight SeniorPass? It's a great deal. Learn more here.
Our Cloudeight SeniorPass is a great deal. You get unlimited support for one full year from the date you first use your SeniorPass. We can help keep your computer running well, fix all kinds of computer problems, clean up malware, and a whole lot more. Our SeniorPass is like having insurance for your computer. And it's only $99 for an entire year.Get your SeniorPass today for just $99. It's just like having insurance for your computer - only better!
To learn more about our SeniorPass, please see this page.
Sandy says Microsoft got into her
computer and changed her passwords
I turned my computer on after being gone all day and I come to find out
Microsoft changed all my passwords. I couldn't get into any of my Gmail
accounts. I had a doozy of a time trying to change all of them. How can
they do that?
Our answer
Hi Sandy. Microsoft would not arbitrarily change your passwords - it
would result in billions of dollars worth of class-action lawsuits and
perhaps criminal charges.
I have no idea what happened but we can assure you it was not Microsoft. It almost sounds like you were scammed by someone pretending to be Microsoft - it happens more than anyone realizes.
You should use a good password manager to generate, store, and protect your passwords. There are several good free password managers out there -including Bitwarden, LastPass, and RoboForm. All of those also offer inexpensive paid versions with more features.
We hope this helps you in some way, Sandy.
![]()
Jay says CalendarPal lost his
appointments and wants us to recommend a new calendar app
CalendarPal suddenly lost all my appointments. Is there another (free)
calendar that you can recommend for use on my Windows desktop computer?
Our answer
Hi Jay. We're sorry to hear you've had problems with CalendarPal. But
you'll be happy to know that you have a really nice calendar app on
Windows 11 already. Type CALENDAR in the taskbar search. Press Enter
when you see Calendar App appear. You can sign into the calendar using
your Hotmail.com address. To make it even more convenient, when the
calendar is open, right-click on its icon in the taskbar and choose "Pin
to taskbar". That way, all you have to do is click the taskbar icon to
open the calendar.
Here's an article we wrote about the Windows Calendar App.
We hope this helps you, Jay.
![]()
Leslie asks about Windows Screen
Recorder
Hi, Darcy & TC. Someone told me that Windows has a built-in screen
recorder that will capture your clicks as a series of screenshots. Does
Windows 11 have that? And if so, where is it? Thanks, Leslie.
Our answer
Hi Leslie. Both Windows 10 and Windows 11 come with a built-in screen
recorder that you can use to capture your screen activities including
onscreen clicks.
Here are the steps to use the screen recorder in Windows 10 or Windows 11:
Open the app or screen that you want to record.
Press the Windows + G keys on your keyboard to open the Xbox Game Bar.
If prompted, select "Yes, this is a game" to proceed.
Click on the "Capture" icon in the Game Bar menu, or press the Windows + Alt + R keys on your keyboard to start recording. The recording will start after a 3-second countdown.
You can click the red "Stop" button in the Game Bar menu or press the Windows + Alt + R keys again to stop recording.
Your recorded video will be automatically saved in the "Captures" folder by default. The Captures folder is located in your Videos folder.
Note: If you don't see the Game Bar, make sure it's enabled by going to Settings > Gaming > Xbox Game Bar and turning on the "Record game clips, screenshots, and broadcast using Xbox Game Bar" option.
Also, you can customize the screen recorder by going to Settings > Gaming > Captures and selecting your preferred options for recording, audio, and video quality.
We hope this helps you, Leslie.
![]()

Make a donation today and help us keep on helping you!
Our Spring Donation Drive Has Begun!
Four times a year we have donation drives. We hope that you will continue to help us keep helping you. Today, we are beginning our spring donation drive.
Any donation, large or small is appreciated.
If you can help us during our spring donation drive, we would really appreciate it. If not, we understand and we’ll be here for you to help you with your computer questions and problems. You’ll always get our best, no matter what.
Read more about our Spring Donation Drive here.
THANK YOU SO MUCH!
![]()

How to Clean Up Your Messy Desktop
This tip has been revised and updated for Windows 10 and Windows 11.
Are you one of those fine folks who have a beautiful desktop background with dozens and dozens of desktop icons and shortcuts cluttering up your view?
There’s a cure for messy desktops, you know. And you won’t lose any of your desktop icons or shortcuts. Impossible you say? Nope! We’re going to show you how to clean up desktop clutter without removing a single desktop icon or shortcut.
Messy Desktop > Windows 10
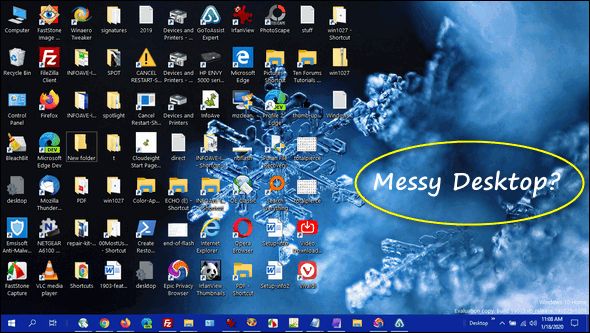
The cure for your messy Windows 10 desktop.
a.) Right-click on an empty area on your desktop.
b.) Click “View”.
c.) Uncheck “Show desktop icons”.
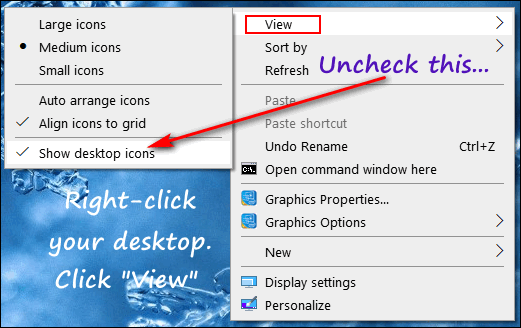
The uncluttered desktop. Look ma! I can see my desktop wallpaper!

Getting your shortcuts and desktop icons back… sort of.
a.) Right-click on your taskbar.
b.) Click “Toolbars”
c.) Select “Desktop”
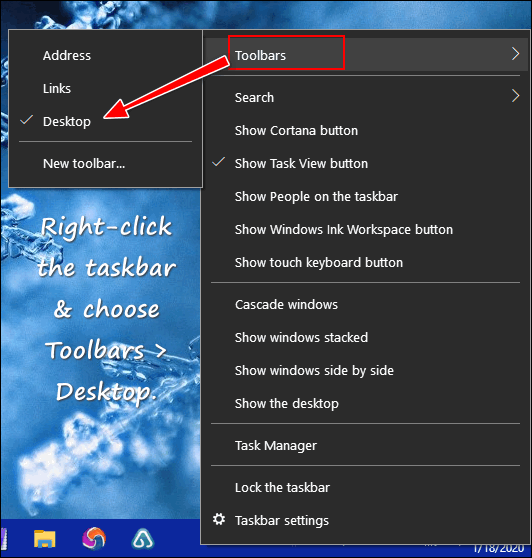
All of your desktop icons and shortcuts are back– but not on your desktop.
That’s right, every desktop icon and shortcut that was on your desktop is now available in a toolbar. Click on your new desktop toolbar icon (double right arrows).

And voila! There are all your desktop shortcuts and icons in a list.

Messy Desktop > Windows 11

The cure for your messy Windows 11 desktop.
a.) Right-click on an empty area on your desktop.
b.) Click “View”.
c.) Uncheck “Show desktop icons”.

And wow! Look at that beautiful clean desktop!

Unfortunately, unlike Windows 10, Windows 11 does not allow you to create a desktop toolbar, so to see the icons/shortcuts on your desktop – you’ll need to open File Explorer (Windows key + E) and click on “Desktop”. Your desktop is nothing but a folder, you know – a Windows system folder.

And whether you’re using Windows 10 or Windows 11…
And should you ever want your messy desktop back again… no problem! Right-click an empty area of your desktop, click “View” and then check “Show desktop icons”. Your messy desktop is back again, just like you left it.
![]()
How to Pin Tabs in Your Favorite
Browser and Save Space
Windows 10 and Windows 11 - Chrome, Edge, Firefox and most other
browsers
If you’re like us, you visit a lot of websites when you’re browsing the Web. And sometimes you like to go back and forth between the sites you’ve visited. But after a while, you have so many tabs open at the top of your browser you can’t tell which page is which.
Did you know you can pin tabs in all modern browsers and save a lot of real estate in your browser? When you pin a tab it reduces the size of the tab, yet makes it easy to tell what each tab is. You can open a lot of tabs in a fraction of the space compared to using full-sized tabs.
The next time you find yourself browsing the Web with a ton of browser tabs open, this tip will save you space and maybe even some time. And you’ll be glad to know that pinning tabs works virtually the same in most modern browsers.
The screenshot below was taken in Firefox, but pinning tabs works the same in Chrome, Edge and other modern browsers. You can see I have 9 tabs open, but 8 of them are pinned.
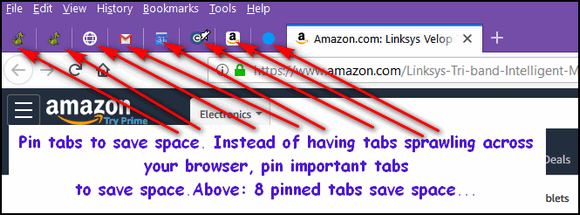
Look how much space all those open tabs (above) would take if they were not pinned.

If you’re worried you won’t be able to tell what page is what if the tabs are pinned, don’t worry, be happy. It’s easy. Just hover over the pinned tab and you’ll get a full description of the pinned page. If you want to open the page, just left-click the pinned tab.
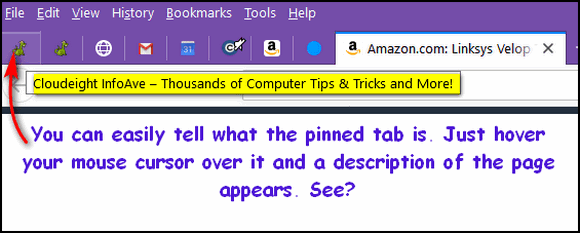
OK. So how hard is it to pin a tab? It’s as easy as pie and a whole lot easier than pi! Right-click the tab you want to pin and choose “Pin Tab” from the dropdown menu which appears when you right-click a tab.

Want to pin more than one tab? No problem. Hold down the CTRL key while you right-click all the tabs you want to pin. In the screenshot below, I pinned all 9 open tabs at one time. See?
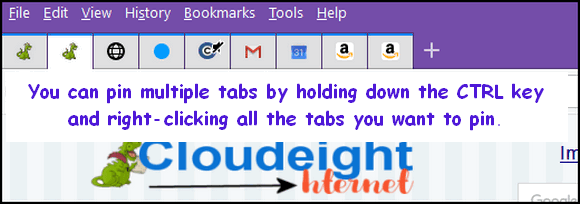
That saved a lot of space, didn’t it?
And what if you don’t want a tab pinned anymore? Just right-click on the pinned tab and select “Unpin Tab” from the dropdown. And if you want to unpin multiple tabs, hold down the CTRL key, right-click on all the tabs you want to pin, and select “Unpin Tabs”.

And finally, feast your eye upon Microsoft Edge. As you can see it works the same way in Edge as it does in Firefox and Chrome. Isn’t it nice they all get along?
Once you pin a tab, it works just like a full-size tab. Left-click it to open the page, right-click and choose “Close tab” if you want to close the tab without opening the page. Or if you want to close multiple pinned tabs just hold down the CTRL key, right-click each tab you want to close, and choose “Close tabs”.
Here’s a bonus tip. You can select multiple tabs and close them all using CTRL+W.
![]()
Four Mouse and Keyboard Tricks for
You
Windows 10 & Windows 11
Here are four seldom-used mouse and keyboard tricks that can save you time.
1. Use your mouse wheel to close a browser tab.
You can do it, yes you can. Most of us use the mouse wheel to scroll pages and other common mouse wheel stuff. But if you press down on your mouse wheel you’ll notice it depresses just a bit. Well, did you know that just a bit is enough to allow you to close a browser tab (among other things)? Try it and see. Position your mouse pointer in the middle of a browser tab and press down on the control wheel. See?
2. Use the Shift key + the right mouse button to extend the Context Menu.
When you right-click on the desktop document icon, you will see a context menu. But did you know there’s another context menu called the extended context menu? To see the extended context menu, n just press and hold the Shift key and then right-click on an icon to open the extended context menu. Here’s an example from Windows 11.
In the screenshot below, on the left, you can see the standard Windows 11 context menu, but by using the Shift key and the right mouse button you can open the extended context menu. See?

3. Use the Shift key to select text.
Most of you know that you can select files and folders by holding the Shift key and clicking on the first and then the last file/folder. But this also applies to selecting text in documents like MS Word docs as well as text files (and Web pages).
All you have to do is click on the first character in the text you want to copy, then hold down the Shift key and point to the last character you want to copy. All the text between the first click and the last click is selected. Now just press CTRL + C to copy the selected text and CTRL+V to paste it wherever you want…like a Word doc, an email, or a text file.
You can practice the tip above right here. Just click on the Y at the beginning of this paragraph, then hold down the Shift key and click on the period at the end of this sentence.

4. Maximize any program window with a double-click.
Instead of fumbling around looking for the maximize button between the – and the X in the top-right corner of most program and file windows, just double-click anywhere on the title bar (or top bar) to maximize or minimize the window.
![]()
The title bar or top bar in Firefox (also referred to as the menu bar.
![]()
The top bar or title bar (Microsoft Edge)
![]()
The top bar or title bar (Google Chrome)
![]()
The title bar (OE Classic)

The title bar (Microsoft Word)
That’s enough, you get the idea. You can maximize or minimize a program window by double-clicking on the title bar, menu bar, or top bar.
Want more tips, tricks, and information?
We have thousands of Windows tips, tricks, and more on our InfoAve website.
Subscribe to our free InfoAve Daily newsletter.![]()

Now available: Reg Organizer 9.1
If you purchased or renewed Reg Organizer through Cloudeight within
the last 12 months, you're entitled to a free version upgrade to Reg
Organizer 9.1. Works great with Windows 10 and Windows 11!
Save $14 on
Reg Organizer right now!
Reg Organizer
- A Swiss Army Knife of Windows Tools - Works Great on Windows 10!
![]()

Bulk Rename Utility – Advanced File Renaming Made Easy
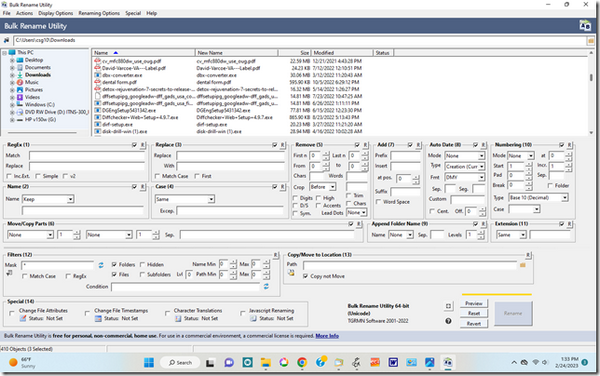
Today, we’re going to discuss renaming files. One thing almost all of us computer users do is rename files. There are many reasons why we all need to rename files, but let’s use an example we can all relate to. Photos. Most of us take photos with a smartphone (or digital camera) and when they’re saved they are given arcane names like 0101142003 or DSC2301. Maybe that works for general everyday pictures, but what about those special pictures like the birth of your grandchild, a special vacation, a wedding, etc.?
You can rename files using nothing more than File Explorer in Windows 10 or Windows 11. And for general file renaming, it works well. Most of us won’t need anything else… See this page for our tutorial.
But some of you want to do advanced file renaming – for example using different prefixes and/or suffixes for files in a folder. Our freeware pick automatically renames photos individually using the EXIF (metadata) that’s included in the coding for all JPG files. You can’t do advanced file renaming with Windows File Explorer. You’re going to need something else.
Several weeks ago, Cynthia wrote to us because she needed a utility to do some advanced file renaming, and asked us for a suggestion. We suggested Easy File Renamer as a good choice for renaming files, but even it would not do the advanced file renaming she needed to do (adding different suffixes and prefixes to files in the same folder). But our suggestion did lead her to a program called “Bulk Rename Utility” which allowed her to do all the complex file renaming she needed to do, including adding different prefixes/suffixes to files in the same folder.
Although we didn’t have any advanced file renaming we needed to do, we did put the program through some tests and barely scratched the surface of what this amazing program can do. Perhaps the most amazing thing about the Bulk Rename Utility is that it is FREE for personal/private use.
Here are some screenshots we took during our test just to show you some of the features the Bulk Rename Utility has…
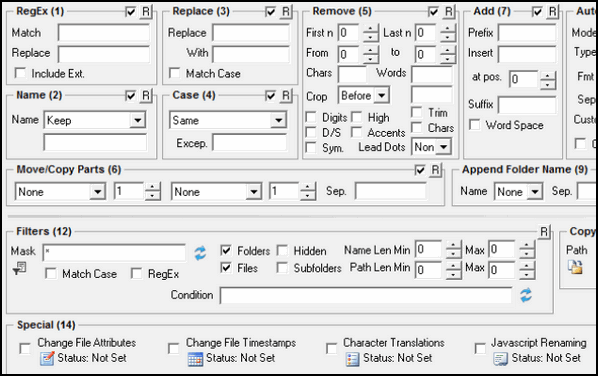
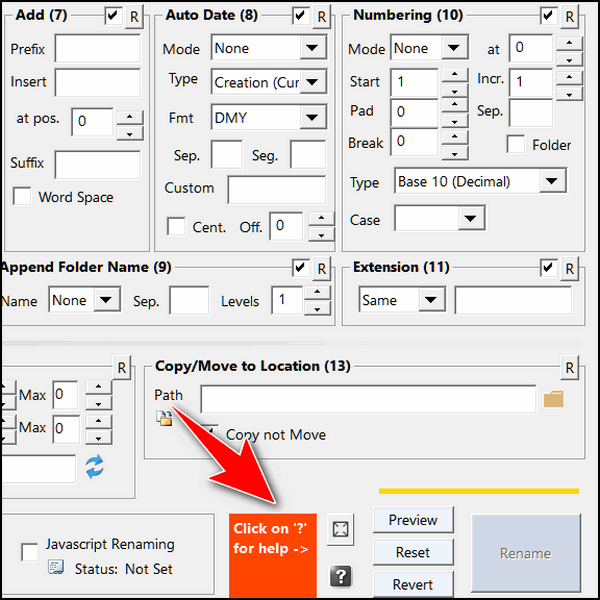
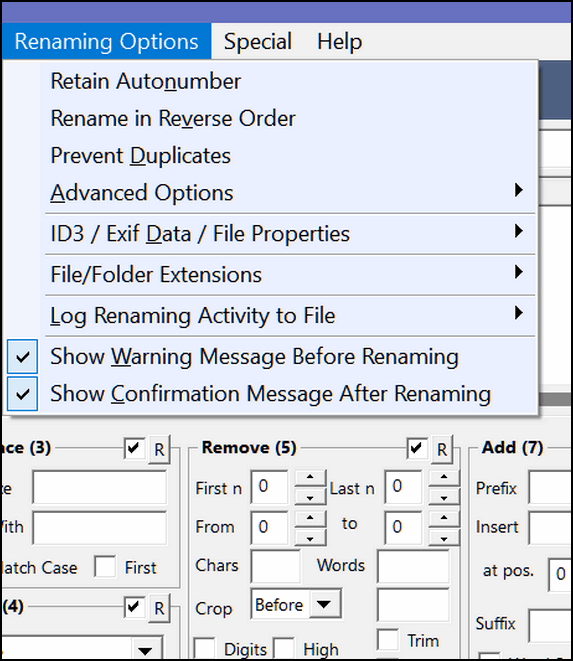
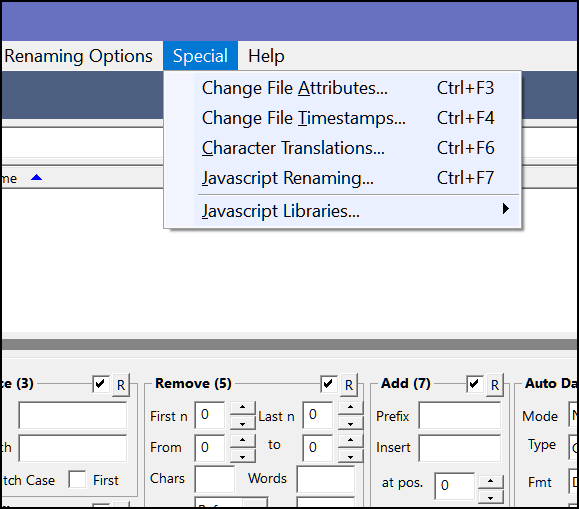
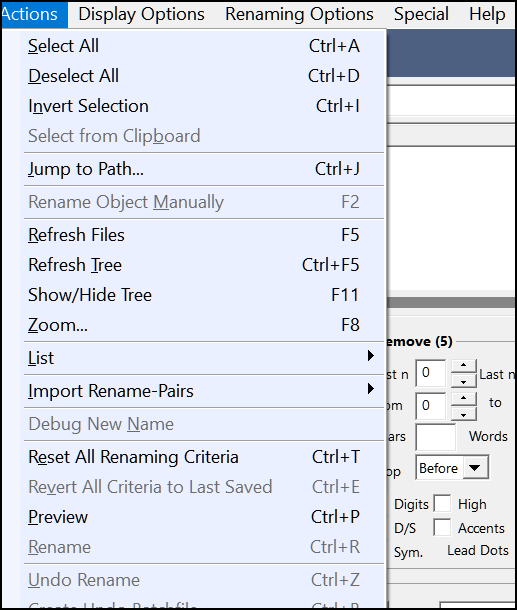
From the screenshots above, you can see many of the features of this program and how many renaming options this program provides. And we’ve barely scratched the surface.
And here come the developers of Bulk Rename Utility to tell you more about this amazing application:
Bulk Rename Utility: file renaming software for Windows.
Bulk Rename Utility is free of charge for personal, private use, at home. To use Bulk Rename Utility within a business entity, company or for commercial purposes, a commercial license is required.
Bulk Rename Utility allows you to easily rename files and entire folders based upon extremely flexible criteria.
Add date/time stamps, replace numbers, insert text, convert case, add auto-numbers, process folders and sub-folders….plus a whole lot more!
Rename multiple files quickly, according to many flexible criteria.
Rename files in many ways: add, replace, insert text into file names. Convert case, add numbers. Remove or change file extensions.Check the detailed preview before renaming.
Rename photos using EXIF metadata (i.e. “Date Picture Taken”, “Resolution” and other information embedded in all JPG photo files) Rename your holiday pictures from a meaningless dsc1790.jpg to NewYork1.jpg in a flash.
Rename MP3 files using ID3 tags (a.k.a. MP3 ID3 tag renaming).
Rename files using Windows File Properties (e.g. media video length, width, height, rate, publisher, etc.).
Change files’ creation and modification time stamps.
Easy to Install. Download and start renaming your files now!
So… if you need to do some advanced file renaming, make it a lot easier on yourself and download Bulk Rename Utility. You’ll be amazed at all its advanced features and how easy it can make renaming files any way you need to rename them. It’s so good, it’s now a Cloudeight freeware pick!
Read more about and/or download Bulk Rename Utility here.
![]()
Don't have a Cloudeight SeniorPass? It's a great deal. Learn more here.
Our Cloudeight SeniorPass is a great deal. You get unlimited support for one full year from the date you first use your SeniorPass. We can help keep your computer running well, fix all kinds of computer problems, clean up malware, and a whole lot more. Our SeniorPass is like having insurance for your computer. And it's only $99 for an entire year.Get your SeniorPass today for just $99. It's just like having insurance for your computer - only better!
To learn more about our SeniorPass, please see this page.
![]()

Have You Ever Listened To The Rain?
Have you memorized the sound of it as it pours down on the streets and the roofs and the leaves and the grass? Now it is a sunny day and for all the world it looks like summer, feels like summer, smells like summer, yet it won’t be long before that ridge of trees just over there – beyond the old wooden fence – will blaze with autumn color.
Time is passing and summer will soon give way to autumn. And it is autumn’s summer teasing that takes the mind backward. The day is so sunny and so bright so much so that the colors of autumn glow in the sunshine. Now go back and remember the sound of the rain. Can you? Can you picture the lowering clouds and the dismal weak light of a rainy day? Imagine it is raining through the sunshine and the colors of autumn are dripping wet with rain. Imagine a day when the seasons transpose and the sun shares the sky with the rain. You still can’t hear the pouring rain on a day that escaped from summer and came to visit us in the fall. You can’t walk in the snow and remember the heat of a hot summer day.
And neither can I.
Imagine a day in the winter when the dour and timid sun barely rises from its bed of stars and comes to see us only for a wisp of time...
Read the rest of this essay here...
![]()
We can fix your Windows computer... check out our low prices here!

Why is an email program called an
email client?
The term "client" in this context refers to a software application that
communicates with a server to access or request resources, such as email
messages. In other words, the email client is a software program that
acts as a client to the email server, which is responsible for sending,
receiving, and storing email messages.
So an email program is often called an email client because it acts as a
client program that enables users to interact with the email server,
much like a customer interacts with a service provider.
![]()

Sales of the following products and services help support our newsletters, websites, and free computer help services we provide.
Cloudeight Direct Computer Care: Single Keys, SeniorPass, or Season Tickets - always a great deal. Cloudeight Direct Computer Care is like having PC insurance. Get more information here.
Emsisoft Anti-Malware: Emsisoft is the only Cloudeight-endorsed and recommended Windows security program. It provides users with a complete antivirus, antimalware, anti-ransomware,
and anti-PUPs solution. We offer single Emsisoft licenses and multi-computer licenses at discount prices. Also, we offer our exclusive Emsisoft with Cloudeight installation & setup. Get more information here.
Reg Organizer: Reg Organizer is the Swiss Army Knife of Windows tools. It's far more than just a registry optimizer and cleaner... it's a Windows all-in-one toolkit. Reg Organizer helps you keep your computer in tip-top shape and helps you solve annoying Windows problems. Reg Organizer works great with Windows 10
and Windows 11! Get more information about Reg Organizer (and get our special discount prices) here.
SeniorPass - One year of Cloudeight Direct Computer Care - unlimited sessions!
Get more information here.
Windows 10 Customization: Make Windows 10 look and work the way you want it to. Learn more.
MORE IMPORTANT STUFF! Your
InfoAve Weekly Members' Home Page is located here.
Print our Cloudeight Direct Computer Care Flyer and spread the word about our Cloudeight Direct Computer Care repair services. Get our ready-to-print flyer here. Help us Grow! Forward this email newsletter to a friend or family member - and have them
sign-up for InfoAve
Weekly here!
Get our free daily newsletter! Each evening we send a short newsletter with a tip or trick or a computer-related article - it's short and sweet - and free.
Sign-up right now.
We have thousands of Windows tips and tricks and computer articles posted on our
Cloudeight InfoAve website. Our site has a great search engine to help you find what you're looking for too!
Please visit us today!
Help us by using our Start Page. It costs nothing, and it helps us a lot. Print our Cloudeight Direct Flyer and spread the word about our computer repair service! If you want to help us by telling your friends about our Cloudeight Direct Computer Care service, you can download a printable flyer you can hand out or post on bulletin boards, etc.
Get the printable PDF Cloudeight Direct Computer Care flyer here.
We'd love to hear from you!
If you have comments, questions, a tip,
a trick, a freeware pick, or just want to tell us off for something, let us know.
If you need to change your newsletter subscription address, please see "Manage your subscription" at the very bottom of your newsletter.
We received hundreds of questions for possible use in IA news. Please keep in mind we cannot answer all general computer questions. We try to personally answer as many as we can. We can only use a few
in each week's newsletter, so keep this in mind. If you have a support question about a service or product we sell, please contact us here.
Subscribe to our Daily Newsletter! Get computer tips & tricks every night. Our daily newsletter features a computer tip/trick or two every day. We send it out every night around 9 PM Eastern Time (USA). It's short and sweet, easy
to read, and FREE.
Subscribe to our Cloudeight InfoAve Daily Newsletter!
We hope you have enjoyed this issue of Cloudeight InfoAve
Weekly. Thanks so much for your support and for being an InfoAve Weekly subscriber.
Have a great weekend... be safe!
Darcy and TC
Cloudeight InfoAve Weekly - Issue #1019
Volume 20
Number 25
April 21, 2023
Not a subscriber? Subscribe to our FREE Cloudeight InfoAve
Weekly Newsletter here.>

"Cloudeight InfoAve
Weekly" newsletter is published by:
Cloudeight Internet LLC
PO Box 73
Middleville, Michigan USA 49333-0073
Read our disclaimer about the tips, tricks, answers, site picks, and freeware picks featured in this newsletter.
Copyright ©2023 by Cloudeight Internet

