
Issue #883
Volume 17 Number 46
September 11, 2020
Dear Friends,
Welcome to Cloudeight InfoAve Weekly Issue #883. Thank you very much for subscribing and for being a part of our Cloudeight family. We appreciate your friendship and support very much! Please share our newsletters and our Website with your family and all your friends.
We wish you all the best during the global pandemic. Our prayers and good wishes go out to all of you during this difficult time. We are all in this together.

THANK YOU FOR HELPING US!
When you support us with small gift, you help us continue our mission to keep you informed, separate the truth from the hyperbole, and help you stay safer online. Plus, our computer tips make your computer easier to use.
Did you know that we provide support to thousands of people? Every week we help dozens of people via email at no charge. The questions and answers you see in our newsletters are from the email answers and help we provide to everyone free of charge.
Thanks to your gifts, we do a lot more than provide this free newsletter. We help you recognize online threats, fight for your online privacy, provide you with the knowledge you need to navigate the Web safely, provide you with suggestions for safe, free software and websites, and help you get more out of your PC.
Please Help us keep up the good fight with a small gift.
Interested in making an automatic monthly gift?
Visit this page.
Help us keep helping you... and helping you stay safe on the Web.
![]()

Dianne's computer won't start after an update
My computer was acting strange after an update and I tried doing a system
restore. Unfortunately, I think it got caught in a loop, but I left it overnight
and wouldn't you know my hydro went out. Now I have a blank screen. I can get
into it using f8, but it says it cannot be repaired. Is there anything else I can
do to get my computer back? Will a windows repair disk help and how do I use it.
Our answer
Hi Dianne, try starting your computer this way:
1. Turn your PC off with the power switch
2. Leave it off for 5 minutes.
3. Hold down the SHIFT key and then turn on the computer (keep holding down the
SHIFT key)
4. Continue to hold down the SHIFT key until you see the Advanced Boot Options
menu
5. From the Advanced Boot Options menu, click on Troubleshoot and try running
Startup repair.
You cannot fix a Windows version update with system restore, you have to use
System > Update & Security > Recovery > Go back to the previous version of
Windows (See our article here).
For cumulative updates, you can uninstall the offending updates by going to
Settings > Windows Update > Update History .
See our article about the Advance Boot Options menu.
You should only use system restore if you download and install something that
causes problems of if you accidentally install malware. System Restore is not a
good choice for rolling back problematic updates.
You can boot your computer with a Windows 10 installation disk which you can
make by following the instructions here.
Once you use it to boot your PC, you will be able to Reset your computer which
saves all your files and reinstalls Windows - but you'll need to reinstall all
the programs you use.
I hope this helps you - please let us know if you need more help.
![]()
Linda says all of a sudden .docx files appeared on her computer
We have files on our computer that all of a sudden have the extension docx and
when we try to open them a window pops up and tells us we have to purchase
office 365 and we are unable to open them unless we do. Is there a way you can
fix our files so we can open them again without purchasing office 365, which is
$99 per year.
Our answer
Hi Linda. First, Microsoft Office 365 Personal is $69 a year or $6.99 per
month.
Now on to your question: .docx has been the standard Microsoft Word document
format for many years. You can open .docx files with WordPad which is included
with all versions of Windows. All you have to do is right-click on any .docx
file and choose "Open with" and choose WordPad.
There are also many free office suites and free word processers that you can
download and install that will open and even create .docx files. Here are some:
Free Office Suites (replaces Microsoft Office)
Open Office
www.openoffice.org
LibreOffice
www.libreoffice.org
Free Word Processor (replaces MS Word)
AbleWord
https://www.thundercloud.net/infoave/new/take-a-look-at-this-free-ms-word-and-pdf-editor/
I hope this helps you Linda.
![]()
I have two questions:
Question #1: I just updated to Windows 10 version 2004. It was a 4-hour marathon. I wound up with the taskbar looking like an Apple computer. How can one convert it back to something looking like it did originally
Question #2: My photo storage looks all messed up is there a program that will sort this out.
Regards, Dennis.
Our answer
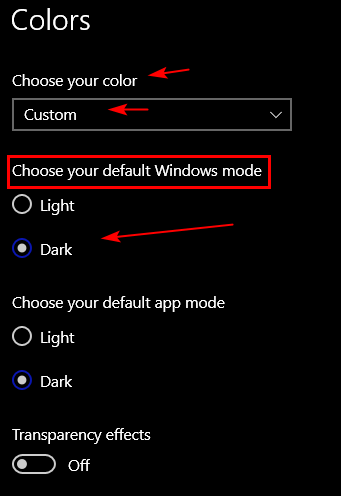
Hi Dennis. The taskbar in Windows 10 version 2004 is the same taskbar that was in previous versions of Windows 10. Make sure you were not switched to light theme in Settings >Personalization > Colors.
Under "Choose your color" use the down arrow to select "Custom"
Under "Choose your default Windows mode" choose "Dark".
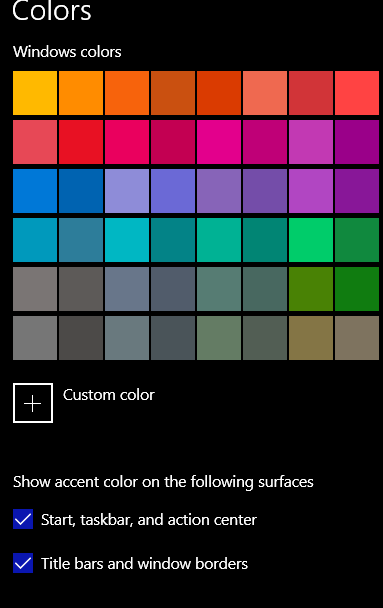
Then scroll down and make sure both boxes under "Show accent colors on the following surfaces" are checked.
If you open the Windows Photo App, it will automatically organize your photos. See our article here.
You can also download and install the free "FastStone Image Viewer". You can read more about it here.
Sharon was to create a taskbar shortcut for Gmail
I have checked out several sites on how to make an icon on the taskbar for a shortcut (icon) to Gmail., but nothing works. I downloaded Chrome and use that but have to go into start page and then Gmail.
Our answer
Hi Sharon. You can make a shortcut to Gmail on your taskbar this way...
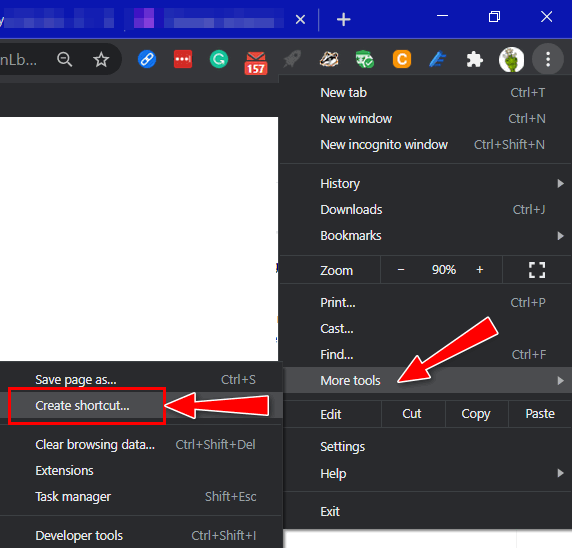
Open Gmail in the Google Chrome browser. While your Gmail page is open, click the three vertical dots in the top right corner of the browser --> hover over More Tools --> click Create Shortcut... -->
Tick the box next to "Open as window" … this will make sure Gmail opens separately from any other tabs or in any open browsers.
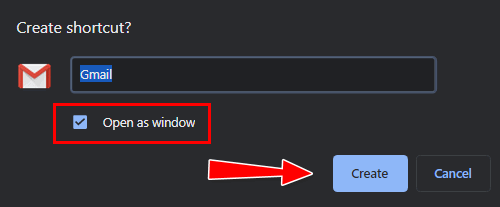
Gmail should open immediately. Now, look in your taskbar and right click on the Gmail icon and then click "Pin to Taskbar".
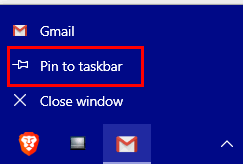

This creates a taskbar shortcut with the with the Gmail icon.
You can drag the icon around on your taskbar to place it exactly where you want it.
Hope this helps you, Sharon.
The Best Computer Care and Repair - Anywhere!
We can fix your computer while you watch. You never have to leave your home. Just sit back, relax, and watch us work. Get PC service from folks you trust at the best prices you'll find anywhere.
Get more information here.![]()
Kat wants to know our opinion of "Patch My PC".
What is your take on "Patch My PC"? I trust your opinions more than all
others.
Our answer
Hi Kat. Thank you. In short, another useless program. There have been
programs like this around for years and years. Any program installed on
your computer that needs to be updated will tell you and offer you an
update.
Updating programs that don't need to be updated can result in problems.
Just like driver updaters that update drivers that don't need to be
updated -- "app updaters" update programs that don't need an update.
And I'm not sure from reading the program's page that this program
doesn't also update some drivers.
Finally, programs like this are constantly scanning your computer
looking for programs that need to be updated - and that means it's
constantly using RAM (Memory) and 'CPU and this can negatively affect
computer performance.
We would not install something like this, so we recommend that you don't
either.
![]()
Cheri has questions about Microsoft Office, Edge and more
I have received a notice that my Microsoft Office 2010 will not be
updated as of October 2020. Will I still be able to use everything in it
like Word, Power Point and Excel?
When you told us about Neat Office being free, I installed it but have
never used it. I see you also like Open Office. Between the 2 programs
which do you prefer if I am unable to use my 2010 Office past
October. Also, with Microsoft dropping Internet Explorer, is there
anything we need to uninstall on our computers? The New Edge downloaded
with the last updates, but I prefer Chrome with Firefox as backup
browser. Any insight into these questions would be appreciated. Stay
Safe and Be Kind.
Our answer
Hi Cheri. Microsoft is no longer going to update Office 2010 after
October 2020. The programs will still work (Word, Excel, PowerPoint,
etc.) but over time there may be security issues and eventually Office
2010 will stop working - but it won't stop working in October.
We recommended Neat a long time ago when it was still free, I don't know
if it's still free or not, I know for a while it wasn't. We still
recommend and frequently revisit and test OpenOffice and LibreOffice.
You can get more info and/or download OpenOffice at
https://www.openoffice.org/.
You can learn more about and/or download LibreOffice at
https://www.libreoffice.org/..
Both OpenOffice & LibreOffice offer Word, PowerPoint, Excel, and Access
compatible programs in their respective suites -and both are frequently
updated.
It doesn't matter what browser Microsoft recommends or installs
automatically with Windows Updates, you can use whatever browser you
choose. I use Chrome and Firefox both more than I use Edge. But the
browser you should use is the browser you like best. The new
chromium-base Edge is a vast improvement on the legacy Edge and Internet
Explorer.
I hope this answers all your questions -- but if not, let me know.
![]()
Judy wants to know if she can use a Cloudeight SeniorPass to set
up a new computer
Hi! Wondering about setting up an unattended pass and what that
means.... I am buying a new laptop and wondering if you can set it up
for me? Can you transfer stuff from my old laptop onto the new one or
should I pay the store to do it? Thanks!
Our answer
Hi Judy. Our SeniorPass is good for unlimited computer repair and
support for one year. Our SeniorPass also includes the option for us to
set up "Unattended Support" which means we can connect and work on your
PC even if you're not able to be there. Our SeniorPass also includes
emergency telephone support for our customers in the USA. The cost of a
SeniorPass is $99.
We can help you transfer files & folders from your old computer to the
new computer - that requires that you have an external hard drive
available. An external hard drive is a hard drive that plugs into a USB
port and is very inexpensive (around $50 for a 1 terabyte drive). We do
not recommend nor do we transfer programs from one computer to another
as it usually ends up causing problems.
If you're interested in learning more about our SeniorPass see
https://thundercloud.net/direct/2018/senior/.
If you need anything else or you have any more questions, please let us
know.
![]()
Robert cannot change MSCONFIG startup option to "Normal
startup"
When in msconfig (I was there to get a clean boot) under the General tab
there is the Startup Selection. The first option is Normal Startup and
then Diagnostic Startup and then Selective Startup. Why is my desktop PC
set to Selective Startup and will not allow me to change it to Normal
Startup? The "clean boot" I mentioned above was on my laptop and not my
desktop PC, so it was not a setting I changed. The Apply button at the
bottom of the box is greyed out so it cannot be selected. Thank you once
again. Sincerely, Robert F.
Our answer
Hi Robert. If your desktop will not let you return to Normal startup
then you have selected some items in under "Advanced options". You will
need to open MSCONFIG, click on the Boot tab, click on Advanced options,
and clear whatever you checked there. Then you'll be able to select
"Normal" startup.
Clean boot is not the same as Safe boot...
Here's the right way to do a clean boot on Windows 10 (tutorial by
Microsoft).
I hope this helps you.
![]()
Attention Cloudeight SeniorPass Holders! Announcing our new SeniorPass Telephone Hotline Service
Don't have a Cloudeight SeniorPass? It's a great deal. Learn more here.
During this global crisis, we are offering a special telephone hotline service to all SeniorPass holders. There are reports of many COVID19 scams targeting seniors. If you are approached by a scammer or encounter something suspicious, you can use our hotline to discuss your situation with us. We check into it for you and do all we can to help you.If you currently have a SeniorPass, all you need to do is contact us. Send us your telephone number and a brief message/a> describing your problem and we'll call you back during normal business hours.
If you don't yet have a Cloudeight SeniorPass and you'd like to know more about our SeniorPass, please see this page.
Please note: Currently, our telephone hotline service is only available to SeniorPass holders in the United States due to international call restrictions.

The Windows.old folder – What’s it for? And how to
remove it
Windows 8.1 and Windows 10 (all versions)
Many of you have or will soon be upgrading to Windows 10 version 2004. And in just a few months, Microsoft will be releasing Windows 10 version 2009 (November 2020 update).
Did you know that every time Windows has a version update, your computer gets a new Windows.old folder?
The Windows.old folder is created when you upgrade from one version of Windows to another. The Windows.old folder makes it easy for you to retreat from a major Windows 10 update and go back to previous Windows 10 version without losing any data, programs, or settings.
The Windows.old folder contains everything needed to go back to the previous version of Windows. It includes your installed programs, all user accounts, all Windows system files, all users’ files, and folders, etc. Everything you need to go back to the previous version of Windows is stored in the Windows.old folder.
Windows 10 keeps your Windows.old folder intact for 30 days after a major version upgrade. While Windows 10 keeps the folder intact for 30 days, it can only be used to go back to a previous version of Windows 10 for ten days after a version update. If you’re interested and adventuresome, you can also look inside the Windows.old folder and extract individual files from it.
And as you might guess, the Windows.old folder can be quite large – 20-40 GB. So, it does take up substantial hard drive space.
For 10 days after you install a major Windows 10 update, you’ll see the “Go back to the previous version of Windows 10” option in Settings > Update & security > Recovery.
If you choose the option to “go back to the previous version”, your computer will be restored to the previous version of Windows 10, and all your programs, files, settings, etc. will be exactly as they were before you installed the update. If you remove the Windows.old folder you will not have this option.
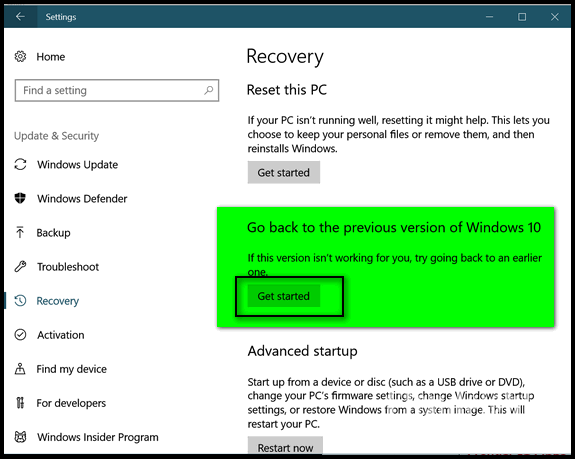
Windows will automatically remove the Windows.old folder after 30 days, but you’ll only have the option to “Go back…” for 10 days after you update.
If you want to remove the Windows.old folder manually, you can’t just open File Explorer and right-click on the folder and delete it. Windows won’t let you. You can manipulate the folder’s security options and delete it, but there’s a much easier way.
Here’s how to manually remove the Windows.old folder:
Type Disk Cleanup in taskbar search and press Enter (or click it) when Disk Cleanup appears at the top.
When Windows Disk Cleanup appears, you’ll see a dialog asking which drive you want to clean up. It will default to C: drive, and that’s fine.
Next, click OK to let it scan your C drive. It will take a few seconds to scan your C: drive. When it’s done it will show you a list of files that you can clean using Disk Cleanup. But don’t worry about that now. Near the bottom of that dialog, you’ll see a button that says, “Clean up system files”. Click on that button.
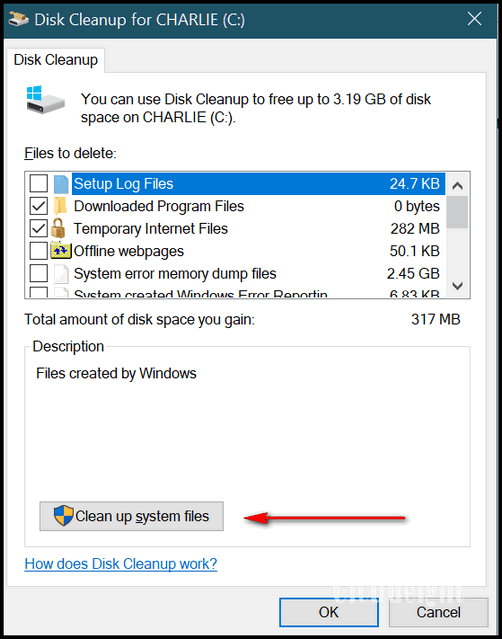
Again, Windows will ask which drive you want to clean up, it will default to “C”. Leave it set to drive C and click OK. Wait a few minutes for Windows to scan your drive. When it’s done, you’ll see another dialog. You’ll need to scroll down to see “Previous Windows installation(s)”.

Tick the box next to “Previous Windows installation(s)", then click OK. Windows Disk Cleanup will begin the process of cleaning up and removing the Windows.old folder. Be patient. This will take some time.
Warning: Remember that the Windows.old folder not only contains your
previous version of Windows, it contains all your personal files and
settings from your previous installation of Windows including installed
programs, all your files, and folders, your personalized settings,
Windows system files, etc. So be careful. Remove the Windows.old
folder only when you are certain that you don’t have any problems with
the new Windows 10 version update before you delete the Windows.old file
— or you will have no easy way of going back to the previous version of
Windows.
![]()
Add a Cascading Settings Context Menu on the Windows 10
Desktop
Windows 10 (all versions)
As all Windows 10 users have learned, Microsoft has now moved most of the Control Panel features into the Settings app in Windows 10. How much longer the Control Panel will be around is anyone’s guess. As of today, there are still some features of the Control Panel that have not been migrated to the Settings app. But it does seem likely the Control Panel will eventually be removed from Windows 10.
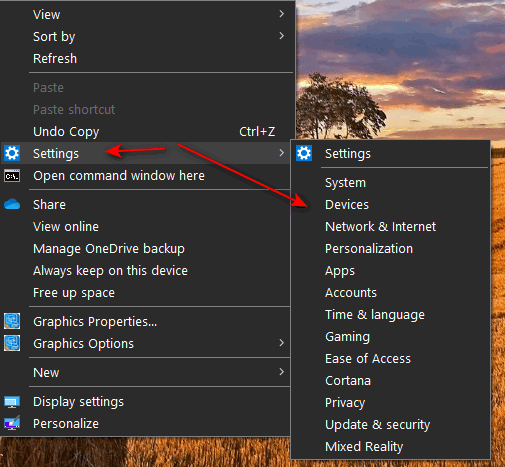
The Settings app contains the following categories: System, Devices, Phone, Network & Internet, Personalization, Apps, Accounts, Time & language, Gaming, Ease of Access, Cortana, Privacy, Update & security (and on some versions “Mixed reality”).
All Settings categories have sub-pages. Most of these sub-pages are accessible directly using the ms-settings commands. you can see a list of ms-settings commands here and directly from Microsoft here.
How to Add a Cascading Settings Context Menu on the Windows 10
Desktop
If you want to add a cascading “Settings” context menu that you can open
by right-clicking your Windows 10 desktop, we’ve made it simple for you.
Once you’ve downloaded the file, unzip it, and right-click on the file named “settings-menu.reg” and choose “Merge”. (You can also double-click it.)
You will get a warning reminding you that adding things to your registry can cause problems. Click “Yes” to proceed.
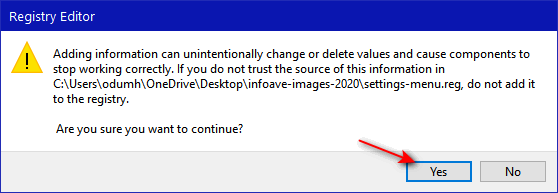
Once you click yes, you’ll see a dialog confirming that the changes have successfully been added to your registry
And if you did all that correctly when you right-click on an empty space on your desktop you’ll have a Settings entry on your right-click menu. And when you click on “Settings” you’ll a cascading menu showing all the categories in Settings will appear.
Enjoy!
![]()
Windows 8.1, Windows 10 (all versions) and Chrome browser installed
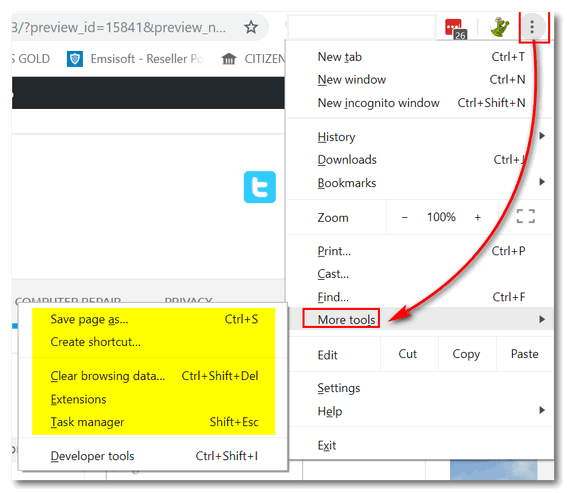
Whether you call these tips or tricks, they’re good ones. And no one likes quick and simple tips and tricks more than we do. It came to my attention just recently that clicking on the Settings (3 vertical dots) icon in Google Chrome’s omnibar (toolbar) then “More tools” reveals some very useful options.
Create a desktop shortcut to a Web page
Chrome allows you to save an entire web page to your hard drive. Click on the 3 vertical dot icon, then click “More tools” and choose “Save page as”. Chrome will download the entire page and all its assets and contents (pictures, etc.) to a folder on your computer; from there you can view the page anytime you want, even if you’re offline.
Save an entire web page to your computer
Visit a page you want to create a shortcut for, then click on the 3 vertical dots at the top-right of Chrome. Select “More tools” and choose “Create shortcut”. A shortcut to the webpage you’re visiting will be instantly placed on your desktop. How’s that for quick and easy?
Clear your Chrome browsing data
Here’s one I have been overlooking for a long time. To clear your Chrome browsing data (history), click on the 3 vertical dots icon at the top-right of Chrome, then “More tools” then choose “Clear browsing data”.
Extensions
Click on More tools > Extensions. This opens Chrome extensions where you can view, enable, disable, and remove any or your Chrome extensions.
Open Chrome’s task manager
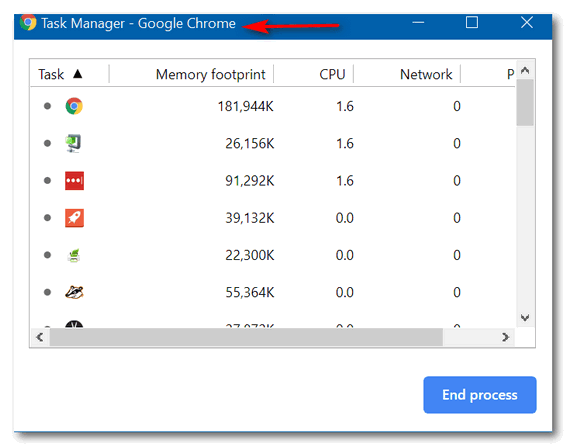
Did you know that Chrome has its own task manager? It does! And if you want to see how much juice (resources) all those extensions you’ve added to Chrome are using – along with how much juice Chrome is using, then Chrome’s task manager can show you. Click on the 3 vertical dots at the top-right of Chrome, then “More tools” then click on “Task manager”. Not only can you see how much Chrome and each extension is using, but you can also end any process you see in Chrome’s Task manager.
Want more tips, tricks, and information?
We have thousands of Windows tips, tricks, and more on our InfoAve web site.
Subscribe to our free InfoAve Daily newsletter.![]()
Our special annual pass for computer repair for our friends 60 or older.
See this
page for more information.
![]()

A Treasure Trove of Desktop Wallpaper & More!

Quite by accident today, I discovered a web site that is a treasure trove of desktop wallpaper for Windows users. But you can also use this site if you have Apple or Android devices. So, you would say, this site has something for everyone.
Not only are there thousands of (mostly) beautiful wallpapers, there are hundreds of beautiful videos (loops) you can download and/or share.
But no more words, how about some samples?


There
are thousands more. All are high-resolution images perfect for any desktop.
Visit our Cloudeight site pick,"PeaPix" right now.

I’d Love to be a Painter
It’s been a warm and beautiful summer this summer. For some, it’s been a little
hot. But for me, it has been one of the best summers I can remember. There has
been plenty of sunshine and plenty of beautiful warm summer days. A summer
simply perfect for outdoor activities.
Two of my favorite outdoor activities are walking and reading. Most people think
of reading as an indoor activity and do more reading on those cold, dark,
blustery days of winter. But to me, there’s nothing better than sitting in the
shade of a large maple tree and reading an engaging book.
The more books I read, the more I find myself drawn to books written by writers
who paint pictures with words. Some writers have amazing ways of painting with
words that the paintings they create enchant the mind of the reader. To me, it
is much better than watching a movie. Movies are always about how someone else
sees the scenes and the characters that the writer painted. Books make me the
director of the movie and allow me to create the scenes...
Please read the rest of this essay here.

VERSION 8.50 NOW AVAILABLE!
If you purchased or renewed Reg Organizer through Cloudeight within the last 12 months, you're entitled to a free version upgrade to Reg Organizer 8.43.
Save $14 on Reg Organizer right now!
Reg Organizer - A Swiss Army Knife of Windows Tools - Works Great on Windows 10!
![]()

What is a Microsoft Account?
If you have an email address that you can sign in to at
https://www.outlook.com, then you have a Microsoft account. In other words,
if you have an email address ending in:
@hotmail.com
@outlook.com
@msn.com
@live.com
@live.ca
@webtv.com
... you have a Microsoft account.
Your Microsoft account can be used to access any or all Microsoft
services. And in Windows 8.1 and Windows 10 you can also use your
Microsoft account to log in to your Windows PC.
And yes, you can have more than one Microsoft account. And if you want to use a Microsoft account to log into Windows 8.1 or
Windows 10, you might want to keep it separate from your regular
@hotmail, @live.com, @msn.com, @outlook.com etc. address that you
use for everyday emailing. But you certainly don't have to.
Just remember, when you create a new account by going to
https://www.outlook.com, you're creating a new email address and a
new Microsoft account.
Logging into Windows 10 with a Microsoft account allows you to
access all of Windows 10's features. Another advantage to logging in
to Windows with a Microsoft account is that if you forget your
Windows password you can reset it online - so you'll never be locked
out of your computer.![]()

THANK YOU FOR HELPING US!
When you support us with small gift, you help us continue our mission to keep you informed, separate the truth from the hyperbole, and help you stay safer online. Plus, our computer tips make your computer easier to use.
Did you know that we provide support to thousands of people? Every week we help dozens of people via email at no charge. The questions and answers you see in our newsletters are from the email answers and help we provide to everyone free of charge.
Thanks to your gifts, we do a lot more than provide this free newsletter. We help you recognize online threats, fight for your online privacy, provide you with the knowledge you need to navigate the Web safely, provide you with suggestions for safe, free software and websites, and help you get more out of your PC.
Please Help us keep up the good fight with a small gift.
Interested in making an automatic monthly gift?
Visit this page.
Help us keep helping you... and helping you stay safe on the Web.
![]()

Sales of the following products and services help support our newsletters, websites, and free computer help services we provide.
Cloudeight Direct Computer Care: Single Keys, SeniorPass, or Season Tickets - always a great deal. Cloudeight Direct Computer Care is like having PC insurance. Get more information here.
Emsisoft Anti-Malware: Emsisoft is the only Cloudeight endorsed and recommended Windows security program. It provides users with a complete antivirus, antimalware, anti-ransomware, anti-PUPs solution. We offer single Emsisoft licenses and multi-computer licenses at discount prices. Also, we offer our exclusive Emsisoft with Cloudeight installation & setup. Get more information here.
Thunderbird Email Setup: Thunderbird is a great email program that you can use with your Gmail and Outlook.com (Hotmail) webmail accounts as well as with your Internet provider's email. We'll set it up correctly you. Our set up includes configuring up to 3 email accounts and setting up Thunderbird to use stationery (if desired). Our Thunderbird Email Setup Service is always a great deal. For more information visit this page.
Reg Organizer: Reg Organizer is the Swiss Army Knife of Windows tools. It's far more than just a registry optimizer and cleaner... it's a Windows all-in-one toolkit. Reg Organizer helps you keep your computer in tip-top shape and helps you solve annoying Windows problems. Reg Organizer works great with Windows 10! Get more information about Reg Organizer (and get our special discount prices) here.
SeniorPass - One year of Cloudeight Direct Computer Care - unlimited sessions!
Get more information here.
Windows 10 Customization: Make Windows 10 look and work the way you want it to. Learn more. Your
InfoAve Weekly Members' Home Page is located here.
Print our Cloudeight Direct Computer Care Flyer and spread the word about our Cloudeight Direct Computer Care repair services. Get our ready-to-print flyer here. Help us Grow! Forward this email newsletter to a friend or family member - and have them
sign-up for InfoAve
Weekly here!
Get our free daily newsletter! Each evening we send a short newsletter with a tip or trick or a computer-related article - it's short and sweet - and free.
Sign-up right now. Print our Cloudeight Direct Flyer and spread the word about our computer repair service! If you want to help us by telling your friends about our Cloudeight Direct Computer Care service, you can download a printable flyer you can hand out or post on bulletin boards, etc.
Get the printable PDF Cloudeight Direct Computer Care flyer here. ![]()


These products and services are recommended and endorsed by Cloudeight:

We'd love to hear from you!
If you have comments, questions, a tip, trick, a freeware pick, or just want to tell us off for something, let us know.
If you need to change your newsletter subscription address, please see "Manage your subscription" at the very bottom of your newsletter.
We received hundreds of questions for possible use in IA news. Please keep in mind we cannot answer all general computer questions. We try to personally answer as many as we can. We can only use a few to in each week's newsletter, so keep this in mind. If you have a support question about a service or product we sell, please contact us here.
Subscribe to our Daily Newsletter! Get computer tips & tricks every night. Our daily newsletter features a computer tip/trick or two every day. We send it out every night around 9 PM Eastern Time (USA). It's short and sweet, easy-to-read, and FREE.
Subscribe to our Cloudeight InfoAve Daily Newsletter!
Print our Cloudeight Direct Computer Care Flyer and spread the word about our Cloudeight Direct Computer Care repair services. Get our ready-to-print flyer here.
We hope you have enjoyed this issue of Cloudeight InfoAve
Weekly. Thanks so much for your support and for being an InfoAve Weekly subscriber.
With hope and prayers, may you and your loved ones stay safe and well.
Your friends at Cloudeight,
Darcy and TC
Cloudeight InfoAve Weekly - Issue #883
Volume 17 Number
46
September 11, 2020
Not a subscriber? Subscribe to our FREE Cloudeight InfoAve
Weekly Newsletter here.
Subscribe to our Cloudeight InfoAve Daily Newsletter!
Share Us on Facebook!
We'd love for you to share us with your family and friends on Facebook. Help us by sharing us on Facebook! 

"Cloudeight InfoAve
Weekly" newsletter is published by:
Cloudeight Internet LLC
PO Box 73
Middleville, Michigan USA 49333-0073
Read our disclaimer about the tips, tricks, answers, site picks, and freeware picks featured in this newsletter.
Copyright ©2020 by Cloudeight Internet
