Quick Formatting Drives
If you have an external hard drive or a USB flash drive that contains information you don’t need anymore, you can format it. Formatting a drive wipes out all the data on it and makes all the space on those drives available to use, just as if it were a new drive.
Today, we’re going to cover quick formatting, which will wipe out all the data on a drive and make it reusable. It will not make data unrecoverable, so don’t use quick formatting if someone you don’t trust will have access to the drive.
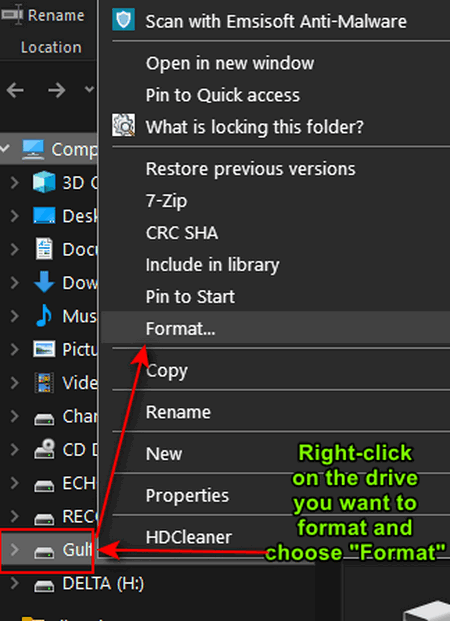
1.) Open File Explorer (Windows key + E) and under “This PC” or “Computer,” find the drive you want to format and choose “Format” from the right-click menu.

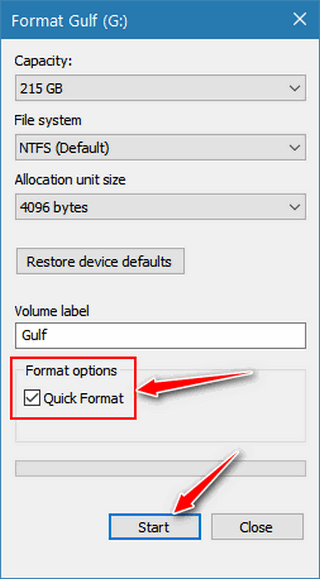
2.) After you click “Format,” you’ll see a dialog like the one shown in the screenshot below. Unless you’re an advanced user and know what you’re doing, it’s best to leave the default settings under “File System (NTFS…), “Allocation unit size 4096 bytes, and “Quick Format” as they are. If you choose to do so, you can change the drive name to anything you want.

3.) Click “Start” to start the format. A Quick Format can take from a few seconds to a few minutes, depending on the size of the drive.
Formatting is a great way to repurpose those old flash drives and/or external drives containing out-of-date backups or data you no longer need.
And remember…
NEVER format a drive that contains any data that you need.

