

“Copy to” and “move to” revisited…and reg files explained
A little while ago we posted an article on how to add Copy to and Move to, to the Windows right-click menu. You can read the original article here.
Here’s an excerpt from that post:
If you’ve ever wanted to move a file from, let’s say, Drive C to a folder on a flash drive, you could open up two Windows Explorer windows and drag and drop the file, but this is a lot of unnecessary rigmarole. Wouldn’t it just have been easier for the Windows Vista brain trust to have put “Copy to” “Move to” selections on the right-click menu? Indeed. But, they didn’t.
All of you who read this newsletter have learned that easier is often better. So you will love this trick. Right click on this link, choose “Save” “Save link as” or “Save target as” and save it to your desktop. Unzip the file to a folder and right-click on one of the two files inside the zip then choose “Merge”. You’ll get a warning that you’re about to enter information into the registry. You can either trust us and allow the registry info to be entered and then you’ll have “Move to” or “Copy to” items on your right-click menu depending on which file you chose. After you’re done with the first file, do the same with the second file. After you’ve finished you’ll have “Copy to” and “Move to” displayed on your right-click menu whenever you right-click on a file. It makes it easy to move files from one location or another. You can copy or move multiple files by holding down the CTRL key while you select each file you want to move, when all files you want to move or copy to another location are highlighted, right-click one of the selected files and choose “Copy to” or “Move to” from the right-click menu.
Since this was posted, many of you have written to say this doesn’t work for you. However, this is not something that works for some and not for others, it works on all versions of Windows and illustrates how important it is that you follow each step of the instructions – or we should take more time to write instructions more clearly. Before we get into the play-by-play tutorial of how to to add Copy to and Move to, to your right-click context menu, we’ll tell you what a reg file is:
The very first line of the .reg file must contain the name of the Windows registry editor; this means that regedit is the program that will open these types (reg) files. For XP and later the correct name, is ‘Windows Registry Editor Version 5.00’. The first line of any reg file then must contain “Windows Registry Editor Version 5.00” This tells Registry Editor (reg edit) to open and process the file. A reg file modifies the Windows registry and saves the user time since they don’t have to manually search for an edit registry keys – the reg file changes the necessary registry keys automatically. In other words, it’s an automatic way to edit the registry to change how Windows works or to add or remove something from Windows or the Windows menus. That’s over simplified but at least it gives you an idea of what “.reg” files are and what they do.
So in order to clear up and expand on our original Copy to and Move to instructions and include screen shots.
How to add Copy to and Move to, to your Windows right-click menu
This works in Vista, Windows 7, Windows 8, and Windows 10. It works on 32-bit and 64-bit computers. Windows XP users don’t need to do this because they already have Copy to and Move to on their right-click context menu.
1. Right-click this link to save the zipped file containing two *.reg files. Depending on the browser you use – chose “Save target as”, “Save link as” or “Save”. Save the zipped file on your desktop.
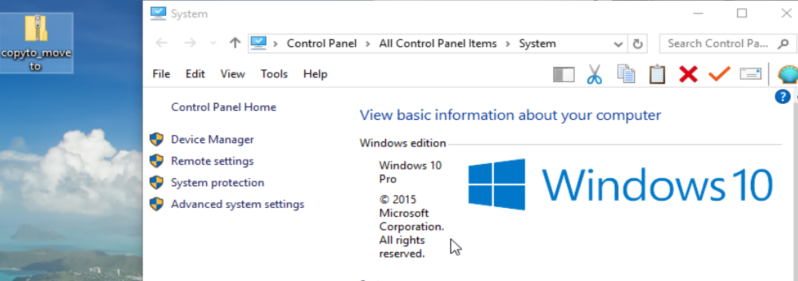
2. You should now have a zip file on your desktop & to show you that this works on Window 10 as well as all versions of Windows from Vista through Windows 10, I did this tutorial using Windows 10 – see below.
Note the file on the desktop called copyto_moveto.zip? Right-click on the zip file and choose “Extract all” See the picture below. (Those of you who are using a 3rd-party program will have the option to extract the files as well.)

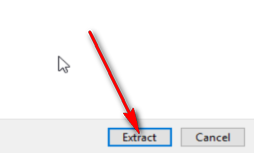
3. Extract the files to a folder on desktop. See the image below.

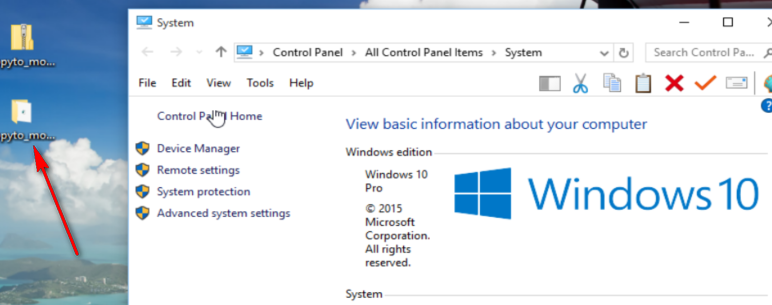
Notice that Windows will automatically extract the files to the same directory as the zip file is in (in this case Desktop) and create a folder with the same name as the zip file. In this case it’s “copyto_moveto” . Look at the screen shot above.
4. Next step? Click “Extract” . Whether you use Windows to extract the files or a 3rd-party zip utility like 7-zip. You must extract the files from the zip file before you can move on. So let’s extract the files now (see below);
#5. In the screen shot below, the red arrow points to the folder that was created when the files were extracted from the zip file. If you don’t extract the files first this tip will not work. So make sure you extract (decompress) the zipped file first.
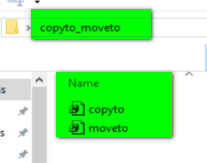
6. Double click the folder that was created (above). Inside the folder, if you extracted the zip file, are two .reg files (registry files). One is called “copyto” the other is “moveto”. This does not depend on a certain version of Windows. If you extracted (decompressed) the zip file correctly you will have a folder with those two files in it.
7. With the folder above open, right-click on the file called “copyto” and choose “Merge”. You’ll get a prompt warning you that editing the registry can cause problems. Click OK – this won’t damage your registry.

If you don’t see “Merge” double-click the reg file.
8. Another warning will appear (see below) click “Yes” .
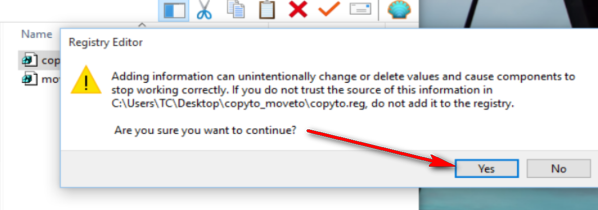
9. Once you click yes, the data contained in the copyto.reg file will be added to the registry and you’ll get this confirmation (see below):

Now, repeat steps 7 and 8, this time right-clicking the “moveto” file. ‘
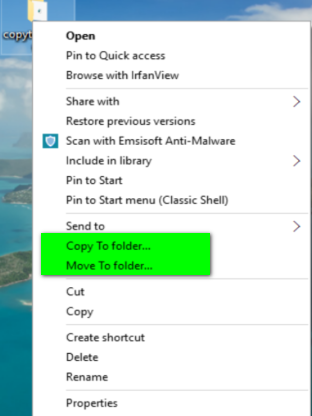
10. Once you’ve done all of the above you can right click on any file or folder and choose “Copy to” or “Move to” and move or copy any file or folder to anywhere on your computer (see below):
This tip isn’t one that works for some and doesn’t work for others. This is one of the most tried and true tips for Windows we’ve ever published, It works on 32-bit and 64-bit versions of Windows Vista, Windows 7, Windows 8x and Windows 10 (Remember, if you have Windows XP you don’t need this tip because you already have Copy to and Move to on your right click menu.)
There is only three cases in which this tip won’t work and they are:
- You are not an administrator
- You are on a company computer with restricted rights
- You have a some 3rd-party program installed which won’t allow you to make changes to your registry
With number 3 being least likely of all.
If you follow the steps above exactly, 99% of you will have Copy to and Move to on your right click context menu.
When you’re done adding Copy to and Move to, to your right-click menu, you can delete the zip file and folder that contains the extracted reg files from your Desktop or from wherever you downloaded the zip file.
I just did this and it worked perfectly!
I do not have the MERGE option on my right click. I have only: OPEN, CUT, COPY, DELETE, & PROPERTIES for options. Will OPEN work? I have Windows 7, Professional.
You can also double click on the reg file and merge it.
Thank you. It worked fine for me this time.
worked great for me. Thank you so much.
The first time you published the instructions, it did not work for me, but this worked for me. However, I would like to know if I need to leave the 2 folders on the desktop, or can they be deleted?
Worked great for me after a couple of try’s. Thank you
I also have a few left overs on my desktop not sure if I should delete them. For now . Will leave them there.