Disaster Recovery Windows 10 Style
It’s all academic until it happens to you. Then the theoretical become reality and you have to deal with it. So, all the tips and tricks we’ve written to help people fix boot problems and fix problems after a Windows update went awry, we’re pretty much theoretical to me – until last Sunday.
Because I didn’t want to be bothered during the busy weekday hours, I set the Windows 10 Cumulative Update to install at 12:05 AM on Sunday morning last. At 2;00 AM I woke up and happened to see my computer screen was on. I looked and saw my computer was not booting up after the update. After many attempts of trying to get it to boot up, and running many commands from an administrator command prompt like these:
sfc: /scannow

sfc /scannow /offbootdir=c:\ /offwindir=c:\windows

bootrec.exe  /fixMbr
bootrec.exe  /fixBoot
bootrec.exe  /rebuildBcd
bcdedit /export C:\BCD_Backup
c:
cd boot
attrib bcd -s -h -r
ren c:\boot\bcd bcd.old
bootrec /RebuildBcd
If you don’t know what those commands do, best leave them be. They didn’t work for me anyway.
I had a Windows 10 installation USB and an Ashampoo Rescue USB, unfortunately, my ASUS laptop does not have an option to boot from a USB flash drive and it does not have a CD/DVD drive. In fairness to Asus, in my haste and in my tired grogginess, I might have accidentally deleted the USB boot option from my UEFI (BIOS) … something I can remedy when I get a chance (maybe).
But nothing like a first hand fist fight with Windows to imbue one with crazy resourcefulness. So intrepid, I trekked on.
When all else fails, you can try to get to the Advanced boot options menu by shutting off your PC (and I mean powering down until no power lights, hard drive lights – no lights at all) and leaving it off for a few minutes (2 or 3 minutes should be fine).
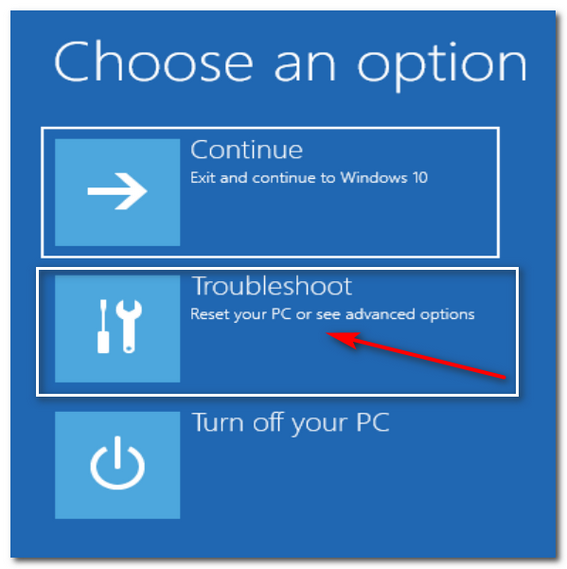
Windows 10 Advanced Boot Options
When you turn it back on, make sure you press and hold down the SHIFT key until you see the advanced boot options screen. See the screen shot above.
Click on Troubleshoot (above). And the best option for most of us is staring at you as soon as you click “Troubleshoot” will be staring you right in the face. And that option is “Reset this PC”
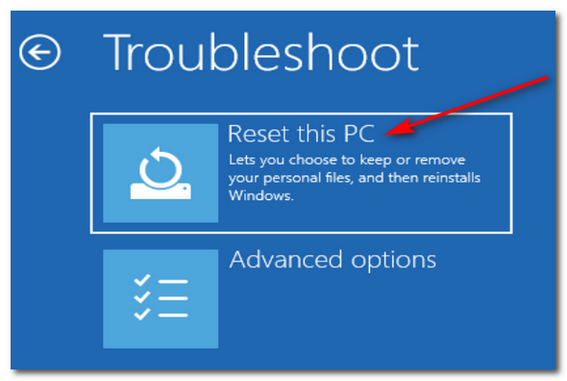
The best option for most users is going to be “Reset this PC”
And if you choose that option, you’ll save a lot of grief if you:
- Take your time and choose
- Keep my files
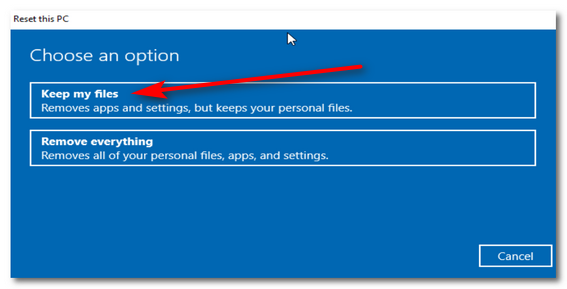
Above: Unless you want to wipe out everything and lose all your personal files, settings, etc. you’ll want to click on “Keep my files”.
It will take from 30 to 60 minutes to reset your PC. Once the reset is finished, you will have to type your Windows password and log in to Windows. Once you’re logged in, you’ll find your desktop looks just like you remember it, but some of the shortcuts may not work. Also, all your personal files (pictures, documents, music, etc.) will be right where you they were. But any programs/apps that did not come installed with Windows (i.e. the ones you installed) will need to be re-installed.
To make this easier, on your desktop you’ll find a HTML file (web page) called “Removed Apps”. When you open it (it will open in your default browser, which after a reset will be Microsoft Edge (until you change it). It contains a list of all the programs that were removed during the reset. But keep in mind, this a great opportunity to do some housecleaning. If there are 100 programs listed, try to reinstall only the programs you really need. You’ll find that some of the programs/apps listed will be clickable and will lead you directly to the page from which you can download the program or app. Quite useful.
But… if in the Troubleshoot menu…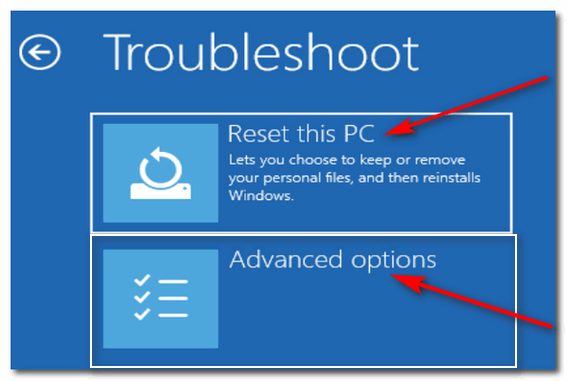
you decide not to take our advice to reset your PC
and you decide to click on “Advanced options”, make sure the first option you try is System Restore.
In Windows 10, System Restore ain’t what she used to be – it’s a bit less reliable than it was in past versions of Windows… but worth a try. If you want to try it before doing a reset, ti won’t hurt anything and if it works,you won’t lose any personal files and you will save most of your installed programs. However, the chances of System Restore fixing an update-bricked computer are not great – but worth a try if you have time… it can take an hour or more to run System Restore. But if System Restore does not work for you, everything will be back to where it was – and you can try other advanced options.
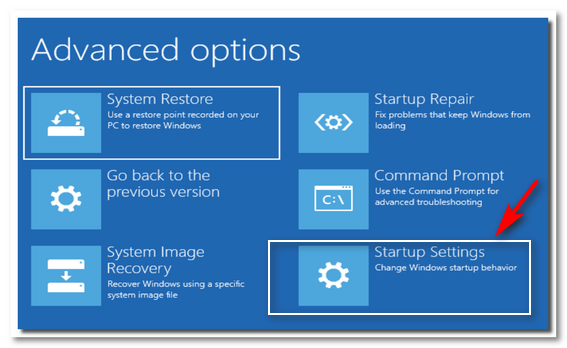
Startup Settings, in Advanced options.
Startup Settings would be your next choice after System Restore. When you choose Startup Settings you’ll have to restart in order to access them. You’ll see this screen:
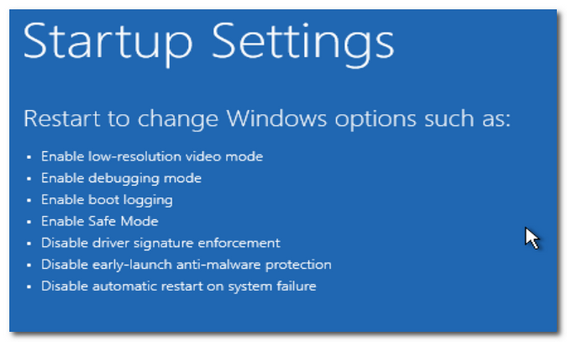
When your computer restarts, you’ll see you have many options to choose from. Unless you’re an advanced Windows user and/or a geek, You’re best bet is to stick with number 5 – “Enable Safe Mode with Networking”. If you can boot into Safe Mode with networking you an access Settings, you can check your email and even open your browser and look for help. You’ll also be able to use the Command Prompt and even, if you’re a procrastinator, copy your precious, irreplaceable files to an external hard drive … just in case.
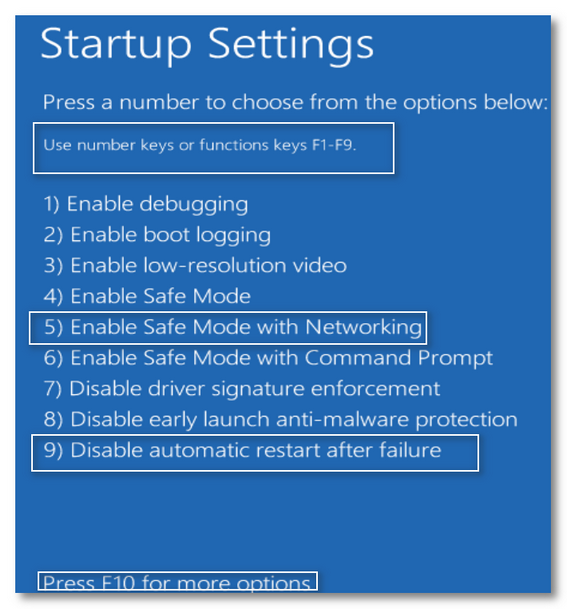
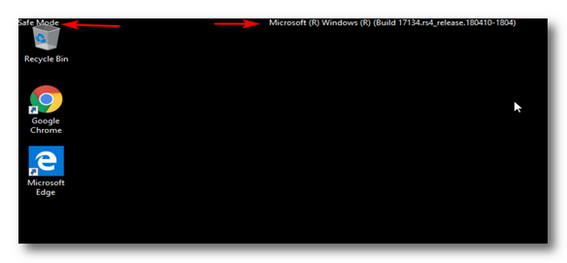
Booting into Safe Mode with Networking in Windows 10 is as good option because it allows you to send and receive emails, browse the Web, save your files to an external drive, access Windows Settings, run commands like CHKDSK /F (to fix disk errors) and other commands, and more.
If the problem with booting your computer involves a BSOD (Blue Screen of Death), option #9 “Disable automatic restart after failure”, would be a good option for you.
Having had my computer bricked by a Windows update gave me the opportunity to practice what we preach, and looking back, other than losing a lot of sleep for one day, it didn’t take me more than a couple days to get everything reinstalled and get my computer back to how I like it.
And thanks to Ashampoo, I was able to import some application folders from programs like FileZilla, Chrome, Firefox, FastStone, etc. so when I reinstalled them my personalized settings were already configured and ready to use.

