Does Your Computer Take Forever to Start? Here’s a Time-Saving Tip For You
One of the biggest complaints we hear about Windows 10 – besides the continuing litany of botched updates – is how long it takes to start up. Well, it’s true, you can disable some startups and do some optimization tricks that can reduce Windows 10’s startup times, but still, most Windows 10 computers will take between 2 minutes and 5 minutes to start up. And something else to remember is that boot times vary depending on the computer. Systems with more RAM (memory) and SSDs (Solid State Drives) boot faster than those with less RAM and HDDs (Standard Hard Drives).
Two to five minutes is pretty much the norm
When we say 2 minutes to 5 minutes to start up, we don’t mean 2 to 5 minutes until you can see Windows on your screen — we mean 2 to 5 minutes from the time you start Windows 10 until the time you can actually use it. In other words from the time you start Windows 10 until the time it is fully loaded.
Windows Sleep Mode
And a bit about Windows 10 Sleep mode: If you’re one of the many people who have used Widnows 10 sleep mode only to find that Windows 10 takes forever to wake up from sleep — this tip is for you too.
A Time-saving tip for you
Now we are going to share a tip that both of us have used for many years. Both of us love to get up in the morning and have our PCs ready to use. We don’t want to waste 2, 3, 4, or more minutes before using our computers. We want to right to work!
So, despite the controversy that this tip will probably evoke, we’re going to share our homemade time-saving tip with you. Please remember: Every computer is different, just like everyone who uses a computer is different. If you’d like to have your computer instantly ready to use every time you want to use it, this tip may be just what you’re looking for.
Here is how we set up our Power Options on our Windows 10 computers.
Press and hold down the Windows key & tap the x key (or right-click the Start button) and select “Power Options” from the menu which appears.

If you don’t have a laptop, and you want to try these just use the settings we have selected for “When plugged in…”.
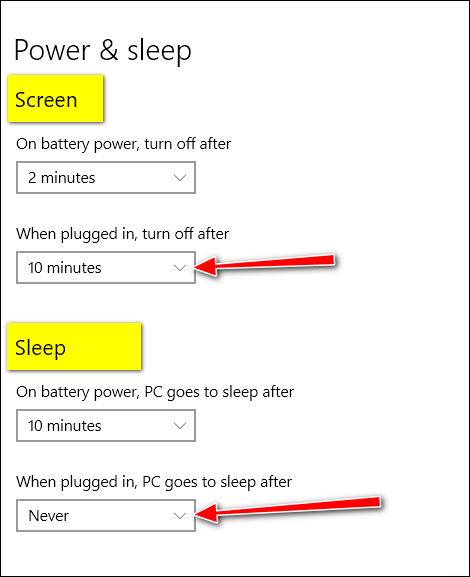
Under “Screen”
Set it to turn off after 10 minutes
This means that after 10 minutes of inactivity (no keyboard, mouse, or touchpad activity) your screen will turn off.
Under “Sleep”
“PC goes to sleep after”.. should be set to “Never”.
You may be wondering about how much extra electricity you’ll use if you don’t turn your computer off every night or put it to sleep. It depends on your PC. Newer desktops, all-in-ones, and desktops are a lot more energy efficient than old ones.
Desktops and all-in-ones use more electricity than laptops. It’s impossible to say how much more electricity your computer will use if you leave it turned on using the settings as suggested here. Our best guess is about 10-20 watts for a laptop (a nightlight or two), and 30- 60 watts for all-in-ones and desktops.
Using these settings guarantees instant access to your computer the minute you need it. To wake the screen just touch a key, move your mouse or tap the touchpad if you’re using a laptop.
Oh, and one more thing…
Leaving your computer turned on with these settings does not — at least not in our 24+ years of experience — shorten the life of your computer. The computer on which this tip was written is a ten-year-old Dell laptop – and it’s still going strong. It originally came with Windows 7 and I upgraded it to Windows 10 several years ago.
A word about Windows 11
If you’re using Windows 11, you can also use these same settings if your Windows 11 PC is slow to start up – but generally, all things considered, Windows 11 computers start faster than Windows 10 computers.

