How to Configure System Restore in Windows 10
Recently, we’ve received quite a few emails asking about System Restore on Windows 10. Some of you are wondering why you have no restore points at all, and others want to know how to increase the number of restore points they can choose from. So, today’s tip is a refresher course on configuring and using System Restore.
Windows 10, by default, sets the maximum hard drive space that System Restore can use at 1 % of the total hard drive. If you have a 1 TB hard drive, that’s a maximum of approximately 10 GB. If you have a 500 GB hard drive it’s about 5 GB.
System restore points, depending on the amount of data on your computer, can be quite large, so it’s likely that many of you have only 1 or 2 restore points you can choose from if you need to do a system restore. This is because of Windows 10’s small default System Restore disk space limit.
We recommend that you change this to at least 5% and preferably 10% – and here’s how you can do that.
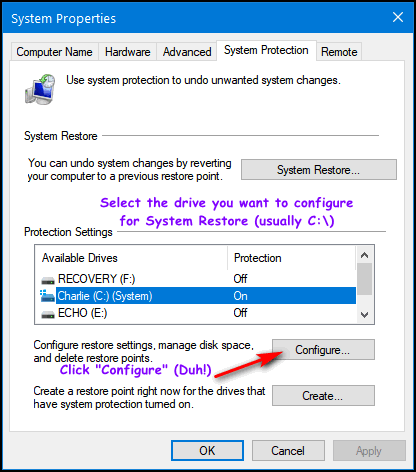
Type CREATE in taskbar search and press Enter.
System Restore will open.
Select your Windows drive (usually “C:” ) and click on the “Configure” button:

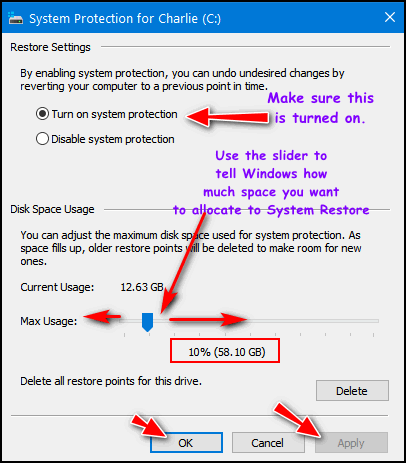
Make sure that “Turn on system protection” is selected. Under ”Disk Space Usage” use the slider to adjust the amount of disk space you want to allocate to System Restore.

Now, click Apply/OK. And that’s it!
Increasing the disk space allocated to System Restore increases the number of restore points you’ll have available. We recommend you don’t go crazy with this. It’s wise not to allocate more than 10% of your hard drive space to System Restore. And keep in mind too, increasing the drive space allocated to System Restore has no immediate effect – you’re not going to see 2 or 3 new restore points appear out of the blue. Over time, you’ll have 3 or 4 restore points to choose from instead of 1 or 2 — and that should be plenty. You don’t need more than 3 or 4 restore points, so don’t go use common sense when configuring the space you want to allocate do System Restore.
If you should ever need to restore your computer using a System Restore point, here’s how to do it.
- Right-click the Start button
- Click “Run”
- In the Run box type “RSTRUI” (no quotes) and press Enter
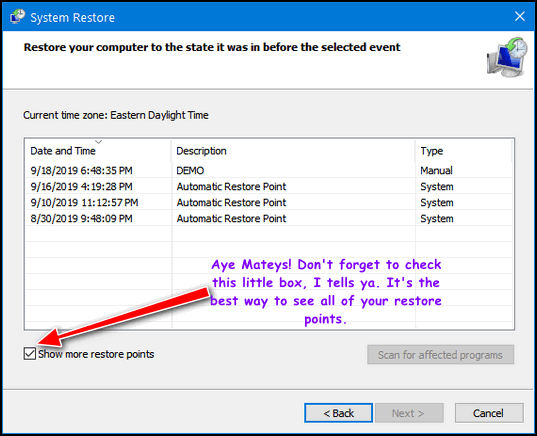
- System Restore will open. To see all of your restore points you might need to choose “Show more restore points” at the bottom of System Restore. See the screenshot below.

Aye! Now yer a System Restore Expert (SRE), I tells ya!


I get a box with a message that no restore points have been created on your system drive. It asks me to create a restore point in *system protection*, but I did this in the earlier part of the post.
Hi Debi,
if you do everything as in the article and you still can’t create a restore point then it gets complicated.
You need to check to make sure the appropriate services are running. Right-click the Start button, click “Run” and type SERVICES.MSC in the Run box.
Make sure that Volume Shadow Copy service is running. Also check to make sure its dependencies: Remote Procedure Call (RPC), DCOM Service Process Launcher, and RPC Endpoint Mapper, are running.
Hi! This is the exact reason why I purchased your computer help that I haven’t used yet.
My C Drive is 90.5 GB Used space and 59.4 GB Free space. But, my D Drive is 291 GB Used space and 471 GB Free space. To me, it would make sense to add extra space from the D Drive to the C drive., but maybe that isn’t the best idea. Aside from the fact that I wouldn’t know how to do that. lol