How to Create a Guest Account On Windows 10
We’ve worked thousands of computers with our Cloudeight Direct Computer Care service, and one thing we’ve seen frequently are computers with problems caused by parents or grandparents letting their children or grandchildren using their PC. Most of the time they let the children or grandchildren use their own user accounts, which almost always have administrator privileges. Admin privileges give users a lot of power to change computer settings, uninstall and install software and almost anything else they want to do with a PC. If you have young children or grandchildren, or if you frequently have guests who you want to allow to use your computer, why not create a guest account?
A Guest Account on Windows comes handy when you want to share your computer with someone else, but don’t want them making any changes to your computer. By default, Windows 10 does not have Guest accounts enabled… but everything you need to create a guest account is still there. And you can use an Administrator Command Prompt and the Net User command to a Guest account on Windows 10.
First, we called our Guest account “BeMyGuest” – you can call yours whatever you want (except “Guest” which is reserved for Windows). So, wherever you see “BeMyGuest” in the tutorial below, feel free to substitute whatever name you want for your Guest account.
Let’s create a Guest account on Windows 10.
1. Press Windows Key + X to open the “power menu” and click “Command Prompt (Admin)”.
2. Now we need to add a user account. So, type in the following command to create a new user. ‘BeMyGuest’ when you see it in the commands is the name of my guest user account, you can name yours whatever you want, except for Guest – Windows reserves that name and you can’t have it!
3. In the Command Prompt at the prompt > type the following command and press Enter:
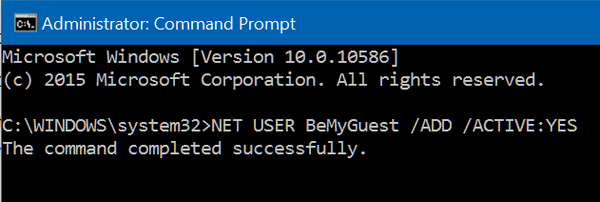
NET USER BeMyGuest /ADD /ACTIVE:YES

If you typed that correctly, you’ll see “The command completed successfully”. If you don’t see that, then make sure you left a space between the account name (in our case BeMyGuest) and the forward slash / .
4. Now, because this is a Guest account we don’t want to assign a password for a guest account. So, enter the following command at the prompt and press Enter:
NET USER BeMyGuest *
We don’t want a password for his account so press Enter twice.

5. Now we need to delete our guest account from Localgroup Users and put it in Localgroup Guests
First delete the new guest account from Users by typing the following command at the prompt and pressing Enter:
NET LOCALGROUP USERS BeMyGuest /DELETE

Now, we’re going to add the Guest account to Localgroup Guests by typing the following command at the prompt and pressing Enter:
NET LOCALGROUP GUESTS BeMyGuest /ADD

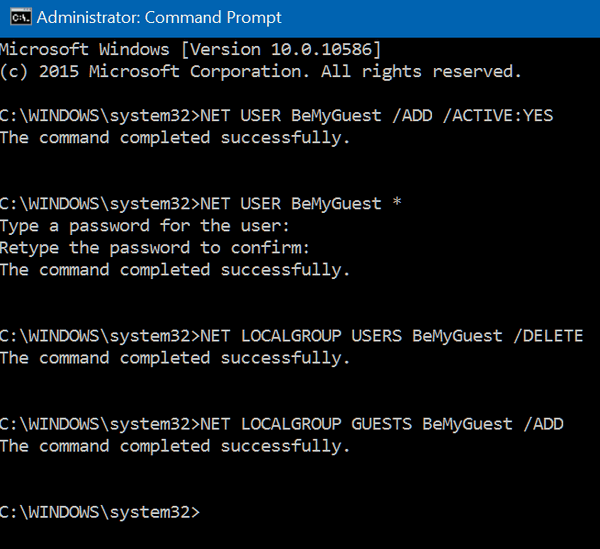
And that’s all there is to it. Below is a screen shot of all the commands in order so you can see how it all should look.

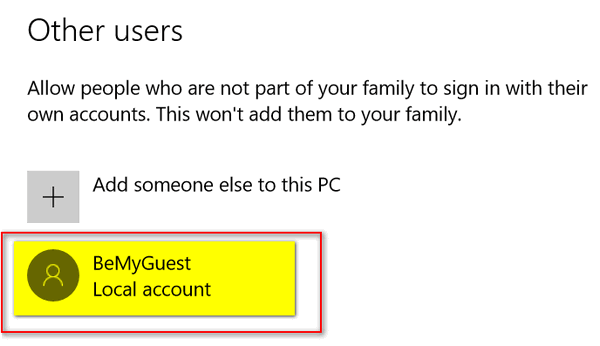
When you open Settings —> Accounts —> Family & other users you’ll see your new Guest account right there under Other users. See? There’s BeMyGuest.

From now on, when you start your computer or log out, you’ll see “BeMyGuest” (or whatever you called your Guest account) listed on the login screen with your account. Click on the guest account to log in- no password required. Your guests will be able to run apps & programs, browse the internet, play music. etc.. But Guests cannot change system settings, install or remove programs, or make any changes to your computer.


Thank you so much for this. Everything looks exactly as you show above so I expect there is now a BeMyGuest account on my pc. Yay!