

Before we get started, we’ll tell you that you won’t find this on Microsoft’s Web site – although they allude to it several times. And there are a couple things you need to keep in mind first: Anytime you reinstall an operating system there’s a chance that something will go wrong and you’ll lose some — or a lot of data. If you have purchased a new computer with Windows 7 SP1 on it, you cannot use this tip. If you’ve installed SP1 on your computer you can’t use this tip unless you uninstall service pack 1 first.
Let’s get started.
You’ll need the following things before you can reinstall Windows 7 on your Windows 7 computer:
1. A Windows 7 DVD – if you don’t have one, borrow one. It’s completely legal. All Windows 7 DVDs have both 32bit and 64 bit versions of Windows. All you need is your own registration key. If you borrow a Windows 7 DVD from someone, make sure you have the same version as the version you already have on your computer. You can also legally download the Windows 7 ISO files and create your own Windows 7 SP1 DVD installation disk. Here’s what you’ll need:
- A blank, writable DVD disk
- The Windows 7 iso file – make sure you know what version of Windows you’re currently running so you download the right file. For instance, if you’re running Windows 7 Home Premium 32-bit, download that version. If you’re using Windows 7 Home Premium 64-bit download that version. Here are the download links for those two versions, since it’s highly likely you have one or the other. Download the Windows 7 Home Premium 64-bit ISO from here. Download the Windows 7 Home Premium 32-bit ISO from here. These files are huge — about 4 gigabytes — so they will take some time to download. If your version is different from the above (say if you have Windows 7 Professional — see this site for other versions.
- After you’ve downloaded the Windows 7 ISO file, you’ll need to create the installation DVD. It’s easy. Insert a blank, writable DVD disk into your DVD/CD drive. Then double-click on the ISO file you downloaded. Windows will burn the ISO file to the DVD. Make sure you label it then put it aside.
- You’re going to need a product key before you begin the repair installation of Windows 7. Almost always, the product key is attached to the back of your tower (if you’re using a desktop) or the bottom (if you’re using a laptop). You’ll need to write this down carefully as you’re going to need it when you being the repair installation. You can also retrieve a copy of your Windows 7 key by using a tool such as Magical Jellybean Keyfinder (the free version is just fine). You can get it from: http://www.magicaljellybean.com/keyfinder/.
2. If you have Windows 7 and you have installed SP1 via Windows updates or you installed it manually, you’ll need to remove it. Why? Because if you try to reinstall Windows 7 and Windows 7 SP1 is already installed Windows will object because the files on the DVD are older than the ones on the PC – hence this trick won’t work. We need to trick Windows into thinking we’re doing an upgrade. Here’s a link to Microsoft’s tutorial on uninstalling SP1.
Once you are sure you have everything you need, it’s time to proceed with the “repair” installation of Windows 7. This will replace any missing or corrupted Windows system files and leave all your data and programs intact.
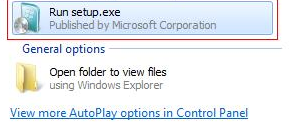
3. Insert your Windows 7 DVD in your DVD drive but do not let it auto-start. Instead click Start / Computer and click on your DVD drive and find “setup.exe” and double-click it. Widnows 7 installation will start.
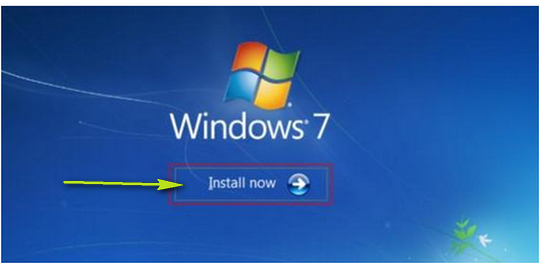
Then click “Install now”.
Next you’ll see a screen asking if you want to check for updates. We suggest that you do this. This will take several minutes. After this is finished, you’ll see “Restarting Installation”.

5. Next you’ll have to agree to the terms of the license to continue.
6. After you agree to the license, you’ll see the following screen. Choose “Upgrade”.

6. After installation is complete, you’ll need to enter your license key and then activate Windows.
7. Hopefully, this reinstallation – or “repair” installation will fix whatever problems you were having. All you files and programs should be exactly like they were before. But no guarantees — we’re not liable for anything, capiche?
I was just wondering if this works if you had bought Vista then upgraded to Windows 7? I have Windows 7 Professional upgrade 64 bit. So far mine is doing OK. Not great but OK.
It doesn’t matter what version of 7 you have, what matters is if you have SP1 installed. If you do, you’ll have to uninstall SP1 and then you should be able to use the “upgrade” trick to reinstall Windows 7 without losing anything.
I just tried this, I have Windows 7 Pro Disk and it has SP1 included on the disk. Do I need to uninstall SP1 even thought it is on the disk?
You can’t upgrade a Windows 7 SP1 disk installation; you cannot uninstall SP1 when it came installed with Windows (i.e. on your installation disk).
So what you are saying in Step 3 is because my Windows 7 came with SP1 installed there is no way I can do a repair install on my computer. I would have to do a new reinstall over the existing operating system with the SP1 already there?
Yes. You would.
I have a Dell installation disc. Will it install all the bloatware that Dell puts on their computers? Should I download the
Windows ISO file and use it instead?
If it says “Operating System Disk” it will not. If it says recovery disk — it will restore your computer to its factory state. Normally Dell provides a Windows installation disk (Operating System Disk) — at least Dell has with the Dells I have purchased.