How to Make Zip Files Without Using Any Third-Party Software
Here’s an easy tip that we know will come in handy… maybe not today, maybe not tomorrow, but soon, and for the rest of your computing life. (Thanks, Humphrey B.)
There are a lot of good reasons to make zip files. Today we’re going to show you how to make zip files. We will zip up a folder of images and videos so they’ll be easier to share, save, or upload to Google Drive, OneDrive, DropBox, or similar. And since you’re using Windows 10 or Windows 11 you should know that you don’t need any 3rd-party zip software to make zip files, Windows has all you need. Remember what Uncle TC and Aunt EB always say… with computers, less is more.
OK let’s get started. Below, I’ve got a folder with 57 images (and some videos) of my grandkids. Yep! I’m that old, I tells ya!
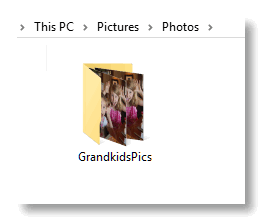
You can see the folder has a lot of files in it (57 ). See?

It would be awkward (and poor etiquette) to share 57 separate files by email or website. And it would be impossible to send a folder as an attachment. Zipping folders make the easy to share, move, copy, or back up. Once the folder is zipped up, unzipping it yields a folder that is a duplicate of the folder you zipped. Ah! You’ll think of a lot of ways you can use zip files.
Enough yammering, let’s make a zip file.
Windows 10
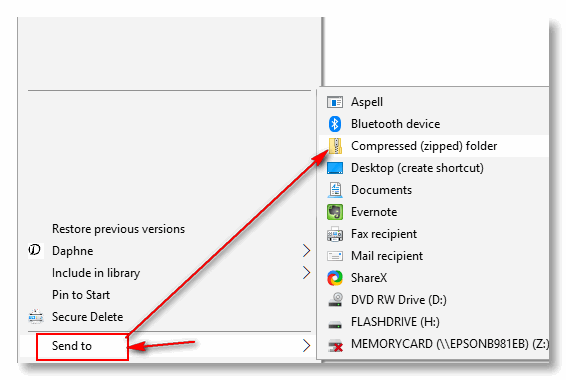
To turn that folder into a zip file, all we need to do is right-click on the folder, choose “Send to” on the left pane, and then choose “Compressed (zipped) folder” from the right pane. See?
Windows 11
In Windows 11, you make a zip file the same way you make one with Windows 11, except you have one extra step. You’ll need to right-click the folder, click on “Show more options” then “Send to” “Compressed (zipped) folder”. Do you want to know a secret? If you hold down the Shift key when right-clicking the folder, you can skip the “Show more options” step.
As soon as you do that, you’ll see a dialog appear telling you that your zip file is being created. When Windows is finished making your zip file, you’ll see it in the folder with the folder you zipped. See?

You can rename the zip file if you want. You can move the zip file to a different location, or a different drive, upload it to Google Drive, or DropBox, or copy it to a USB flash drive. The zip file I created is 105 MB, which is too big to send by email. If you keep your zip files under 25 MB you can attach them to an email and send it to anyone. But if you want to make big zip files like this one, you can easily share them using Google Drive, DropBox, One Drive, etc. For my example, I’m going to use Google Drive.
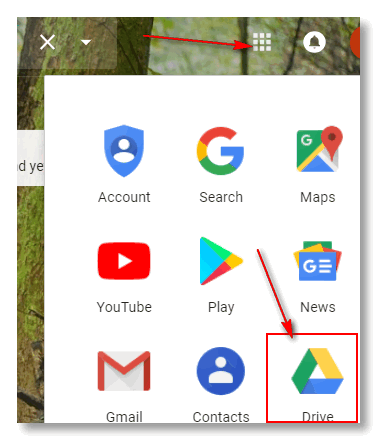
Login to your Google Account and open Google Drive.
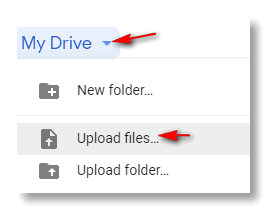
Click on My Drive and then choose “Upload files”
Wait while Google Drive uploads your file. Once it’s uploaded, you’ll find it on Google Drive. Right-click on it and choose “Get shareable link”.
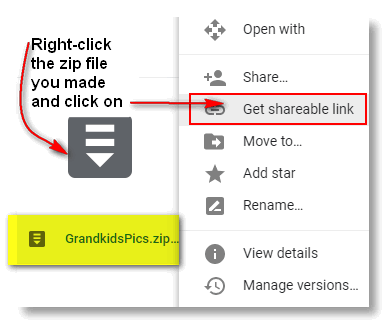
A link you can share with anyone will be copied to the Windows clipboard so all you have to do is paste it into an email or social networking site.
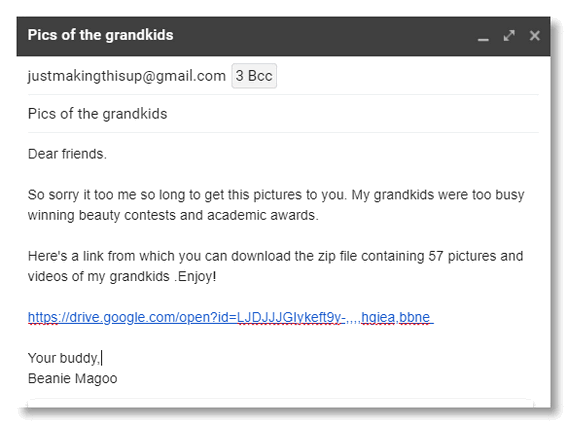
For this example I changed my name to Beanie Magoo – I’m going to share my newly created zip file with some friends who will all think their grandchildren are cuter and smarter than mine – and isn’t that what being a grandparent is all about?
When the recipient gets this email, all he or she has to do is click the link to download the zip file I created and uploaded.
There are a lot of good reasons to make zip files. They make it easy to move and/or share a lot of files at once by making all the files in a folder one single zip file. You can even zip up a folder that has subfolders. When the zip file is unzipped the folder will look just like the folder we zipped at the beginning.
See?


You can always split the folder as another alternative.
The idea is to send one zipped file instead of 2 or 3 or 6 or 7.