How to Manage Items in the Action Center [Windows 10]
We showed you how to disable the Windows 10 Action Center. And now, for those of you who use the Action Center in Windows 10, we’re going to show you how to edit the “quick actions” which appear in the Action Center. We’ll show you how to add, remove and rearrange quick actions. in the Action Center.
I like the Action center because it’s a quick way to get to Settings, turn night light on/off, open “Screen Snip”, turn on Battery saver, check Network settings and more.
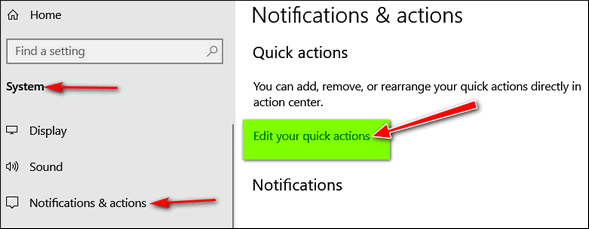
1.) Right-click on the Windows 10 Start button and click Settings.
2.) In Settings, click on “System”.
3.) In Settings > System, click on “Notifications & actions” and, under “Quick actions” click on “Edit your quick actions” (see below):

4.) The Action Center will open and you see all the items in the Action center are displayed with what looks like a pin and a tiny x. You can see the icons in the screenshot below. When the quick actions in the Action center have this icon displayed on them you can click on an item to delete that quick action. Also, when the quick actions have this icon displayed on them, you can drag the items around and put them in any order you like.

5.) And you can add quick actions too – providing y0u don’t have all available quick actions already displayed.

When you’re done, click “Done”.
Now you know how to disable the Action center; how to add or remove quick actions from the Action Center, and how to rearrange the quick actions in the Action Center.

Help us by shopping Amazon using our affiliate link.

