

How to Perform a Clean Boot in Windows 10
If you’re having problems with your computer, one easy way to find out if there is a conflict with your software or processes is to do a clean boot.
Before we show you how, this is not something you’re going to want to do on a whim. You may want to print this tip and save it in case you start experience troubles down the road. If you are having problems right now and you just can’t figure out what’s going on, troubleshooting by using a clean boot may be helpful.
Microsoft summarizes it this way:
A clean boot is performed to start Windows by using a minimal set of drivers and startup programs. This helps eliminate software conflicts that occur when you install a program or an update or when you run a program in Windows 8.1, Windows 8, Windows 7, or Windows Vista. You may also troubleshoot or determine what conflict is causing the problem by performing a clean boot.
Why software conflicts occur?When you start Windows by using a normal startup operation, several applications and services start automatically, and then run in the background. These programs include basic system processes, antivirus software, system utility applications, and other software that has been previously installed. These applications and services can cause software conflicts.
- Right click on your start button and choose Run — or press the Windows Key+R
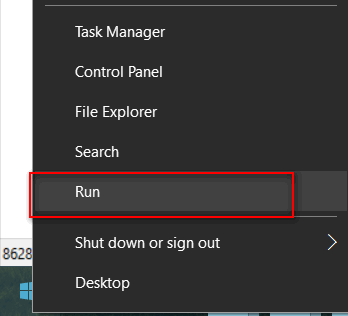
In the run dialog type MSCONFIG and press enter.
2. Under the General tab, check “Selective startup” and then uncheck “Load startup items” then click OK.

3. Next click the Services tab (at the top). Tick the box next to “Hide all Microsoft services” . Then click “Disable all” and press Apply / OK.

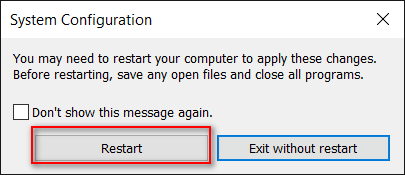
4. You’ll see the dialog below appear. Click “Restart”. Your computer will reboot
After the computer is restarted, you will be in a clean boot environment. Then, do one of the following:
If you could not install or uninstall a program or an update before you performed the clean boot, try to install or uninstall the program or update again.
Note If you receive the “The Windows Installer service could not be accessed” error during the installation or uninstallation, follow How to start the Windows Installer service when system services are not loaded, and then install or uninstall the program or update again.
***If you get the Windows Installer service could not be accessed” error you will need to enable it manually. Press Windows Key + R and type “Services MSC” (no quotes) in the run dialog and press Enter. Look for Windows Installer in the services list. Right-click on it and choose “Start” ***
If the installation or uninstallation is successful, you have resolved your issue. Follow How to reset the computer to start as usual to reset your computer to the normal startup.
If the installation or uninstallation still fails, that means this issue is not caused by application or service conflicts. You may have to consult he software developer or a computer repair service for more help.
If you could not run a program before you performed the clean boot, try to run the program again.
If the program runs correctly, this issue is caused by application or service conflicts.
If the program still does not run as expected, this issue is not caused by application or service conflicts. You may have to consult he software developer or a computer repair service for more help.
If no Startup Item causes this problem, a Microsoft service probably causes the problem. To determine which Microsoft service may be causing the problem, repeat steps above without selecting the Hide all Microsoft services check box in each step.
If you have no problems while in a clean boot environment, you know you have a service or software conflict. If you do it will be with program you’re trying to install or the program that won’t run. Your best bet is contacting the software or hardware manufacturer. More than likely if it’s causing a problem on your computer, it’s causing a problem on other people’s computers too.
How to put your computer back to normal startup:
5. Open the run dialog as above and type MSCONFIG in the run dialog. Press Enter.
Tick the box next to “Normal startup” and press OK.

6. Click the “Services” tab. Click “Hide all Microsoft services” click “Enable all” click Apply/OK.
 6. You’ll see the dialog below:
Click “Restart”. Your computer will restart and you’ll be back to normal Windows.
Don’t forget Windows 10 has an Advanced Boot Menu with Troubleshooting options available as well. A quick way to access the Advanced Boot Menu is to hold down the left Shift key while restarting your computer.
———————