

How to Stop Troublesome Windows Updates from Reinstalling
Note: This tip applies to cumulative updates and other regular “Patch Tuesday” Windows 10 updates. This does not apply to Windows 10 version updates. If a version update causes you problems, by default, you have 10 days to go back to the previous version of Windows 10. See our article here if you have a version update that’s causing problems.
By default, Windows 10 keeps your device is automatically updated with the latest features, security patches, and bug fixes.
Anyone using Windows for any length of time knows that sometimes a Windows 10 update can cause problems with your PC. In this case, you’ll need a way to prevent the problematic update from reinstalling automatically the next time Windows Updates are installed.
If an update is causing system crashes, problems, or instability on your PC, follow the instructions below, to prevent the troublesome update from being reinstalled/
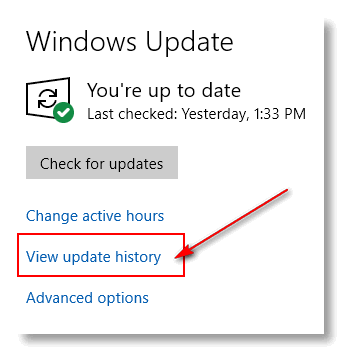
Right-click on the Start button and click “Settings”. When the Settings app opens, click on “Update & Security” > “Windows Updates”. In Windows Updates, click on “View update history”.
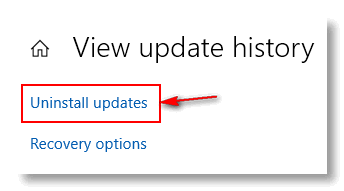
Next, click on Uninstall updates.
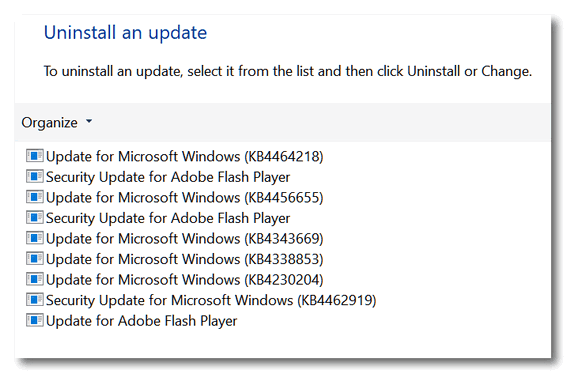
To uninstall the unwanted update, click on it to select it and then click “Uninstall”.
Now, you’re all set until the next time Windows updates and reinstalls the update you just worked so hard to uninstall. You have more work to do if you want to prevent Windows from reinstalling a trouble-causing update.
For some reason, since January 2021, the link to the “‘Show or hide updates troubleshooter” on Microsoft’s site doesn’t work. Despite numerous inquiries about the broken link – and promising to fix it – as of today, July 7, 2021, it’s still broken.
But no worries. Thanks to the Internet Archive, better known as “The Wayback Machine”, you can still download the ‘Show or hide updates troubleshooter” to prevent a troublesome update from being reinstalled.
Download the “Show or hide updates” troubleshooter now.
Save the troubleshooter to your PC, then click to run it.
Opening wushowhide.diagcab launches the troubleshooter; click Next to proceed. Then follow the instructions provided to hide the problematic driver or update.
When the program starts to run, it will scan your computer for updates. When it’s done, a window like the one below will open.
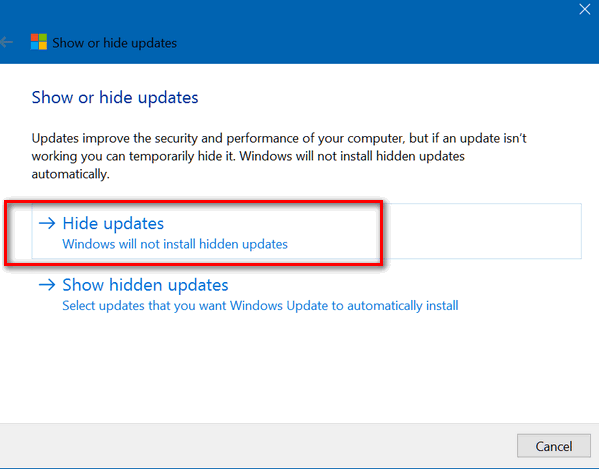
Click on “Hide updates”
Windows will display any pending updates:

You’ll see a list of available updates. Select the update that is (or updates that are) causing you problems. Windows will not reinstall the items you select. You can choose to install the hidden updates later by running the troubleshooter again and “unhiding” the updates.
Keep in mind that this does not stop updates from installing. It allows you to uninstall updates that have been installed and are causing problems. And prevents troublesome updates from being reinstalled.
And remember, this does not apply to version updates, only cumulative updates which are usually sent monthly. Windows 10 version updates have a rollback feature – you have 10 days to go back to the previous version of Windows if a version update causes you problems. See this page to learn how to roll back a Windows 10 version update.
How will we identify which update on the list is the one causing problems?
This article was written assuming you installed an update and they cause problems. Generally, but not always, Microsoft issues one cumulative update each month and usually on Patch Tuesday. They all have KB identification numbers.
My computer was updated yesterday K B 500 ……
Today I installed the recent feature update. computer had to shut down and boot up again. I didn’t sit here watching. Now the screen says: Non-system disk or disk error. Replace and strike any key when ready. Nothing changes when striking a key. What do I do now? All I have is a black screen with the above message.