How to Stop Windows From Automatically Updating Drivers and Why You Might Want to
A tip for Windows 10 and Windows 11
Did you know that Windows 10 and Windows 11 will update device drivers automatically? That sounds like a good thing, right? Not so fast!
We have been advocates against using any kind of automatic driver update software for a long time, but we’ve been more tolerant of Windows automatic driver updates. You might think that Microsoft would always provide you with the latest most up-to-date software drivers for your device and download them automatically. Even if it worked as well as it sounds, there are a couple things wrong with that:
1. If your hardware devices are working well, then you don’t need to update your drivers.
2. Windows sometimes downloads the wrong (or outdated) drivers for your hardware causing you heaps of problems.
A good example of problems that occur when Windows automatically downloads and installs drivers are graphics drivers. I can’t tell you how many times we’ve received emails from people who had problems with their computer’s display properties after a Windows update.
The best course of action is what we’ve always suggested: The only time you ever need to update your drivers is if a hardware device is not working correctly. Your printer, your display, and your sound – are all examples of devices that use drivers.
If you do need to update a driver, the device manufacturer’s website is the best place to go for new drivers. Not only are you assured you’ll get the correct driver(s), but you’ll also get the newest driver(s) including the ones with unique interfaces to interact with your device… touchpads and printers are good examples of this.
So, how do you keep Windows from automatically updating drivers? You might think Windows Update would be the place to go to stop automatic driver updates…but it’s not. Here’s how to disable automatic driver updates in Windows 10 and Windows 11.
Here’s the short way to do it (this saves you several steps):
If this does not work for you, see the second way further down in this article.
1. Type Device Installation in the Taskbar search and press Enter when you see “Change device installation settings” appear at the top.
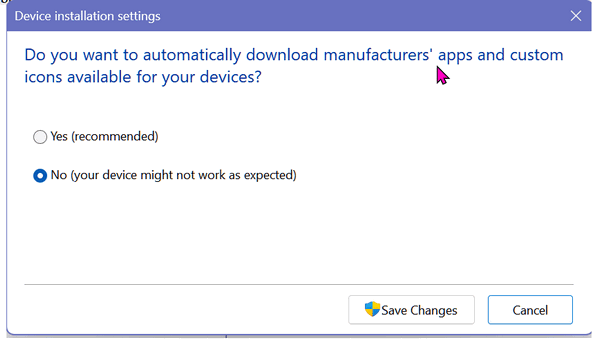
2. When the “Device Installation settings” window appears, select “No (your device might not work as expected) & click “Save Changes”. See the screenshot below.

And that’s it. And don’t forget to click “Save Changes” before you close this dialog.
If that way does not work for you – for example when you type Device Installation in the taskbar search you don’t see “Change device installation settings” appear, then try this.
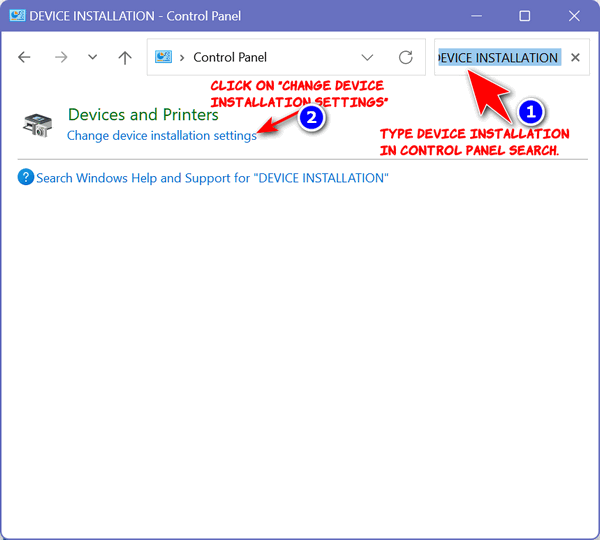
Type CONTROL in the taskbar search.
When the Control Panel opens, type Device Installation Settings in the Control Panel search box.
Then click on “Change device installation settings”.

And you’ll see this:

Yes…you will. And don’t forget to click “Save Changes” before you close this dialog.
IMPORTANT: If you change your driver update settings this way, you are responsible for updating device drivers if a hardware device stops working correctly. Always get drivers from the device manufacturer’s website never do a general search for drivers. Doing a general search for drivers may not end up well for you. It is very like to end with you installing useless driver updaters which are at best worthless and at worst loaded with malware.
IF YOU CHANGE YOUR MIND: If you decide to let Windows automatically update drivers in the future, repeat the steps above, but this time select “Yes (Recommended)” in the Device Installation Settings dialog and click “Save changes”.

