

The RECIMG Command In Windows 8x and Why You Should Know It
Windows 8x
An advanced user tip
Windows 8x has a very special feature that few people know about, but which can save you hours of time should you have to Refresh your Windows 8x PC due to major problems. Windows 8x contains a command line tool called RECIMG which you can use to make a quick image of your Windows installation including any desktop programs you’ve installed. If you haven’t run RECIMG and you run System Refresh, your personal files and folders and Windows apps (not desktop programs) will be restored. And so will all the junk that your computer manufacturer put on your PC. Unfortunately, if you use System Refresh and you have not used RECIMG you will have to reinstall =all of your desktop programs.
The RECIMG command gives you a pretty easy way to create a disk image containing all of your installed desktop programs. It does not contain your personal folders or files nor your Windows Apps (from the Windows store) as these are preserved by System Refresh, so your RECIMG (Recovery Image) will be much smaller than would a full mirror-image backup.
Knowing how to use the Windows 8x command “racing” to add all your installed programs to the Windows 8x System Refresh option, can save you a lot of time and heart ache. After you create a CustomRefresh image using the recimg command, when you run System Refresh on Windows 8x you won’t have to reinstall your desktop programs plus all your personal files, folders, settings and Windows apps are preserved by System Refresh. So it’s essentially a quick and easy way to reinstall Windows and keep all of your personal files, Windows apps and installed programs.
At first glance it may seem complicated – especially if using the command prompt is not your cup of tea. But it is really not as difficult as it looks on the surface and it’s something all Windows 8x users could really benefit from. So we’re going to cover all the facets of using the RECIMG command and give you a step-by-step tutorial on using RECIMG.EXE in Windows 8x to create a custom refresh image that you can use to refresh your Windows 8x PC in case you’re having serious Windows issues.
Taking a few minutes to learn to create a custom refresh image could save you hours of work and trouble down the road.
First, all commands using RECIMG.EXE must be run from an elevated command prompt – that is a command prompt with administrator privileges.
In Windows 8x, either right-click the start button and click Search and type CMD in the search box or go to the start screen and type CMD anywhere. When the command prompt appears in the search results, right-click it and choose “Run as administrator”
When running commands, all commands are typed after the prompt which looks like > .
On my Windows 8x computer the command dialog opens with C:\Windows\System32> but yours may open with C:\> or C:\Windows> ; it doesn’t matter. All commands are typed after the > regardless of the directory you’re starting in.
Also, lowercase/uppercase doesn’t matter but spaces and slashes do. A forward slash / is not the same as a backward slash
\ and spaces matter. If you use a backward slash instead of a forward slash, or you don’t leave a space were you should have one or you put a space where there shouldn’t be one, the command won’t work and you’ll get an error message. So if you get an error message you’re not doing something right — it’s not that commands don’t work. If you can’t run an elevated command prompt, it means you’re not logged in as an administrator.
OK with all that out of the way, when using the RECIMG command in Windows 8x, all commands begin with recimg.
So open and elevated command prompt right now and type recimg /showcurrent after the prompt >
See? C:\Windows\system32>recimg /showcurrent
This shows you the current location of the file Windows will use to refresh your PC. If you haven’t created a CustomRefresh.wim then it will show the default refresh image
Running the commands using recimg configures the recovery image Windows will use to refresh your PC
It’s important that you understand that if you use RECIMG to create an image including all of your desktop programs, that you use System Refresh and not System Reset to repair your computer. System Refresh refreshes your Windows installation, saves all your personal files and folders and Windows Apps that came with your computer or that you downloaded from the Windows store. If you use RECIMG to create a recovery image you will also be restoring all of your installed desktop programs too. So using RECIMG to create a recovery image that you can use in times of serious trouble can be a real time saver for you.
You can run RECIMG only from an Administartor (elevated) Command Prompt. Right-click Windows 8x start button, click Search and type CMD. When the Command prompt appears, right-click it and chose “Run as Administrator”.
In order to use RECIMG correctly you must first understand how it works and that you must follow the instructions exactly. We highly recommend you create a directory on an external drive or any other drive but the Windows drive (usually C:\ ), because if your computer goes belly up you may not be able to access the Windows drive and all your planning and work will be for naught. Create the directly on your external or other drive first before you begin — call it my recovery or whatever you will recognize.
So before we get started with the tutorial let’s see what Microsoft has to say about the RECIMG command — with our translation from geeky to English included:
RECIMG.EXE <command> <arguments>
The recimg.exe command line tool lets you configure a custom recovery image for Windows to use when you refresh your PC. When you create a custom recovery image, it will contain the desktop apps you’ve installed, and the Windows system files in their current state. Recovery images do not contain your documents, personal settings, user profiles, or apps from Windows Store, because that information is preserved at the time you refresh your PC.
Translation: You can create a custom Windows 8x recovery image which contains all of your installed desktop programs so that when you use Windows 8x System Refresh, not only are all your personal documents, ,settings, Windows apps, photos, etc. restored but all the desktop programs you’ve installed as well. I
When you create a custom recovery image, recimg will store it in the specified directory, and set it as the active recovery image. If a custom recovery image is set as the active recovery image, Windows will use it when you refresh your PC. You can use the /setcurrent and /deregister options to select which recovery image Windows will use. All recovery images have the filename CustomRefresh.wim. If no CustomRefresh.wim file is found in the active recovery image directory, Windows will fall back to the default image (or to installation media) when you refresh your PC.
Note that you cannot reset your PC using a custom recovery image. Custom recovery images can only be used to refresh your PC.
Translation: You can store your recovery image in any folder you want, on any drive you want, but you cannot rename it. It will be called CustomRefresh.wim and you cannot rename it or it won’t work. And you can only access the recovery image via Windows 8x System Refresh; if you use System Reset you’ll lose everything and your computer will be restored to its factory state.
If you have more than one CustomRefresh.wim files in different folders, you can chose which one will be used by running a command like RECIMG.EXE /D:\Recovery\CustomRefresh /setcurrent to set any CustomRefresh image as the one Windows will use when you use System Refresh. You can also run the command RECIMG.EX /:D /deregister to prevent Windows from using your custom recovery image. In the examples we used, Drive D:\ and the folder Recovery as the location of our CustomRefresh.wim custom recovery image.
However you should remember you do not have to use these commands if you want Windows to always use the more recent recovery image you created. Windows automatically sets the more recent CustomRefresh.wim you create as active and will use it whenever you do a System Refresh.
And just a reminder: If you use an external drive to store your recovery image, you must leave the external drive turned on and plugged in when you do a System Refresh, otherwise Windows will use the factory recovery image and your custom recovery image will not be used.
The following commands can be specified:
/createimage <directory>
Captures a new custom recovery image in the location specified by <directory>, and sets it as the active recovery image.
The Tutorial:
RECIMG /createimage D:\recovery
The above command would put the CustomRefresh.wim recovery image on the D:\ drive in a folder called Recovery. You can use whatever drive you want (other than C:\) for example:
RECIMG /createimage E:\MyCustomRefresh
RECIMG /createimage F:\MyCustomRecovery
Got it? You can put your custom refresh image on any drive and name the containing folder anything you want. In the examples above we’ve shown you D:\ , E:\ and F:\ drive options, and different folder names. The folder names don’t matter really – once you create the CustomRefresh.wim file, Windows will remember its location.
A word to the wise: We strongly suggest you create the directory first before you run RECIMG. You can either go to the drive and create the folder or use the command below (always from an elevated command prompt – with administrator privileges):
mkdir D:\Recovery
That command would create a folder on D:\ drive called “Recovery”
mkdir E:\MyRefreshFile
That command woud create a folder on E:\ drive called MyRefeshFile
mkdir F:\SystemRefreshFile
That command would create a folder on F:\ drive called SystemRefeshFile.
Got it? You can choose whatever drive you wish and create a folder with virtually any name you wish using the MKDIR command. If you don’t want to use that command, just navigate to the drive on which you want to create the folder to use to store your CustomRefresh Image and create the folder by right-clicking and choosing “New” and “Folder”.
After you’ve created the folder on the drive where you want to store your CustomRefresh image, run the RECIMG command:
RECIMG /createimage D:\Recovery
The command above will create the CustomRefesh image in the folder “Recovery” on the D drive. Again you can choose any drive (but C:\) and any folder you want
RECIMG /createimage E:\MyRefreshFile
RECIMG /createimage F:\SystemRefreshFile
See? But for our purposes today, I’m going to use my external drive “D:\” to store my custom refresh file and I’m going to save it in a folder I created called Recovery on the D:\ drive.
First I open an elevated command prompt:
Microsoft Windows [Version 6.3.9600]
(c) 2013 Microsoft Corporation. All rights reserved.
First I create a directory on my D drive called “recovery” – no quotes – by running the following command:
C:\Windows\system32>mkdir d:\recovery
Next I create a custom recovery image to be stored in the folder I just created on the D:\ drive. The CustomRefresh file I create is automatically set active by Windows and Windows will use my CustomRefresh image instead of the default.
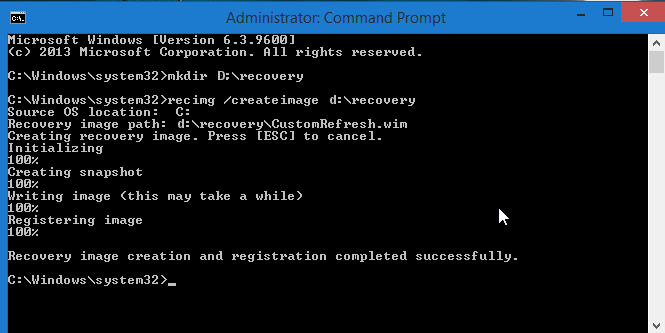
OK now let’s create the CustomRefesh image:
I type the command:
C:\Windows\system32>recimg /createimage d:\recovery
Windows responds with:
Source OS location: C:
Recovery image path: d:\recovery\CustomRefresh.wim
Creating recovery image. Press [ESC] to cancel.
Initializing
100%
Creating snapshot
100%
Writing image (this may take a while)
8%
After 45 minute or so (the length of time it takes to run depends on how many desktop programs you have installed), RECIMG finishes and the dialog changes to:
Recovery image creation and registration completed successfully.
When RECIMG has completed Windows will automatically use this new custom recovery image containing all of my installed desktop programs instead of the default. The Image will include all my installed desktop programs but not my Windows Apps, my personal files and folders, my personal Windows settings, my photos, etc. Those are automatically preserved and restored by Windows System Refresh by default. So in essence, the RECIMG command allows you to create a mirror image of your current setup, including all installed desktop programs and all of your personal files, folders, and Windows Apps.
/setcurrent <directory>
Sets the active recovery image to the CustomRefresh.wim file in the location specified by <directory>. Windows will use this image when you refresh your PC, even if a recovery image provided by your PC’s manufacturer is present.
So if the custom recovery image you want Windows to use is located on drive F:\ for example, but you have made more than one custom image, you could set any other custom recovery image as active (current) by running the following command:
recimg /setcurrent F:\recovery\CustomRefresh.wim
(F: being the drive and recovery being the folder in my example. However it could be whatever you want it to be, for example E:\MyCustomImage\CustomRefresh.wim where E:\ is the drive letter of the drive and MyCustomImage being the folder in wich your custom recovery image is stored.
/deregister
Deregisters the current custom recovery image. If a recovery image provided by your PC’s manufacturer is present, Windows will use that image when you refresh your PC. Otherwise, Windows will use your installation media when you refresh your PC.
If you create a custom recovery image and you no longer want to use it, you can use this command to deactivate it and revert back to the default recovery image. For example if your CustomRefresh.wim image is located in a folder called CustomRefresh on drive G, then you could deactivate it by running the following command:
recimg /deregister G:\CustomRefresh\CustomRefresh.wim
In the above command you’re telling Windows not to use your custom recovery image anymore, and to revert back to the default. In the example above, your custom recovery image is located on drive G, in a folder called CustomRefresh.
/showcurrent
Displays the path to the directory in which the current active recovery image is stored.
This is a straight forward command that lets you view the current location of the active recovery image. If you have not created one, it will be the default location. If you have created a CustomRefresh.wim, it will show the location of the file which Windows will use to refresh your system..
For example:
recimg /showcurrent
/help, /?
Displays this help text.
For example
recimg /help,/?
If you forget any of these commands or need to refresh your memory, you can get a list of all of them by typing “recimg /help,/?” (no quotes) at the command prompt.
There you have it – all you need to know about RECIMG in Windows 8x. Now go forth and make your custom system refresh image; and someday, maybe not today, maybe not tomorrow, but some day soon, you will be very glad you did.
How in the world would anyone like me, *not* a computer wizard, know about these things? If not for TC and EB, we would not. At least I wouldn’t. Even though it’s (appartently) not a secret and Microsoft posts it on their website, how would anyone know about it, know to look for it there, or understand their geek-speak? If not for TC and EB…
Thank you so very much for telling us these things, and explaining them in detail – and with screenshots!
Grateful hugs to you both, ~Mary Lee
[Oh, fine! Now I’ve got Olivia Newton-John in my head singing “If Not For You.”]
The best thing since sliced cheese. I’ve spend so many hours refreshing, reinstalling, tuning and tweaking
that I had to visit a optometrist in China.
This is so amazing it makes me wonder why Microsoft hid it and I’m not a conspirator spreading
innuendo or unlabelled, unjustifiable criticism, ‘no not me’ !!!! 🙂