Increase the Number of Days to Go Back to the Previous Installation of Windows
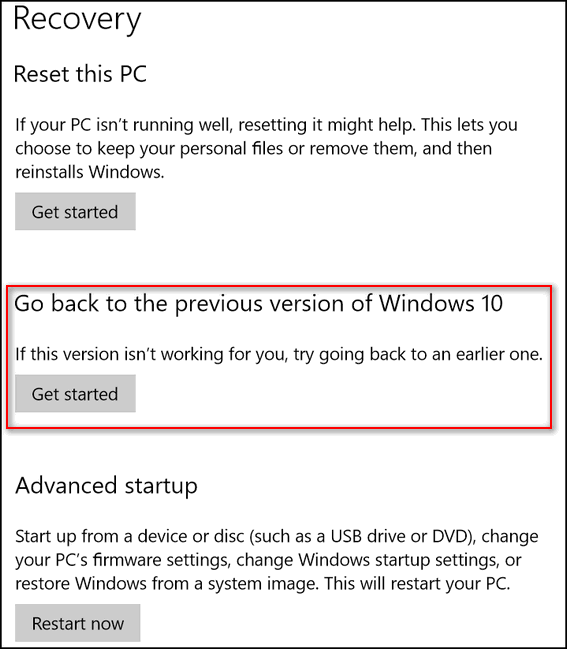
When Windows 10 was introduced, each new version upgrade gave you 30 days to roll back to the previous version of Windows. The ability to go back to the previous version of Windows is a nice feature of Windows 10 because it gives you time to use the new version and make certain it doesn’t cause any major problems with your computer.
With the Windows 10 Anniversay Edition, Microsoft changed the maximum number of days you had to go back to the previous installation from 30 days to 10 days.
In most cases, 10 days is enough time to evaluate the new Windows version to make sure that everything is working OK. But sometimes it’s nice to have a little extra cushion – like insurance – in case problems appear after the 10 days have passed. A number of times we’ve encountered situations while working on other computer with our Cloudeight Direct Computer Care services where going back to the previous version of Windows would have been extremely helpful in solving the problems people were having, but the 10 days had passed and the “Go back to the previous version…” option was no longer available. Maybe you’ve experienced this with your own computer
When Windows installs a version update, such as Windows 10 April 2018 Update (Windows 10 version 1803), a copy of the previous installation is created and saved as “Windows.old folder”. And in case the update to the new version of Windows fails, Windows can reinstall the previous version automatically. Also, if the update causes significant problems with your computer, the Windows.old folder allows you to go back to the previous version of Windows 10 without losing anything.
After 10 days, Windows 10 deletes the Windows.old folder and when it does you no longer have the option to go back to the previous version of Windows.
In this tip we’re going to show you how to increase the number of days you have to go back to the previous version from 10 days to a maximum of 60 days.
Beginning with Windows 10 April 2018 Update (Windows 10 version 1803), Microsoft has added new commands to its DISM (Deployment Image Servicing and Management) tool that you can use to extend the number of days you have to go back to the previous version after a version update. [Tip: Version updates are major feature updates like Windows 10 Creators Update, Windows 10 Fall Creators Update, and the Windows 10 April 2018 Update.]
IMPORTANT THINGS TO KNOW BEFORE YOU PROCEED:
- This works only on Windows 10 Version 1803 (April 2018 Update) and newer versions of Windows 10.
- You must run these commands within 10 days of a major update – before Windows automatically deletes the Windows.old folder.
[TIP: Since you may not be able to run these commands right now because your computer does not meet one or both of the above conditions, it might be a good idea to save this tip by sending it to yourself, saving it as a PDF files, or printing it – all of those are made easy by using the Green Print Friendly button at the top of this article … or if you’re reading this in our InfoAve Premium newsletter visit this page and use the Print Friendly button.]
To increase the number of days you have to go back to the previous version of Windows, follow the guide below:
1. Type CMD in Widows 10 Taskbar Search
2. When “Command Prompt” appears at the top, right-click it and choose “Run as administrator”
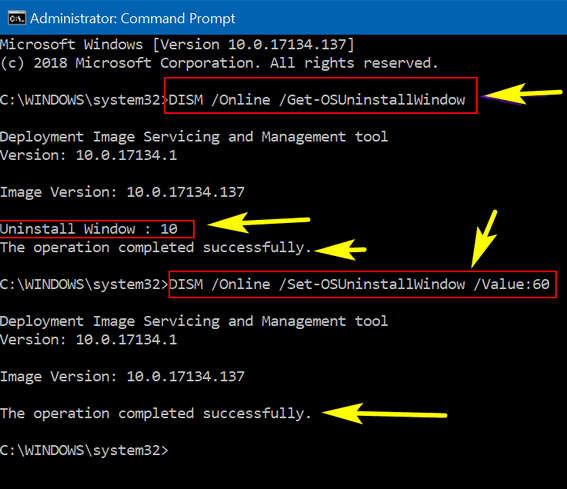
3.Type the following command to see the current time window (number of days you have) to go back to the previous version after a major upgrade of Windows 10) and press Enter.
DISM /Online /Get-OSUninstallWindow
4. Type the following command to change the number of days before the previous installation is deleted and press Enter:
DISM /Online /Set-OSUninstallWindow /Value:60
[Tip: The above command changes the default value from 10 to 60 days. Sixty days is the maximum number you can enter. If you enter a number larger than 60, Windows will revert back to the default 10 days. You can enter any number between 11 and 60 and you’ll have that many days to go back to the previous version of Windows 10.]


And remember. You may not be able to use this tip now, but you may want to use this tip the next time there’s a major Windows 10 Update. Use the Print Friendly button at the top of this to save, email or print this article or you can also bookmark this page.


Nice Tip…Thank You. I missed some News Letters. Have you been able to figure out how to network between your home computers yet. I have 3-computers. Ever since 1803 came out, and HomeGroup is gone, I can’t network between my 3-computers. Microsoft says you still can, and gives you some lame instructions how to do it without HomeGroup. BUT IT DOESN’T WORK. If anyone can figure that out, I’m sure you could. PLEASE HELP. I’m sure I’m not the only one.
Ken
I don’t have any networked computers since we use Google Drive & OneDrive to share files and folders between computers and wireless printers that we can connect to from any device or PC.
Here is the answer I think you’re looking for, Ken.
https://winaero.com/blog/network-computers-not-visible-windows-10-version-1803/
Let me know if that helps you… if it does we’ll put it in the newsletter so anyone who used HomeGroup can network their computers.
Been wondering about this. Is it a good idea to burn a recovery disc after every major update?
It’s better to make a Windows 10 installation DVD or USB than recovery media – and if you ever need to use it reinstall Windows having the latest version of Windows on media would save you hours of updates during/after the installation.