 It’s Time for Spring Cleaning
It’s that time of year… dear!
A lot of you live in the northern hemisphere where Mother Nature is getting close to trying to give us spring. It’s just a couple weeks away. Hooray! Already I can see a few crocuses are pushing up out of the ground, some daffodils and tulips trying to push up into the world. Why it wants to do that, I don’t have a clue.
And I’m not hemisphereocentric (I love making up words) either. I realize some of you live in that hemisphere down south where water goes down the drain backwards and where winter is summer and spring is fall that it will be autumn cleaning for you.. So for those of you in Oz and Kiwi country (and other folks in the southern hemisphere) please substitute the word “autumn” for “spring” and keep on reading (and cleaning).
You don’t need any special tools to do a spring tune-up, you can accomplish everything on this short list without downloading or installing anything. But we’re going to mention a couple of tools to make your job easier – and they are (for the most part) free.
We’ll assume most of you (hopefully all of you) have good antivirus/anti-malware installed that helps your guard against malware and PUPs. Many of them don’t you know. And if your security software does not have adequate malware / PUPs protection, all the spring cleanings in the world probably won’t help much. We’ll assume you have a good antivirus, anti-malware that protects you against malware and pups – if you don’t – you can read about Emsisoft here.
OK let’s get cleaning!
Step 1: Remove unused programs
One of the things people ask us most when we’re doing Cloudeight Direct Computer Repair sessions is: “What programs should I remove? I don’t even know what half of them are or what they’re for!”
We think this is pretty typical of everyone – including us. We all install programs that sound good or interesting at the time but then we never use them. We don’t know many who don’t do this – we’re especially guilty of cluttering things up with a bunch of programs that we never use.
You don’t have to download anything or install anything to clean up those unwanted or unused programs. Just open your Control Panel, head to Programs, Uninstall a program. In a few moments you’ll see a list of all the programs installed on your computer. Start removing the ones you don’t use or don’t recognize. You’ll see the date the programs were installed on the far right – that will tell you how long they’ve been installed. If you see something there you don’t recognize that was installed in October 2013, there’s a good bet you don’t use it and you don’t need it.
To make removing programs easier (and more thorough) we recommend the free version of Geek Uninstaller. Geek does install, it runs as a portable app, i.e. when you’re done with it your can remove it from your computer like a file – right-click and delete it. You can get the free version of Geek Uninstaller from http://www.geekuninstaller.com/download/ . BE CAREFUL! There are many big green download buttons that download bad things and which do not download Geek Uninstaller.
If you like Revo Uninstaller, it’s a great program too.
IMPORTANT: Removing unused programs isn’t going to speed up your computer or increase its performance (unless you’re running very low on hard drive space) or you are a believer in some of those other goofballs who write tech newsletters, who make almost everything sound like something that will make your computer run faster. Sure!
Anyway, you should remove unused / unwanted programs as a matter of good housekeeping. If you do a good job I’ll send EB around with her Good Housekeeping Seal which you can proudly display on your desktop – or not.

Step 2: Clean out your Documents and Downloads Folders
Lots of things end up in your Documents folder. Go on and take a gander. What a mess, eh? If you don’t want to get rid of stuff at least organize it. My grandmother always told me to wear clean underwear in case I got hit by a car. It’s the same thing with your Documents folder…do you want people to think you’re a disorganized slob like me? Of course you don’t! So take some time this spring to rummage through your Documents folder, delete what you don’t need and organize the stuff you think you do need by making folders for similar types of documents.
Your downloads folder is probably full of installers you’ve downloaded over time. Most of these installers are now useless since the program is probably installed, and most of these old installers are out-of-date, so why not get rid of them? You can delete everything in the download folder without losing anything important – the only exception being if you have a portable app in your downloads folder that runs from that folder. If you do, and your remove it by mistake, big deal! You can re-download it in a minute or two anyway. There is no sense to hang unto installers you’ve already used to install programs. Clean it up, I tells ya!
Again, cleaning up your Documents and Downloads folders aren’t going to make your computer faster – ain’t going to turn it into a screaming machine anymore than wearing clean underwear is going to make your run faster, but it’s good housekeeping and you do what that seal don’t you?
Step 3: Organize your Windows Start-up programs
Do you really need Skype, iTunes, Corel Paint Shop Pro, Aunt Jenny’s Greeting Care Maker, QuickTime, Adobe DRM, Adobe Reader, or stuff like that starting with Windows? NO you don’t. You’re not that lazy, I know you’re not. Cut the programs starting with Windows down to a very few. Then use desktop or start menu shortcuts to open programs when and IF you need them. Everything you allow to start up with Windows runs in the background sucking up your system resources like a sponge sucking up water. Programs often set themselves up to start with Windows because they think they’re so important – like iTunes and Skype for example. Do you constantly Skype? Do you constantly use iTunes? No, I tells ya! You don’t. You don’t need them running in the background just in case you might want to use them.
If you’re using Windows 7, you don’t need to download anything to tidy-up your Windows start-ups. Just press and hold down the Windows Key and press the R key. In the Run dialog that opens type MSCONFIG and press Enter. Click the start-up tab and start disabling startups. You DO want to allow your antivirus to start with Windows and anything with a Microsoft in its name is a “probably should”. You don’t need to be a genius to do this. If you, for any reason, disable something you should not have, you’ll still be able to boot into Windows. If something’s not working right MSCONFIG (System Configuration Tool) puts the date you disabled something next to the disabled item. You can re-enable anything you disabled that may have caused your problem. But, I tells ya this – disabling Skype or iTunes or Adobe Reader, or QuickTime, or Adobe DRM isn’t (aren’t) going to cause you any problems. You can start those things from shortcuts or from your start menu when you need them – and not a minute before.
If you’re using Windows 8.x or Windows 10, you have a slight problem. Windows 8.x and Windows 10’s Configuration Utility doesn’t have a start-up tab. You have to use Task Manger to disable start-ups. Woe is you. Windows 8x and Windows 10 Task Manager Start-ups Tab is woefully inadequate. It doesn’t list ALL of the start-ups, we are not even sure it lists most of the start-ups. Woe is you!
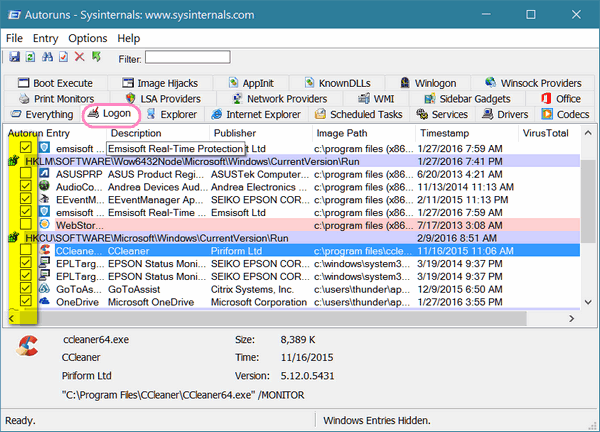
No! Not woe is you. You have a choice. You can download SysInternals AutoRuns and you’ll get a complete picture and description of what is starting with Windows and you’ll be able to disable unnecessary start-ups quickly and easily. But, here’s the thing, don’t go messing around with all those tabs you’ll see on AutoRuns. The only one you have to worry about if you’re not an advanced user is the “Logon” tab. See?

Now, of course, if you’re an advanced user or you’re crazy and love to see what will happen if you click this or that, AutoRuns is a great tool for tweaking things. If you’re not computer savvy, just stick with the Logon tab. Notice how it explains what the highlighted item is? You just untick the box to the item you don’t want starting with Windows. If you right-click an item, AutoRuns tells you what it is and where it’s installed so you can make an informed decision about whether to allow something to start with Windows or not. When it doubt, disable it. You can always re-enable it later. As a general rule if it’s printer-related, leave it alone, unless you don’t want your printer to work when you need it. If it’s antivirus/anti-malware related, leave it be. If it has the word Microsoft in it, it’s best to leave it alone. If you make a mistake, and you are keep to the Logon tab, you can’t do much damage. You can re-enable things as easily as you disabled them. It’s best to know what you’re doing though, so if you’re not sure, right-click the item to find out more about it before you go off and disable it. If you’re still not sure, that’s what googling’s for.
You can download AutoRuns from here – it’s free and it’s by Microsoft’s TechNet people.
One more warning: AutoRuns is a powerful tool. If you don’t know what you’re doing and you use the other tabs besides “Logon” – you could makes some serious unwanted changes. So stick to the Logon tab and if you don’t recognize something – leave it also. Also don’t disable your antivirus/anti-malware application, or anything that says Microsoft. Not sure? Leave it be or google it.
Unlike the first two cleaning tips, trimming and optimizing your start-ups will make your computer start up and shut down faster. It may also increase your computer’s performance – since what starts with Windows, runs in the background eating up resources.
I hope you all enjoyed this article and that each and every one of you will earn EB’s Seal of Good Housekeeping.
She won’t give me one – she says I’m a slob. But what does she know, I asks ya?


I’m going to get EB’s seal of GOOD Housekeeping next week if all goes well.
TNX TC