Managing File History in Windows 10
File History is great feature of Windows 10, but it can be even better with some tweaking by you. If you have not turned on File History yet or don’t know what it is, you can learn more about File History here.
By default, Windows 10 File History saves copies of files and folders until space on the drive gets low. And by default it backs up new or changed versions of files/folders every hour.
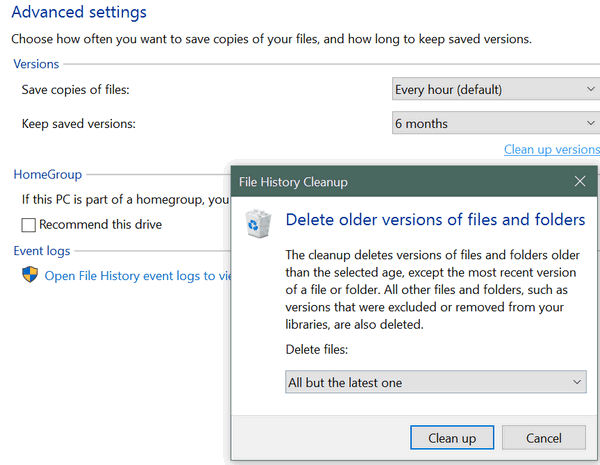
We’ve left our “Save copies of files” at the default settings -“Every hour”. Using the drop down menu, you can choose anything from every 10 minutes to every day. Every hour is good for us. When writing a newsletter or doing graphics work, saving files every hour gives us a fallback just in case, if a program freezes or we accidentally reboot our computers, the work is saved in File History every hour. So we might not get all our work back, but the most we’ll lose is an hour’s work, instead of the entire day’s work.
We don’t work fast enough to have to set it to every ten minutes, do we EB?
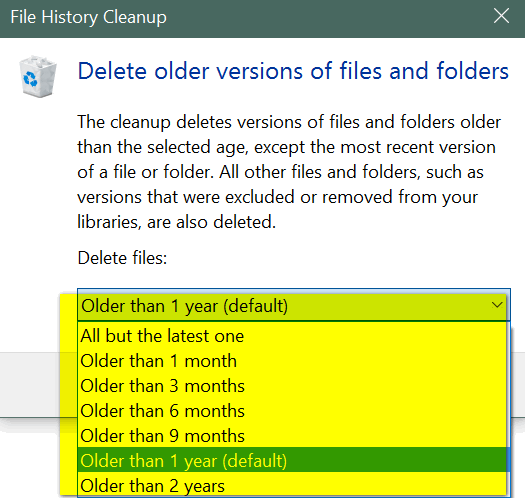
But let’s go beyond the stuff we already covered in this article and show you some advanced settings in File History, specifically, how to clean up File History. You can clean up all the file history but the latest ones, or choose to clean up all files older than 1 months, 2 months, 3 months, and all the way up to 2 years.
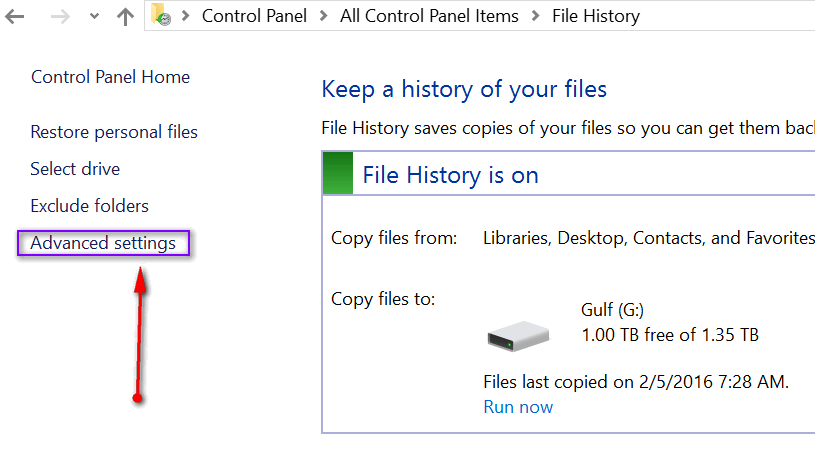
So how do you get to these settings? In Windows 10, right-click on the Start Button can choose “Control Panel”. Make sure you’re in icon view (top right) and click on File History. In the left pane you’ll see “Advanced settings”. Click on “Advanced settings”.

Once you click on Advanced settings you’ll see the dialog below. Click on “Clean up versions” and you’ll see the “Delete older versions of files and folders” dialog (below).

You can clean up your File History files and folder backups by selecting one of the options of under delete files (see below). You can choose to delete files “Older than 1 month” or all the way up to 2 years. You can also choose to save only the very newest copy of each file/folder.

And that’s how you can keep your File History clean. You’ll also note you can change the File History drive and exclude folders from your File History backup. Now you can take control of Windows 10 File History!


Hi, I proceeded to check on mine in windows 10 and it’s not even turned on! Is this a bad or good thing? If I need it on how do I go about that? Thank you
For Margie:
Here’s how to turn on File History:
Open the File History control panel applet. Connect an external drive, (or select a second internal drive – i.e. a drive other than the one with Windows on it and click Turn on. If the drive you want to use for File History back up to is not selected, you can change drives by clicking the “Select a drive” link. Now File History will automatically backup and update your personal files automatically — you won’t have to give it a second thought. In the File History dialog, you also can restore files by clicking “Restore personal files”.
Thank you Barb very much for your info.
Do these instructions also apply to 2 in 1 tablets with Windows 10 on them? Is Win 10 the same on a tablet as it is a desktop version? I’m very new to 10 (still on xp on desktop … I know I know, I’m working on that. Lol) and it is such a huge learning curve and I have not figured out how to maneuver around in it yet.
Windows 10 is the same on a tablet expect it runs in Tablet mode with a start screen instead of a start menu. The start menu is available to tablet users – table mode can be turned of, if desired.