Not Happy With Windows 11? You Can Go Back to Windows 10
But you better hurry – you have only ten days to do it

If you installed Windows 11 and/or your PC has been upgraded to Windows 11 and you now find that you don’t like it, don’t worry, you can go back to Windows 10 without losing anything. That means you can go back to Windows 10 without losing your files, programs, or settings. It’s a painless and easy procedure But there is a catch – you only have 10 days to do it after Windows 11 was installed to do it. After that, it becomes a whole lot more complicated to get rid of Windows 11 and go back to Windows 10.
So, if you’ve updated to Windows 11 and you’re now wishing you hadn’t, here’s how to go back to Windows 10 without losing anything.
Right-click the start button and choose “Settings”
1.) Open Settings > Recovery (Tip: You can open settings using the Windows Key + i shortcut.)
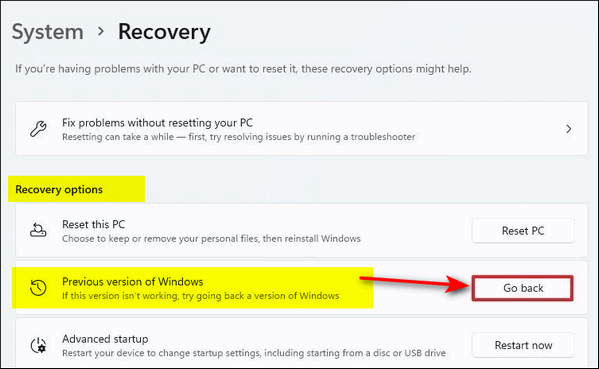
2.) In Recovery Options > Previous Version of Windows, click “Go back” (If it’s grayed out or not available, you can’t use this method to go back to Windows 10.)

NOTE: If you see the following and “Go back” is grayed out, you’ve waited too long and you won’t be able to seamlessly go back to Windows 10. Woe, woe, woe.

Microsoft will then ask you why you want to uninstall Windows 11 and if you want to check for updates to Widnows 11 instead of going back to Windows 10. Click “No, thanks” to continue to go back to Windows 10. Follow the on-screen prompts then click “Go back to earlier build” to begin the process of rolling back to Windows 10. This will take a while, so be patient. Once the rollback has been completed, you’ll be back to Windows 10 with all your files, settings, and apps/programs intact.
And remember, Windows 10 will be supported until October 14, 2025 – so you have plenty of time to safely use it.
Bonus Tips:
Want to see how much time you have remaining before it’s too late to go back to Windows 10? Type CMD in the taskbar search, then click “Run as administrator”. Enter the following command and press Enter.
DISM /Online /Get-OSUninstallWindow
Want to increase the number of days you have to roll back?
You can change the number of days you have to roll back to a previous version of Windows from 2 days to a maximum of 60 days. Type CMD in the taskbar search, then click “Run as administrator”. Enter the following command and enter the number of days you want in the “days” value and press Enter.
DISM /Online /Set-OSUninstallWindow /Value:[days]
For example, to set the number of days you have to roll back to 30 days, enter the following command.
DISM /Online /Set-OSUninstallWindow /Value:30

