Windows 10 Storage Sense Cleans Up Automatically
Windows 10 makes it easy and automatic to clear the Recycle Bin every 30 days. Plus Windows can also automatically clean up some other unnecessary temporary files too.
Just enable it!
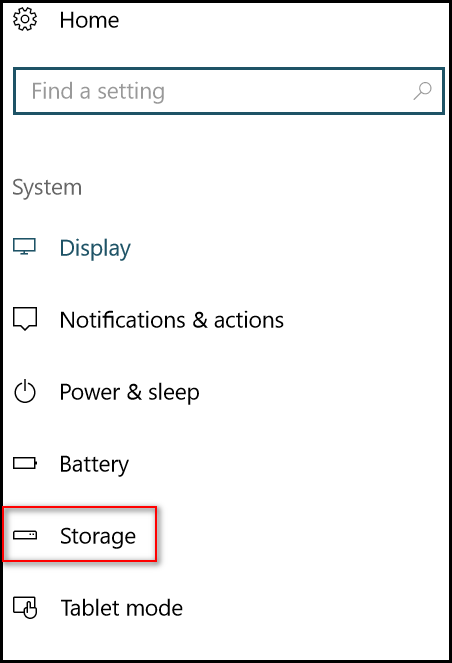
All you have to do to enable this feature is to go to Settings > System and click on Storage:

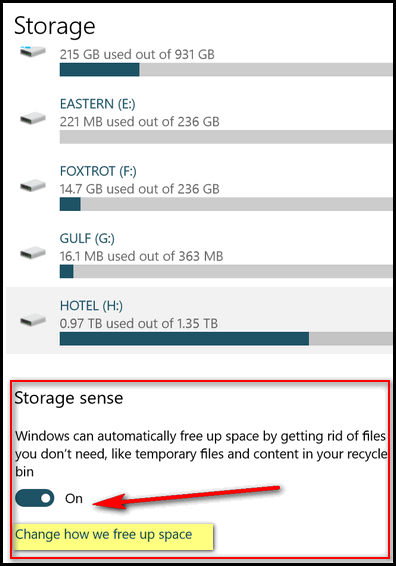
In the Storage section, look for “Storage Sense”. Turn the switch to “On”.

Next click on “Change how we free up space”…
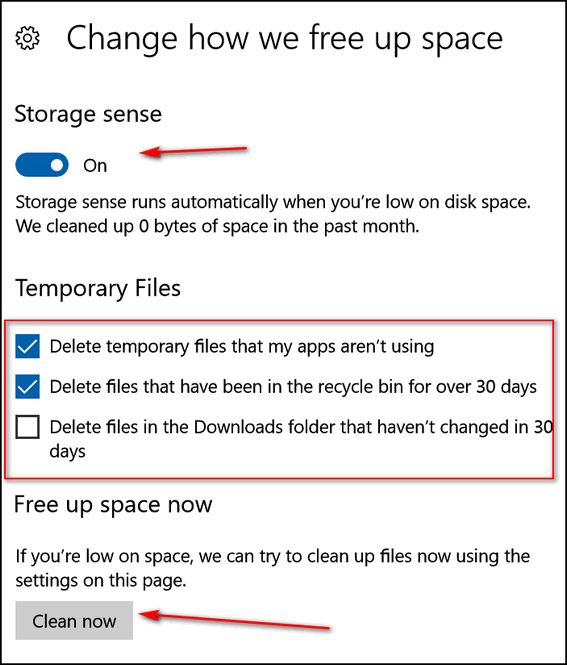
Make sure that “Delete temporary files that my apps aren’t using” and “Delete files that have been in the recycle bin for over 30 days”, are both turned on. I do not have my downloads folder set to be cleaned because I have a lot of files in there I need to test for future newsletters. If you don’t have anything in your download folder other than program installers you’ve already installed, you might want to check “Delete the files in the Downloads folder that haven’t changed in 30 days.” User discretion advised on that one.

If you want to clean up your recycle bin and temporary files immediately, just click on the “Clean now” button. When it’s done cleaning, it will show you how much space was cleaned up. As you can see above, over 2.5 GB of drive space was freed up in the last 30 days.
2 Bonus Tips!
#1. If you accidentally delete a file, just press CTRL + Z to bring it back!
#2. The fastest way to get to Window 10 Settings is: Hold down the Windows Key and tap the i key.
Our 2017 Christmas Special prices are good through Sunday December 17, 2017! You still have time. Get a great deal and help support our small business too!
Get 3 Cloudeight Direct Computer Repair keys for just $89. You save $61.
Get Ashampoo Backup Pro 11 FREE With Any Emsisoft Purchase!
Buy a Cloudeight Direct Computer Care Repair for just $35 – Save 30%


I keep getting requests for adding Windows Defender Notification icon every 5 minutes for the last week daily. I now slide it off to the right out of the screen so I can continue using the computer. How do I stop it from insisting to get me to allow it to be installed. I’ve had nothing but trouble with Defender on my cell phone and I don’t see any need for it on my computer. Can it be stopped? I’m relying on TC’s expertise now! Or do I have to go to top boss EB?
This is a REAllY cool tip – – necessary too for keeping the computer clean. I found that this method doesn’t remove my History, I’m happy about that. Ever since you guys told me how to find my “History” by selecting Ctrl H after putting the cursor in the address bar on your Home Page, I’m finding more and more uses for using that! It’s wonderful! Thank you, again and again.
Merry Christmas TC & EB!