Issue #766
Volume 15 Number 35
June 15, 2018
Dear Friends,
Thank you very much for subscribing and for being a part of our Cloudeight family. We appreciate your subscription and your support very much!


A comment from Susan
Hi TC & Darcy. I just love, love Anti-Twin. So far I have used it on my fonts folder and it found about 200 duplicates. I went through it one by one and deleted almost all of them. Imagine all the space I reclaimed. Thanks so much you two. You always come up with great tips and programs. Cheers, Susan
A comment from David
TC, I just wanted to thank you for the return visit to check out my computer system ...At the time of your visit my system was Windows 10 Version 1709. Everything with my system has been working great since your online visit. I withheld updating my system with the April 2018 Update until this week. I started the April 2018 Update and it took several hours and had several error codes where elements did not install properly. I restarted my system several times and noted that on restarting my system a new prompt had been added, "restart and update Windows" which I chose. On doing so it began to update Windows again and this took several hours but restarted on it own and all updates had been successfully installed this time. I also opened the settings and clicked update all Microsoft programs. This added all the new updates for the version of Microsoft Office that I had installed....
I have been using my system about a week since I installed all of the latest updates and everything has been running extremely well with no issues whatsoever. Thank you ever so much for the assistance and online support that you and ED have provided here with your Newsletter, as well as the fantastic online service of troubleshooting our computer systems and helping them run efficiently and cleanly, a long term user and faithful follower. Take care and have a great week!
A comment from Sharon
Darcy, Thank you! Thank you! Thank you! Can't say how much I appreciate you and the service you provide. Always pleasant even though I frustrate you and myself sometimes when I can't make what I need clear. Your patience is endless as well as your expert experience. Wouldn't use anyone but you and TC for my computer service. Sharon.
A comment from Robert
I wanted to thank TC for working so hard on my computer the other day. He was working my mouse and it flew over the desktop so fast it was hard to keep up with him! In less than an hour he had finished his work and my computer runs great now. I for one appreciate all the work you and Darcy do. I'm sure I will need your help again and I'll be back. Thanks again!
A comment from Mary Ellen
I needed Emsisoft installed, McAfee Removed and Thunderbird set up. I had Cloudeight Repair keys for each service. I was so glad that Darcy did all this in just one session. It was amazing to watch her work. Darcy and TC are the only ones I would ever trust to have remote access to my computer. They are honest and friendly. I feel like they're old friends. This is the best way to have your computer fixed! I just sat there in my chair and watched while Darcy did her magic. Thanks again Darcy. You did a great job. I'm 110% happy and satisfied.
A big Cloudeight "Thank you!" to Susan, David, Sharon, Robert, Mary Ellen and everyone who wrote to us last week. We appreciate your kind words and your support very much! EB & TC
Cloudeight Direct Computer Care computer repair keys are always a bargain. Get more information here.


SeniorPass: A Great Deal for Our Friends 60 and Older!
With our
Cloudeight Direct Computer Care SeniorPass, our friends age 60 and older get one
full year of unlimited computer care and repair for a special price of just $79.
A low, low price for Computer care anywhere - any time you need it!
SeniorPass is valid for unlimited computer care & repair sessions for one
full year starting with the first time you use it. The clock does not
start ticking until you use your SeniorPass for the first time. A great
deal!
Having SeniorPass is just like having insurance for
your computer. And talk about affordable! Right now, our
SeniorPass is available for just $79. You can get help with almost any
computer problem whenever you need it. We're here to help you.
Computer care & repair for one full year. Check out our SeniorPass offer right now!
Get your SeniorPass and/or get more information here.

Here are some important links for you:
- Do you have a question or suggestion for our newsletter? Submit it here.
- You can read and search over 3400 Computer tips and tricks from our Cloudeight InfoAve Web site.
- Do you have a question or comment about one of our products or services? Please contact us.
- Are you having problems with your computer? Visit this page to get information about our Cloudeight Direct Computer Care services. We can fix your computer!
- Emsisoft Anti-Malware provides the best overall malware & virus protection for your computer - we use it and we recommend it. Please visit this page to learn more about Emsisoft products - and our special Emsisoft discounts.
- Would you like to receive our InfoAve Daily Tips & Tricks newsletter? It's free. You can subscribe here.
- Please help us by making a donation; help us keep helping you. If you'd like to help support our newsletters and our Web site, please consider making a donation. Anyone who makes a donation is invited to join our Cloudeight Boosters. Our boosters get freebies, special offers and more. Make a donation and join the Cloudeight Boosters today!
- Our Cloudeight InfoAve Premium Newsletter home page has links to the last several issues of Cloudeight InfoAve Premium newsletter. Visit our Cloudeight InfoAve Premium home and catch up on back issues of this newsletter.


Imogene asks how to open XLR files
Could you recommend a safe file opener program as one of my medical files has the extension XLR and I get popup I need app to open it from internet. It seems to indicate it is from Microsoft, but I cannot trust. Thank you I would like to have pdf extension instead. Thanks, Imogene
Our answer
Hi Imogene. An XLR file is similar to an XLS (Excel spread sheet file). XLR is an old Microsoft Works spreadsheet document. MS Works is no longer available. Some XLR files can be opened by Excel, but only XLR files created in Microsoft Works 8 or newer.
There is a free office suite called Open Office you can download and install. Once of its features is a spreadsheet program called Calc. Calc can open all XLR files. You can get Open Office free from this link.
You can also use a free online service called Zamzar (one of our former site picks) to convert XLR files to PDF. Visit this page to convert XLR to PDF.
We hope this helps you!

Edna asks if she needs to use a VPN service
Should I be using VPN when I'm using my firestick on my TV or even on my computer? Should I pay for one or use the one in my internet options? Thank you, Edna
Our answer
Hi Edna, our option is most people don't need a VPN. The TV advertising you see is biased and not accurate.
A VPN does not make you safer. That's a fallacy. A VPN hides your location from web sites, but it does not hide everything you do online from the VPN service. Many VPN services claim they don't keep logs of your activities on the Web, but you have to take their word for it.... and many experts are pretty sure that every VPN keeps logs of your activity and also sells info they gather on your Web browsing history just like ISPs do. Plus, many VPN are located in countries where privacy laws are very lax or non-existent.
So our advice is this: Unless you have a specific reason to use a VPN (like for you work or if you need to access sites that are blocked by your ISP), save your money. If the only reason you want to use a VPN is to be safer online, a VPN isn't worth the money. There is no proof that a VPN service is any more trustworthy than your ISP. In some cases they may not even be as trustworthy.
Most people who have had their bank accounts drained, their identities stolen, or had personal information stolen online, did not lose them because someone stole them by a man-in-middle attack when signing in to sensitive site. The truth is must people lose money, valuable personal information or even have identities stolen by clicking links in phishing email or being tricked into installing a keylogger by clicking a link in an email. A VPN will not stop this.

Ron wants to give his HP laptop to his daughter
I want to give my old HP laptop to my daughter. Is your procedure (on this page) still the way you recommend erasing personal info from the hard drive? Also, is there a step-by-by guide to reinstalling the windows software? Thanks. Ron
Our answer
Hi Ron. If you are giving your computer to your daughter, the best way to get rid of all your programs and personal stuff is to do a Windows 10 reset. When you do the reset you'll have two options:
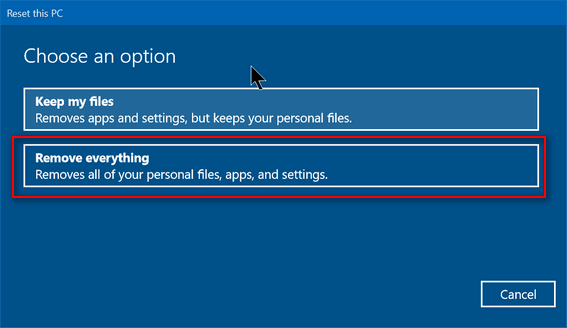
Keep my files or "Remove everything". Choose "Remove everything". Windows will wipe out all your programs and personal files and then reinstall Windows 10 - all in one operation that should take no more than 45 minutes to an hour.
After you initiate the process, you don't even have to be near the computer. It's automatic. Once Windows is reinstalled, you may have to set up things like "Time zone", "Language" -- i.e. the typical things you have to do when you first set up Windows - but you won't need a product key it will already pre-loaded.
To do a reset, do this:
1. Open Settings (Windows Key + i)
2. In Settings go to Update & Security
3. In Update & Security click on "Recovery" (in the menu on the left)
4. Under "Reset this PC" click on "Get started"
While it may still be possible for a computer guru using advanced forensics data recovery software to recover some data from the previous installation, it's extremely unlikely that even a somewhat skilled computer user is going to buy expensive data recovery software and dig around to see what might be left from the previous owner.
Let us know if this helps you, Ron.

Jerry was unable to install Windows 10 April 2018 Update (version 1803) because of Infineon TPM
Hi Darcy, and TC, I thought I asked you this question but I don't know if it sent? Have you checked out voidtools.com? I had to use it to remove that infineon TPM site. It found it hiding in there, was able to send to recycle bin,. No more problems.. Seems like a neat program.. small foot print. Jerry M.
Our answer
Hi Jerry. "Everything" is a great Windows search tool.. it's been around a while. We featured it years ago. It looks like it has been improved since them. It's a great Windows search engine.
To clear any misconceptions - Infineon TPM is not malware, and it's not hiding. But its installation directory is confusing. It's installed at C:\SWSETUP\App\Security ... and that would be a hidden folder unless Folder Options are set to view hidden files and folders. It also would not be easy to find if you're searching for TPM or Infineon.
TPM stands for Trusted Platform Module, and it's by a company called Infineon. It's a bit of overkill that is pre-installed by HP, Fujitsu Lenovo, Toshiba, and some other less-well-known computer manufacturers. Here's some geek speak from Infineon's site about TPM:
"Trusted Platform Module (TPM) is an international standard for a secure cryptoprocessors that can securely store critical data such as passwords, certificates and encryption keys. TPM is a dedicated microcontroller designed to secure hardware by integrating cryptographic keys into devices and is used for secured crypto processes within computing devices as well as for secured storage of critical data. TPMs are typically used in business laptops, routers and embedded and IoT devices. The technical TPM specification was written by an industry consortium called Trusted Computing Group (TCG)."
Note: The text above that shows as bold was bolded by us, to point out that TPM is not usually installed on home PCs. In order to get rid of Infineon TPM you have to remove the folder C:\SWSETUP\App\Security. Not everyone has that folder, though. Dell, Asus, Acer and probably some other brands of computers don't install Infineon TPM.
But we'll sure to include your email and your suggestions (along with ours) just in case anyone else has a problem updating because of Infineon TPM. We gave Everything another look the other day and it's still a very fast Windows search tool. Anyone interested can read more about Everything search by going to www.voidtools.com. There are several different options for downloading "Everything" on that page. For most people downloading the installer would be most convenient.
Thanks for writing, Jerry. And thanks for reminding us of "Everything" - and for helping others who may have not been able to update to Windows 10 Version 1803 due to Infineon TPM.

Bob would like to know how to delete a bunch of emails
If I have 30 emails and only want to delete 25 I remember that you mentioned that by clicking on the top email and then the lower one you could remove only that section of files. I have tried but have not succeeded, could you please mention the method again. Thanks again.
Bob
Our answer
Hi Bob. It depends on what mail program or webmail you are using. Generally, if all the emails you want to delete are in a row, click the top one, hold down shift key, then click the bottom one. Once all the emails you want to delete are selected, right-click and select "Delete" or just press the Delete key on your keyboard.
**Bob wrote back** "Hi Darcy. Thanks for your very quick reply, looks like the shift button was the key, works well. This saves heaps of time, much appreciated. Bob"
.

John has a problem seeing his entire browser window
I'm having problems with my browser, when I click on it, I only see a portion on the left of the screen. I would say about a quarter of an inch. I cannot see the full screen. I tried rebooting, but that didn't work. Please try your magic to fix the problem. Thanking you in advance.
Our answer
Hi John. Try this. Make sure your browser is closed and no instances or it are running in Task Manager. Right-click on the icon you use to open your browser and click "Properties". The shortcut tab should already be selected. Near the middle of the Properties dialog you'll see "Run" and on the right you'll see a down arrow. Click the little down arrow and you'll see menu. Select Maximized (see screenshot below) and then click Apply / OK and then restart the browser.
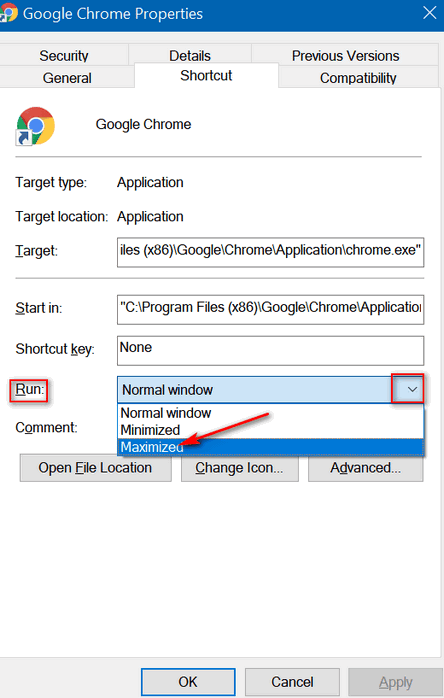
Above: The Properties dialog for Chrome. Every program has a similar Properties dialog.
If this does not work, you'll need to try temporarily changing your screen resolution so the program window fits on the screen and then drag the browser window back to the middle of your screen so that no part of it is off the screen. Then change your screen resolution back to its normal settings.

Ruth wants to clear Windows 7 history
I would sure appreciate it if you please post instructions for clearing history, etc. I am using Windows 7. Thanks, Ruth
Our answer
Hi Ruth. Windows 7 does not have a "history" to clear. The article we wrote about "history" was about browser history. So, if you're talking about browser history let me know what browser and I'll give you instructions.
If you want clean up junk and temporary files on your Windows 7 computer - which would be something like cleaning up "history" in a way - just follow the instructions in our article on this page.
We hope this helps you, Ruth.
**Ruth wrote back** "Thank you so very much for your response ... I really do appreciate it. And I am using Internet Explorer. By the way, I also love your essays... they are great. I have been with you since I got my first computer and still have the CD from when you first started the Smileycons ... I loved those little guys and looked forward to each new addition. Thank You for a job well done ...~Ruth~"

Vic wants to get rid of all those icons showing in his taskbar
I have just had my hard disk replaced with an SSD and everything is working well except. With my original setup the right hand edge of the task bar contained an upside down V and clicking on this showed what was in memory ( Emsisoft , Smileycons etc).
Now, the right hand edge of the task bar shows a whole bunch of icons of different programs in memory. Is there a way, in all your wisdom, that I can get my upside V back. I don't like the icons showing as they do now 'cos it takes up too much room.. Hope you can help me again. By the way my Drive was replaced because it was starting to make an awful groaning noise. So I thought better safe than sorry. The new drive has improved the speed of my PC so much an I am very happy with it. Thanks, Vic
Our answer
Hi Vic. This is very easy to fix. Here's how:
Right-click on your taskbar. Click "Taskbar settings" and scroll down until you see "Notification area".
Under "Notification area" click on "Select which icons appear on the taskbar".
Now make sure the switch under "Always show all icons in the notification area" is turned "Off".
Anything that is turned on in this dialog will show up on the taskbar and not in the Notification area. Note I have only Volume and Network turned on. So only they show in the taskbar. You can see the up arrow or the upside down V (see below) is now showing.
And that's it. Let us know if this helps you.
**Vic wrote back** "Hi TC. Thank you my friend you are marvelous and so quick. Thanks again, Vic"

Maryanne would like to know if we are giving the "all-clear" to downloading the Windows 10 April 2018 (Windows 10 version 1803) update
Hi. I followed your advice and installed Stop Windows Update to keep new Windows 10 version from installing on my computer. Can you tell me if it's safe now? Is it OK to update? Thanks, Maryanne F.
Our answer
Hi Maryanne. Microsoft has steadily been removing the bugs and correcting the major issues with the Windows 10 April 2018 update. We have updated 3 of our computers without any problems. One of our computers updated in just about an hour, and one took over 3 hours. We haven't had any problems at all with the new version of Windows - there are really not many major changes... Timeline is the most significant new feature.
While we can't guarantee anything, we will say that the Windows 10 Version 1803 update (Windows 10 April 2018 Update) is much better than it was six weeks ago and we think you'll be fine installing it now.


Summer Cleanup + Backup Special
This year we introduced our popular Cloudeight Backup Service and our 2018 Cloudeight CleanSweep service. We've offered them separately for $30 each. Starting today, and for a limited time, we're offering you our new Spring Cleanup + Cloudeight Backup service for just $40 - that's $20 off the price when purchased separately.
We'll clean up and backup your computer all in one easy Cloudeight Direct Session. You'll have the peace of mind of knowing your computer is clean, optimized and is being automatically and backed-up every week - so your data is safe.
Our 2018 Summer Cleanup/Backup special includes:
- We will give your computer a general checkup and deep scan your computer for malware/PUPs/viruses
- We will clean up any malware/PUPs/Viruses we find, and we'll optimize your startup programs & services
- We will install Ashampoo Backup Pro 11 and set it up and configure it for automatic backup and we will give you a lifetime license for Ashampoo Backup Pro 11
- We will create recovery media (USB, or CD/DVD) so you can access your backup even if your computer won't boot or your hard drive fails
- All for one low price!
Take advantage of our new Summer Cleanup + Backup Special and get the peace of mind that comes with knowing your computer is clean and optimized, and that all your data is being backed-up automatically.
Get more information about and/or our get you Cloudeight Summer Cleanup + Backup Special right now!


Add [and Remove] Items To/From Your Windows Send To Menu
Windows 7, Windows 8.1 and Windows 10
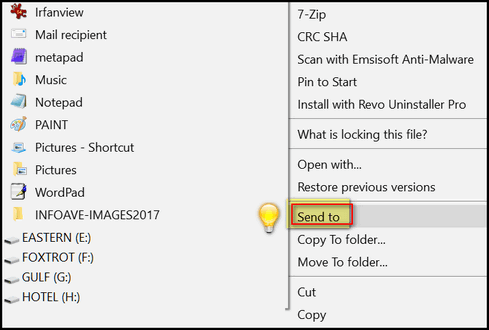
Most of you know what the Windows Send-to Menu is… when you right click a file you see a list of things and one of them is “Send to”, see?
Yeah, we know! There are at least 9 dozen program (most of them freeware) that will help you add and remove things from your SendTo menu. But, if you want to learn how Windows works, you don’t need no stinkin’ program to add and/or remove things from your SendTo menu, I tells ya! We’ll show you how it works…
But before you get rolling you're going to need to make sure that "Show hidden files, folders and drives" is ticked in Folder Options (File Explorer Options on Windows 8x and Windows 10). Because we want to save you from a lot of reading, we're going to use the one-size-fits-all way of doing this. We are going to send you to Control Panel to make sure you can see hidden files and folders. In Windows 7, just open your start menu and click Control Panel. In Windows 8.1 press Windows Key + X then click Control Panel in the menu. In Windows 10 type Control in taskbar search and press Enter. In Control Panel make sure you're in Large Icon view and not category view and click on Folder Options or File Explorer Options and you'll see this:
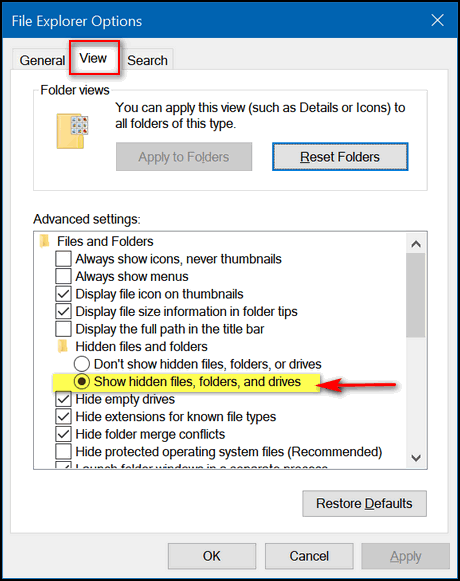
Make sure the circle next to "Show hidden files, folders, and drives" is ticked. Once you've done this, you're ready to proceed.
OK let's go... Press the Windows Key + R to open a Run box. In the Run box type the following
shell:sendto
Now press Enter.
You will see File Explorer (Windows Explorer on Windows 7) open to:
C: \Users\Your User Name\AppData\Roaming\Microsoft\Windows\SendTo .
Look at the screenshot below and you’ll see a list of things that you’ll see when you right-click something and choose “Send to”. You can add almost anything to this list or remove anything from this list.
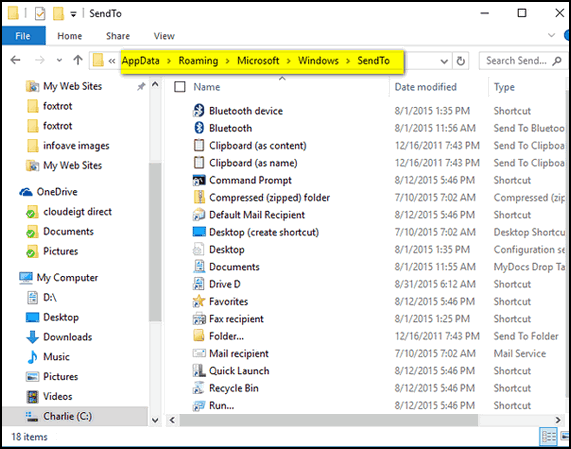
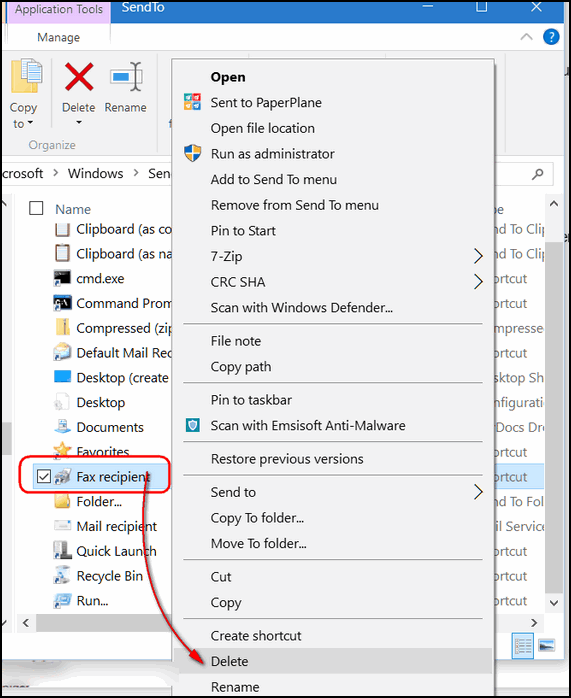
I don’t need Fax recipient on my SendTo
list so I right-clicked on it and deleted it. (These are all just
shortcuts) so you’re not going to accidentally remove any programs from
your computer here.)
Since I deleted “Fax recipient”, from the SendTo folder above, it no longer appears as a choice when I right-click and choose “Send to”.
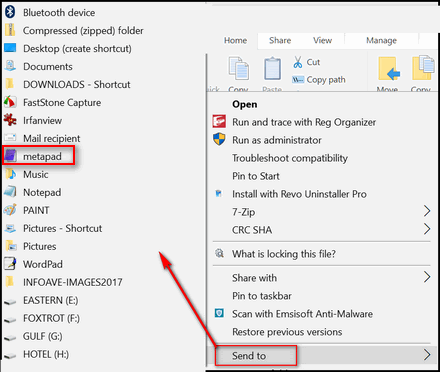
I use a program called MetaPad — instead of Notepad — to open text files, reg files and more – but it was not on the list. To put it on the SendTo list, all I had to do to was drag a MetaPad shortcut and drop it in to the Send-to folder. (Make sure you only move shortcuts and not the program itself.) If you’re not sure, right-click in program’s folder and choose “Create shortcut” – then move the shortcut in to the Send-to directory. Now when I choose Send to, I have the option to “Send to” MetaPad (see the screen shot above). Notice also that “Fax recipient” is no longer on my SendTo menu, because I deleted it.
You can drag any shortcut into the SendTo folder. You can create new shortcuts and drag them into the SendTo folder. You can create a shortcut to any folder and add it to your SendTo list.
If all this seems like a trifle too much maneuvering and aggravation, use can one of the many programs available to accomplish the same things as shown in this article. One of our favorites is a free program called “Sendto Toys”. Sendto Toys makes it a snap to add, delete and modify items to/from your Sendto menu. You can read more about Sendto Toys here.
Now, it’s time to make a shortcut called “Sendto EB”. I’ll send her all my work - send her yours too!

How to Create a Guest Account On Windows 10
Windows 10 (all versions)
The newest version of Windows 10 has a significant new feature called "Timeline". Timeline is part of Windows 10 Version 1803's Task View. Timeline shows a history of the activities you’ve performed on your computer. You can access Timeline by clicking on the Task View icon on your taskbar. If you don't see the icon, it's probably hidden. Just right-click on your taskbar and click "Show Task View Button". See screenshot below to see the Task View icon.
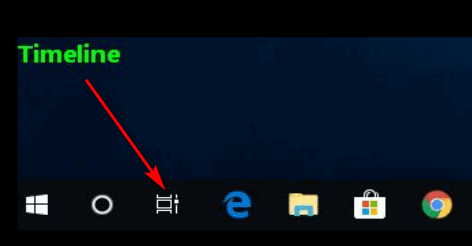
Since Timeline is a historical archive of your PC activities, if you have guests or others that use your computer occasionally, you might not want them accidentally stumbling upon your Timeline history since it is an archive of all you've done. Timeline is yet another good reason why you should create a Guest Account on your Windows 10 PC
A Guest Account on Windows comes handy when you want or need to share your computer with someone else, but don’t want them making any changes to your computer, seeing and/or accessing any of your personal information or files. By default, Windows 10 does not have the Guest Account enabled… but everything you need to create a guest account is there. And you can use an administrator command prompt and the Net User command to create a guest account on Windows 10.
First, we called our guest account “BeMyGuest” – but you can call yours whatever you want (except “Guest” which is reserved for Windows). So, wherever you see “BeMyGuest” in the tutorial below, feel free to substitute whatever name you like for your own guest account
Let’s create a guest account on Windows 10.
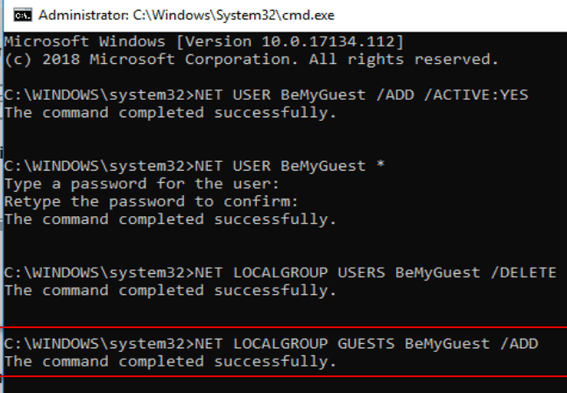
1. Press Windows Key + X to open the “power menu” and click “Command Prompt (Admin)”.
2. Now we need to add a user account. So, type in the following command to create a new user. ‘BeMyGuest’ when you see it in the commands is the name of my guest user account, you can name yours whatever you want, except for Guest – Windows reserves that name and you can’t have it!
3. In the command prompt at the prompt > type the following command and press Enter:
NET USER BeMyGuest /ADD /ACTIVE:YES
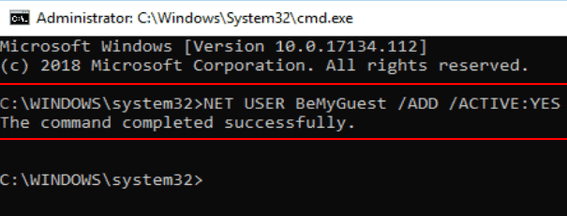
If you typed that correctly, you’ll see “The command completed successfully”. If you don’t see that, then make sure you left a space between the account name (in our case BeMyGuest) and the forward slash / .
4. Now, because this is a guest account we don’t want to assign a password for a guest account. So, enter the following command at the prompt and press Enter:
NET USER BeMyGuest *
Note the space before the asterisk (above).
We don’t want a password for his account so press Enter twice.
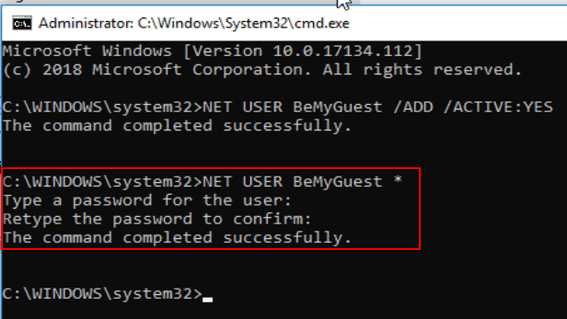
5. Now we need to delete our guest account from Localgroup Users and put it in Localgroup Guests.
First delete the new guest account from Users by typing the following command at the prompt and pressing Enter:
NET LOCALGROUP USERS BeMyGuest /DELETE
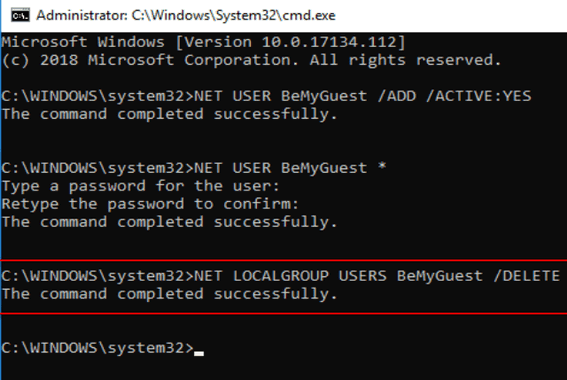
Now, we’re going to add the guest account to Localgroup Guests by typing the following command at the prompt and pressing Enter:
NET LOCALGROUP GUESTS BeMyGuest /ADD
When you open Settings —> Accounts —> Family & other users you’ll see your new Guest account right there under Other users or Other People (version 1803) See? There’s BeMyGuest.
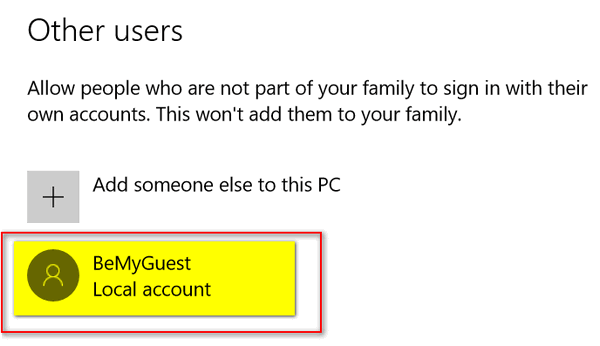
Above: Windows 10 Versions 1703 and 1709.
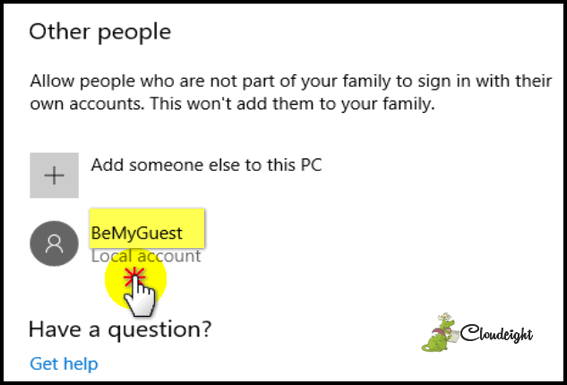
Above: Windows 10 Version 1803 (April 2018 Update)
From now on when you start or restart your computer, or sign out, you’ll see “BeMyGuest” (or whatever you called your guest account) listed on the login screen along with your account. When you have a guest using your computer log out of your account and click on the guest account to log in- no password required. Your guests will be able to run apps & programs, browse the internet, play music. etc.. But guests cannot change your system settings, see your Windows 10 Timeline, install or remove programs, or make any changes to your computer.

Create a Shortcut to Launch Chrome in Incognito Mode
Everyone using Windows 7, Windows 8.1 or Windows 10 and also Google Chrome
If you use Chrome’s Incognito mode often, you can make a shortcut to launch Chrome in Incognito mode with just a click. Here’s how you do it.
Open Chrome’s installation directory:
"C:\Program Files (x86)\Google\Chrome\Application\chrome.exe"
Right-click on chrome.exe, and from the right-click menu choose:Send to > Desktop > Create shortcut.
Right-click on the Chrome Desktop shortcut you just created and choose “Properties”.
Under the Shortcut tab, in the Target field, leave a space after chrome.exe and add the following to the address in the Target field:
Note: Leave a space after ” …chrome.exe”, then type two dashes then word incognito.
See screenshot below. When you’re done click Apply / OK.

Now, when you click on this shortcut, Chrome will launch in Incognito mode.
Suggestion: You might want to right-click on your shortcut and press F2 and rename your shortcut Chrome Incognito or Chrome Private to distinguish it from a normal Chrome shortcut.

There are several reasons to use Chrome’s Incognito mode, though anonymity is not one of them. You can’t hide from Web sites, your ISP, your employer, etc. using Chrome’s Incognito mode, but it is good for some things.
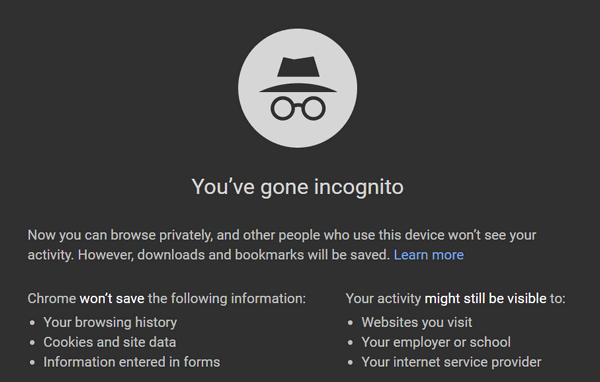
Feast your eyes on the image above. You’ll see that Chrome spells out what Incognito mode will and will not do. But they don’t tell you what Incognito mode is good for, so we will.
1. Use Chrome’s Incognito mode (or private browsing on other browsers) when you don’t want cookies or temp files from sites you’ve visited stored on your computer. Using private browsing doesn’t store cookies or the site URLs you visit on the local computer. If you’re a lady looking for a new husband, you don’t have to worry about your husband looking through your temporary files and finding photos of your prospective new husband or cookies from some dating site or worse! Kidding of course, but you get the idea
2. Logging into multiple accounts from the same computer: If you’re logged into, let’s say one of your Gmail accounts, when you try to log into another it will make you sign out of the account you’re logged into or add the other account to your current session (there’s a way around this, but that’s for another issue).
If you want to open another Gmail account, without any fuss, just open Chrome in Incognito mode by pressing CTRL+SHIFT+N, go to Gmail log into the other account. If you want to log into 5 Gmail accounts, for example, at one time just open 4 private browsing windows.
3. Search without cookies that identify you: You can search Amazon or EBay etc. from a private browsing Window without seeing it come up on searches you perform when you’re logged into other sites. Since cookies are not carried over from a private browsing session, sites can’t use them to identify you when you search using Incognito mode. You’ll have to log into the site to purchase. Using Incognito mode also provides you with a means whereby you can check the contents of a site as a new user and compare prices to make sure new users aren’t getting better prices than members. Hey, it happens all the time.
4. Checking email or browsing from someone else’s computer. If you
need to check your email or browse on someone else’s computer, you may
want to use Incognito mode, since browsing history and web mail account
data are not saved to the computer. Incognito mode never saves web
history, cookies or web data. If you’re using someone else’s computer, be
sure to close the browser when your done.

You Can Make a Batch File to Clean Up Your PC… Yes You Can!
Windows 7, Windows 8.1, and Windows 10 (all versions)
Back in the days of yore — i.e. DOS — batch files were used by geeks to do all sorts of things – including some bad things. Batch files are still as powerful as ever. Geeks use them but that doesn’t mean they’re hard to create. Actually there are very easy to make. All you need to make one is Notepad, a little code, and a little patience.
So open Notepad right now. Press and hold down the Windows Key — then press the R key. In the command line type Notepad and press Enter. Now that Notepad is open copy and paste the following line (or if you’re a masochist you can type it all in but don’t forget the space after exe and before the slash…):
c:\windows\system32\cleanmgr.exe /dc
Now, and this is VERY important! Make sure you select “All files” in Notepad’s “Save as type:” dialog. If you leave it set as “Text Documents”- your batch file won’t work, because text files cannot execute. (See the helpful image below.)
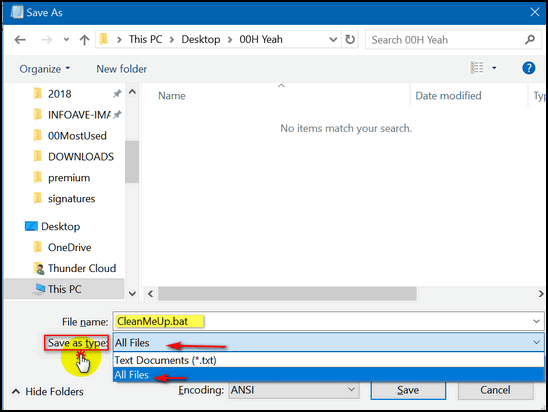
Now that you have Save as type “All files” chosen, save your file as cleanup.bat . Saving it to your desktop is highly convenient because it’s right there where you can see it. Amaze your friends! Even your enemies! You are a geek – you just created a real Windows program!
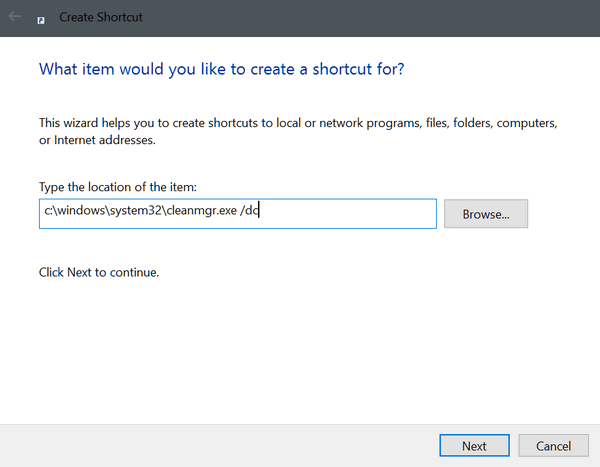
Not a geek? Here’s another way to do it. This creates a shortcut to Windows Disk Cleanup. It’s not as geeky but you can pin the shortcut your taskbar or Start menu if you choose. Click the shortcut and run Windows Disk Cleanup. Just like that!
Ready. Press Windows Key to go to your desktop. Right-click on an empty area of your desktop (i.e. not on an icon 🙂 ). Now choose “New” then “Shortcut” and copy & paste the following line:
c:\windows\system32\cleanmgr.exe /dc
Then click “Next” and give your Disk Cleanup Shortcut a name:
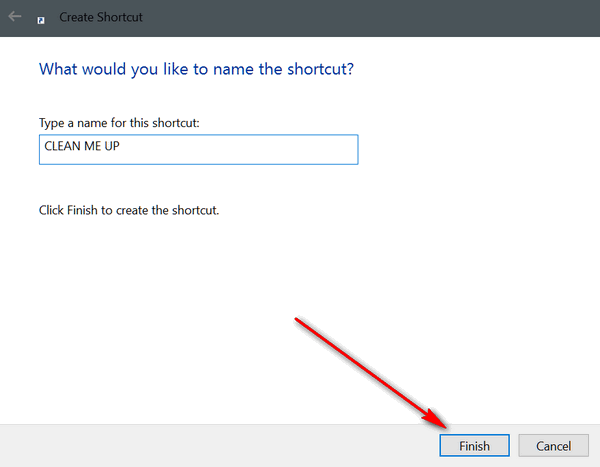
And click “Finish”.
If you want your shortcut to appear on your start menu or taskbar (or both), just right-click it and choose “Pin to start” or “Pin to taskbar” or both. See?
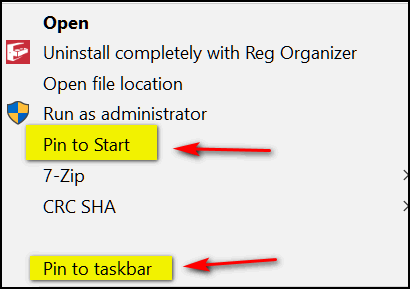
Soooo… whether you want to play around and make a batch file and amaze your cronies with your computer savvy, or if you just want a handy shortcut to clean up your computer, you now know how, right?
That’s a rhetorical question, EB. They don’t need to answer it.

Want more computer tips & tricks?
A Brief (Pictorial) History of Windows (and a Cloudeight Poll too!)
System Font Size Changer Updated for Windows 10 Version 1803
We have thousands of Windows tips, tricks and more on our InfoAve web site. Come see for yourself!


We Need Your Help! If you Don't need anything right now, please consider helping us with a gift.
When you support us with small gift, you help us continue our mission to keep you informed, separate the truth from the hyperbole, and help you stay safer online. Plus, our computer tips make your computer easier to use.
Did you know that we provide support to thousands of people? Every week we help dozens of people via email at no charge. Thanks to your gifts, we do a lot more than provide this free newsletter. We help you recognize online threats, fight for your online privacy, provide you with the knowledge you need to navigate the Web safely, and help you get more out of your PC.
Help us keep up the good fight with a small gift.
After giving your gift, you will receive an invitation
to become a Cloudeight Booster. Three Online Free Image Editing Sites You Might Like Today were giving you 3 for 1. Three Cloudeight site picks in one
InfoAve article. We hope you find these sites useful. If you don’t have a good image editing program, or you don’t often feel
like firing it up just do some simple task like blurring parts of a
image, adding text to an image, or adding a professional looking
background to an image, then you might be interested in one or more the 3
web sites we’re covering today. All are free and none require you to
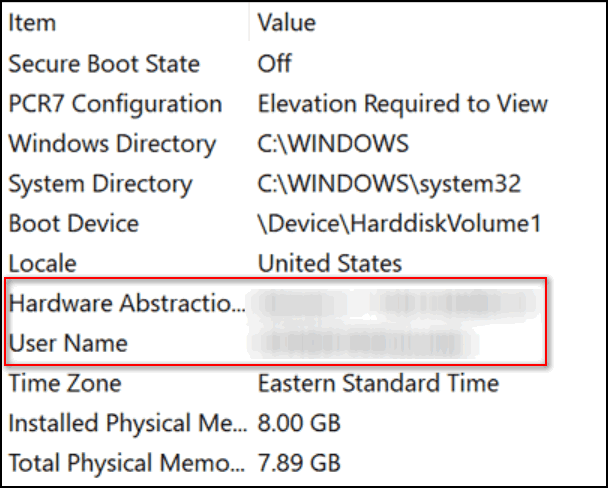
register or create an account to use their free services. Blur Personal or Confidential Data in Images If you take a screenshot of something or have an image you want to
share with someone – or a bunch of someones on social media – you’re going
to want to make sure you blur out any data that is personal or
confidential. If you don’t have a program PaintShop, Photoshop, FastStone
or other image editing program, or you don’t want to go through the bother
of multiple steps to blur out personal and/or confidential information in
an image you want to share, then you’ll want to use imageblur.io . No
registration required, no personal data is uploaded, and it works well…
and it only takes a few seconds. How it works: Choose your file, select the area you want to blur and click the “Blur
it” button. Then download your image with the personal/confidential info
blurred out. You can only use imageblur on images from your own
computer.
Go
blur some stuff! https://imageblur.io/ Add Text to Any Image If you don’t have a good image editing program, or don’t feel like
opening it just to add text to an image, this site is for you. It’s free,
no login required, and there are a enough free features (fonts/styles)
available to make this site useful You can choose a file from your computer or one from the gallery and
add text to it. You can choose the font, font size and you can position
the text anywhere your like on the image. A premium (not free) version is available, but unless you need all
those extra fonts and styles, the free version should work for you. The
free version requires no log in or signup to use. It’s simple, easy, and perfect for quickly adding text to any image you
like.
Want to add text to any
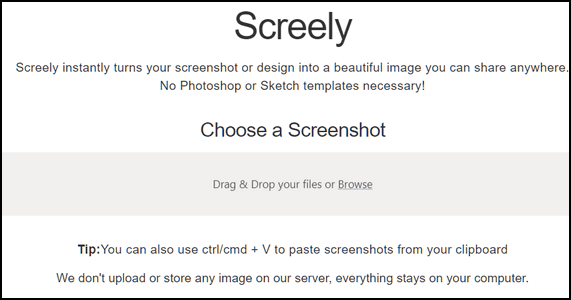
image? Then visit https://addtext.com/ Add a Background to Any Image. If you don’t have image editing software or don’t feeling like jumping
through hoops to add some flair to your images, then Screely might be just
what you need. Crop your image to the size you want and then upload it to Screely.
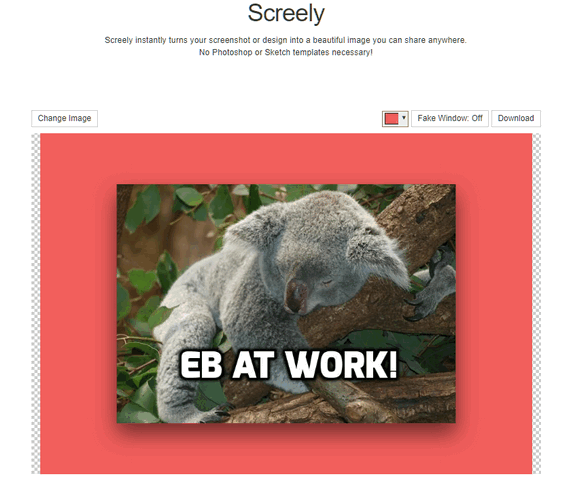
Screely automatically add a background to your image. You can choose the
color of the background. Screely will add the background and a drop shadow
giving it a professional 3D look. You can even choose to add a title bar
(Mac style) if you choose. We chose not to use the title bar effect. If you read the information at the bottom of the page you’ll see that
Screely is working on many more new features. It’s free and no signup or log in is required.
Make your images or
screenshots look professional! Visit https://www.screely.com/
That’s when I discovered baby food. It had been
decades since I shopped the baby food isle. The last time I did it. Gerber
was just about the only brand around- there may have been others, but for
the life of me I can’t recall the brands. Back then, baby food, other than
the cereals that came in boxes, came only in small glass jars with metal
lids. I was shocked then when I first started shopping for baby food for her.
The baby food business has changed drastically in the last 40 years.
Gerber is still around...
SeniorPass:
A Very Special Offer for Our Friends 60 and Older! With our
Cloudeight Direct
Computer Care SeniorPass, our friends age 60 and older get one full
year of unlimited computer care and repair for a special price of just
$79. A low, low price for Computer care anywhere - any time you need it! Computer care & repair for one full year.
Check out our SeniorPass offer right now!
Get your SeniorPass
and/or get more information here.
Interested in making an automatic monthly gift?
Visit this page. Help
us keep helping you... and helping you stay safe on the Web.






Millie
I buried my little friend two weeks ago yesterday. I put her in the ground
on a warm and sunny day in May.
Back in late January, of this year, she was diagnosed with an inoperable
cancerous tumor in her ear canal and from that day on I knew she was
doomed. The doctor said first it would affect her balance and she’d have
trouble walking – and then she would die.
But I never gave up. She never gave up. Neither of us ever gave in. She
only weighed six-and-a-half pounds when all this started. A very small
creature with a very big heart – and very big eyes.
The first thing I notice at the beginning of her decline was that it hurt
her to eat solid food, not because of her teeth but because of the
location of the tumor. I had to be resourceful if I wanted to keep her
alive. So when I bought food for her I looked for the softest food
available – the canned pate’ looked like it would be the solution. It was
for a few weeks, but then she had trouble eating it and that’s when I
discovered the “bisque” treats. But these were treats not meals. I had to
find something else. Something that would sustain her and give her some
variety in her meals.


Now available: Reg Organizer 8.15
If
you purchased or renewed Reg Organizer through Cloudeight within the last
12 months, you're entitled to a free version upgrade to Reg Organizer
8.15.
Save $14 on Reg
Organizer right now!
Reg Organizer - A
Swiss Army Knife of Windows Tools - Works Great on Windows 10!


What in the world is a "hijacker"?
Have you ever seen a car race (like NASCAR) where the car pulls into the
pit and they change four tires in 1.7 seconds? Did you ever pay a
attention to that thing that lifts the car up off the ground so they can
slide the tires on? That's called a "Hijacker". Nah not really. I don't
know anything about car racing.
Actually when someone refers to a "hijacker" they're talking about a
software application that hijacks (takes over) your browser's home page
(start page) or your browser's default search engine.
An example of a "home page hijacker": You have
http://thundercloud.net/start/ set as your home page (please? please?) and
after you install Miss Molly's Smiling Toolbar Extravaganza (MMSTE) every
time you open your Web browser (Internet Explorer, Firefox) you go to Miss
Molly's Super Smiling Home Page with 742 blinking advertisements and 423.5
animated gifs. And one lonely little "Good Golly Miss Molly" search form.
An example of a "search engine hijacker": You use Google to search the
web. But after you install the aforementioned Miss Molly's etc. You find
whenever you type a search in your Internet Explorer address bar the
search results come from - you guessed it! Miss Molly's Magnificent
Screaming Search Engine, which pops up a page of search results which
consists of 992 advertisements for various products related to your search
in some remote way and 10 actual search results buried on page sixty-two.
Another way a hijacker can highjack your searches is to "inject" ads,
banners, etc. into normal search results. For instance, you're searching
on Google and suddenly you see a banner for SmileySenseless at the top and
down there where your search results are normally found you find seventeen
dog food ads, cat flea-spray ads, YOU WON TEN FREE LOBSTER DINNERS FROM
THE ANGRY LOBSTER ads, and then, way down below, your real search results
appear. But, unless you look carefully, the ads look just like real search
results. I suppose this would be OK if you were really hungry for lobster
and you won the ten free lobster dinners from The Angry Lobster
restaurant. But don't hold your breath -the odds against that are about
ten billion to one.


SeniorPass is valid for unlimited computer care & repair sessions for one
full year starting with the first time you use it. The clock does not
start ticking until you use your SeniorPass for the first time. A great
deal!
Having SeniorPass is just like having insurance
for your computer. And talk about affordable! Right now, our SeniorPass is
available for just $79. You can get help with almost any computer problem
whenever you need it. We're here to help you.
Sales of the following products and services help support our
newsletters, websites, and computer help services we provide.
Cloudeight Direct
Computer Care: Single Keys or Season Tickets - always a great
deal. Cloudeight Direct Computer Care is like having PC insurance.
Get more information here.
Emsisoft
Anti-Malware: Emsisoft is the only Cloudeight endorsed
and recommend Windows security program. It provides users with a complete
antivirus, antimalware, anti-ransomware, anti-PUPs solution. We offer
single Emsisoft licenses and multi-computer licenses at discount prices.
Also, we offer our exclusive Emsisoft with Cloudeight installation &
setup. Get more
information here.
Cloudeight
Backup Service: Professional setup of a complete backup
system including creation of rescue media, image backups, incremental
backups, Cloudeight Direct Backup session key and a lifetime license for
Ashampoo Backup Pro 11.
Get all the
details here.
Thunderbird Email
Setup: Thunderbird is a great email program that you can use
with your Gmail and Outlook.com (Hotmail) web mail accounts as well as
with your Internet provider's email. We'll set it up right for you. Our
set up includes configuring up to 3 emails accounts and setting up
Thunderbird to use stationery (if desired). Our Thunderbird Email Setup
Service is always a great deal.
For more information visit
this page.
Reg Organizer 8.10:
Reg Organizer is the Swiss Army Knife of Windows tools. It's far more than
just a registry optimizer and cleaner... it's Windows all-in-one toolkit.
Helps you keep your computer in tip-top shape and helps solve
annoying Windows problems. Reg Organizer works great with Windows 10 too!
Get more information about Reg
Organizer (and get our special discount prices) here.

If you don't need any of the above products or services at this time,
please consider helping us with a small gift. Everyone who helps us with a
gift is invited to become a Cloudeight Booster and is eligible for
special Cloudeight Booster Freebies and special Cloudeight Booster sales.
Please consider
making a small donation today. Ad thanks to all of you who
support us! We appreciate it very much!


These products and services are recommended and endorsed by Cloudeight:
Also... don't forget:

We'd love to hear from you!
If you have comments, questions, a tip, trick, a freeware pick, or just
want to tell us off for something,
let us know.
If you need to change your
newsletter subscription address, please see "Manage your subscription" at
the very bottom of your newsletter.
We received hundreds of questions for possible use in IA news. Please keep
in mind we cannot answer all general computer questions. We try to
personally answer as many as we can. We can only use a few to in each
week's newsletter, so keep this in mind. If you have a support question
about a service or product we sell, please
contact us here.

Subscribe to our Daily
Newsletter!
Get computer tips & tricks every night. Our daily newsletter features a
computer tip/trick or two every day. We send it out every night around 9
PM Eastern Time (USA). It's short and sweet, easy-to-read, and FREE. Just visit this page and
sign-up. All you have to enter is your email address. Once you confirm
your subscription, you'll receive our daily newsletter every day, six days
a week. You can unsubscribe at any time.
Print
our Cloudeight Direct Computer Care Flyer!
Print our
Cloudeight Direct Computer Care Flyer and spread the word about our
Cloudeight Direct Computer Care computer care and repair services.
Get our
ready-to-print flyer here.

We hope you have enjoyed this issue of InfoAve Premium. Thanks so much for
your support and for being a Premium subscriber.
Have a great weekend!
Darcy & TC
Cloudeight InfoAve Premium - Issue #766
Volume 15 Number 35
June 15, 2018
Not a subscriber? Subscribe to our InfoAve
Premium Newsletter
Share Us on Facebook!
We'd love for
you to share us with your family and friends on Facebook. Help us by
sharing us on Facebook!


"Cloudeight InfoAve Premium" newsletter is published by:
Cloudeight Internet LLC
PO Box 73
Middleville,
Michigan USA 49333-0073
Read our
disclaimer about the tips, tricks, answers, site picks and freeware
picks featured in this newsletter.
Copyright ©2018 by Cloudeight Internet

